Anti-forensics - Part 1
This document is a general summary on the most widely used techniques currently to hide or to make unrecoverable digital tracks of a crime in magnetic media. The practice of collecting as much information and documentation about a crime, computer related or not, falls under the name of "Computer Forensics," a term that precisely identifies the discipline that studies the techniques and methodologies required for collection, analysis and presentation of unequivocal "evidences" usable in legal proceedings.
On the other hand, we can also find anti-investigation techniques which aim to make the job performed by automated tools and flesh-and-blood investigators very difficult and/or unreliable.
Usually, in the light of modern operating systems and how they manage data, events, and information, these "evidences" are generally pretty easy to find, especially when the suspect does not expect an action against him. However, for computer related crimes, there are many techniques that can be used to increase the difficulty level of the analysis of media found once the suspect has been identified.
What anti-forensics is about
As already mentioned, anti-forensics aims to make investigations on digital media more difficult and therefore, more expensive. Usually, it is possible to distinguish anti-forensic techniques in specific categories, each of which is particularly meant to attack one or more steps that will be performed by analysts during their activity. All forensic analysts in fact, from either private or public laboratories, like that of police for example, will take specific steps during each phase of the analysis of a new case.
Knowing these steps, generally summarized as "Identification," "Acquisition," "Analysis" and "Reporting," is the first measure to better understand the benefits and limitations of each anti-forensic technique. As in many other branches of information security, a good level of security is achieved through a stratified model for solving a problem. This means that attacking only one of these steps taken by the investigators often do not lead to the desired result Furthermore, an expert analyst, in the best of cases, will still be able to demonstrate that they were able to deal with some evidence, even without knowing the content of that evidence.
Instead, attacking the identification, acquisition and analysis phases of evidence-gathering will make quite sure of the contrary.
These are the general anti-forensic categories discussed within this document:
- Data Hiding, Obfuscation and Encryption
- Data Forgery
- Data Deletion and Physical Destruction
- Analysis Prevention
- Online Anonymity
Note that not all anti-forensic methods are covered by this document, due to space reasons or because some are very easy to detect. Details on some of these techniques have been deliberately omitted, always for space reasons and because of the large amount of information already present online.
- Data Hiding, obfuscation and encryption
Obviously, the great advantage of hiding data is to maintain the availability of these when there is need. Regardless of the operating system, using the physical disk for data hiding is a widely used technique, but those related to the OS or the file system in use are quite common. In the use of physical disk for data hiding, these techniques are made feasible due to some options implemented during their production that are intended to facilitate their compatibility and their diffusion, while other concealment methods take advantage of the data management property of the operating system and/or file system. At this stage, we are going to attack, as we can imagine, the first phase of an investigation: "Identification."
If evidence cannot be found, in fact, it will be neither analyzed nor reported.
Unused space in MBR
Most hard drives have, at the beginning, some space reserved for MBR (Master Boot Record). This contains the necessary code to begin loading an OS and also contains the partition tables. The MBR also defines the location and size of each partition, up to a maximum four. The MBR only requires a single sector. From this and the first partition, we can find 62 unused sectors (sector n. 63 is to be considered the start of cylinder 1). For a classic DOS-style partition table, the first partition needs to start here.
This results in 62 unused sectors where we can hide data. Although the size of data that we can "hide" in this area is limited, an expert investigator will definitely look at its contents to search for compromising material.
HPA Area
The most common technique to hide data at the hardware level is to use the HPA (Host Protected Area) area of disk. This is generally an area not accessible by the OS and is usually used only for recovery operations. This area is also invisible to certain forensic tools and is therefore ideal for hiding data that we do not want to be found easily. The following image shows a representation of HPA within a physical media.

The starting address of this area is represented by the next sector to the disk size given with the ATA command SET MAX ADDRESS * (SET MAX ADDRESS + 1 sector). Some forensic tools such as EnCase, The Sleuth Kit, and ATA Forensic are easily able to counter the use of HPA for hiding data. For example, via the utility "disk_stat" of The Sleuth Kit, it is possible to perform the detection of this area. It can also perform a momentary reset by using the "disk_sreset" utility.
Example:
[plain]# disk_stat /dev/hdb
Maximum Disk Sector: 120103199
Maximum User Sector: 118006047
** HPA Detected (Sectors 118006048 - 120103199) **
[/plain]
Another method to find HPA areas are the ATA commands IDENTIFY_DEVICE , which contains the maximum number of usable sectors, and READ_NATIVE_MAX, which returns the maximum number of sectors on the disk, regardless of a possible DCO area. If the value returned from these two commands is different, there is a high probability that an HPA area is in place. We can also proceed with its removal by using the SET_MAX_ADDRESS command updating the number of addressable sectors.
DCO area
The use of the DCO (Device Configuration Overlay) is another good way to hide potentially incriminating data. It was introduced as an optional feature in the standard of ATA-6. This technique is stealthier than the use of HPA and is also less known. The following image shows a representation of DCO within a physical media.

The more effective way to detect DCO areas remains the use of ATA command DEVICE CONFIGURATION IDENTIFY, which is able to show the real size of a disk. Comparing the output of this command with that resulting from the command READ_NATIVE_MAX_ADDRESS makes it easy to find any hidden areas. It's also important to note that "The ATA Forensic Tool" is also able to find hidden areas of this kind.
Use of Slack space
The "Slack Space," in a nutshell, is the unused space between the end of a stored file, and the end of a given data unit, also known as cluster or block. When a file is written into the disk, and it doesn't occupy the entire cluster, the remaining space is called slack space. It's very simple to imagine that this space can be used to store secret information.
The image below shows a graphical representation of how the slack space can appear within a cluster:

The use of this technique is quite widespread, and is more commonly known as "file slack." However, there are many other places to hide data through the "slack space" technique, such as the so-called "Partition Slack." A file system usually allocates data in clusters or blocks as already mentioned, where a cluster represents more consecutive sectors. If the total number of sectors in a partition is not a multiple of the cluster size, there will be some sectors at the end of the partition that cannot be accessed by the OS, and that could be used to hide data.
Another common technique is to mark some fully usable sectors as "bad" in such a way that these will no longer be accessible by the OS. By manipulating file system metadata that identifies "bad blocks" like $BadClus in NTFS, it's possible to obtain blocks that will contain hidden data. It's also possible to get a similar result with a more low-level manipulation (see Primary Defect List, Grown Defect List and System Area).
Surely, another technique yet to be mentioned under this category is the use of additional clusters during the disk storage of a file. For example, if we use 10 clusters to allocate the content of a file that should take only 5, we have 5 clusters that we can use to store hidden data. For this technique, files that do not change their size over time are usually used to avoid overwriting the hidden data. For this reason, therefore, OS files are often used to accomplish this operation.
Alternate data stream and extended file attributes
The content of a file, in NTFS, is stored in the resident attribute $Data of MFT. By default, all data of a file is stored in a single $Data attribute of the MFT. In a nutshell, considering the immense amount of information on the web about ADS, a file may have more than one $Data attribute, offering a simple way to hide data in an NTFS file system. Similar to the Alternate Data Streams in NTFS, Linux supports a feature called "xattr" (Extended Attribute) that can also be used to associate more than one data stream to a file. The common antagonistic practices to these hiding techniques include a special focus on less-used storage spaces, and generally base our results on several forensics tools, not just one.
It may also be helpful to check the hardware parameters of the media offered by the manufacturer. Finally, it is also possible, with enough time, to perform a static analysis of the slack space.
Steganography / background noise
In information security, steganography is a form of security through obscurity. The steganographic algorithms, unlike cryptographics, aim to keep the "plausible" form of data that they are intended to protect, so that no suspicion will be raised regarding actual secret content. The steganographic technique currently most widespread is the Least Significant Bit or LSB. It is based on the fact that a high resolution image is not going to change its overall appearance if we change some minor bits inside it.
For example, consider the 8-bit binary number 11111111 (1 byte): the right-most 1-bit is considered the least significant because it's one that, if changed, has the least effect on the value of this number.
Taking into account a bearing image, therefore, the idea is to break down the binary format of the message and put it on the LSBs of each pixel of the image. Steganography, obviously, may be used with many types of file formats, such as audio, video, binary and text. Other steganographic techniques that should surely be mentioned are the Bit-Plane Complexity Segmentation (BPCS), the Chaos Based Spread Spectrum Image Steganography (CSSIS) and Permutation Steganography (PS). Going into the details of all steganographic algorithms however, is beyond the scope of this document and should be dealt with through a dedicated paper.
Steganography, alone, cannot guarantee the confidentiality of the hidden data, although it remains difficult to go back to an original hidden message without knowing the generation algorithm. However, if these techniques are associated with cryptographic algorithms, the security level of the hidden message increases significantly, adding also the variable of "plausible deniability" about the information hidden. It's possible, finally, to mention one of the most widely used software in time to apply steganography: S-Tool. This is software that is already dated, but still effective. However, a lot of software designed for this purpose are available online.
Encryption
Encryption is one of the most effective techniques for mitigating forensic analysis. We refer to it as the nightmare of every analyst. As just mentioned, using strong cryptographic algorithms, for example AES256, together with the techniques described above, adds a further fundamental level of anti-forensics security for the data that we want to hide. In addition, the type and content of the information that we want to protect or to hide, can never be compared to anything already known, because the resulting cipher-text of a good cryptographic algorithm are computationally indistinguishable from random data stream, adding the so-called "plausible deniability" on top of all our encrypted documents.
The most widely used tool for anti-forensics encryption is certainly TrueCrypt, an open source tool that is able to create and mount virtual encrypted disks for Windows, Linux and OS X systems.
Generally, in the presence of an encrypted mounted volume, a forensic analyst will try, without doubt, to capture the contents of the same before the volume is un-mounted. Or, if the machine is turned off, the only option for acquiring the content of a dismounted encrypted drive is to do a brute-force password guessing attack. (The "Rubber-hose" is not covered by this document :>)
A noteworthy feature of TrueCrypt is that when using it for full disk encryption, it leaves a "TrueCrypt Boot Loader" string in its boot loader that can help a forensic analyst in the recognition of a TrueCrypt encrypted disk, as shown in the image below:
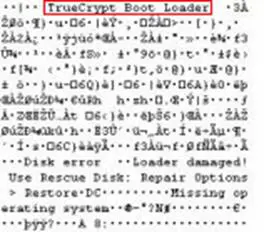
Using a good Hex Editor however, it's possible to modify this string with something random or misleading. Because of the large amount of information about both the tools and symmetric cryptographic algorithms, these will not be discussed in detail in this document, but, generally, it is very important to always maintain a reasonable doubt on the use of cryptographic algorithms within our systems, especially to avoid an analyst being able to prove the presence of an encrypted area.
In principle, the countermeasures to such techniques are quite limited. Besides the already mentioned "brute-force password guessing," the rest is limited to trying a "live" analysis of the volume and an "entropy test" designed to determine whether the data has been encrypted using a known algorithm. Another possibility is the exploitation of encryption algorithm's vulnerabilities, especially considering customized ones. Otherwise, good luck.
Rootkits
Rootkits are often used to mask files, directories, registry keys and active processes, and lend themselves to in-depth considerations. They are, of course, effective only in the course of a live analysis of the system under investigation.
Usually, we can divide them into two main categories, closely related to the area in which they work: UserSpace Rootkit (Ring 3) and KernelSpace Rootkit (Ring 0). Because they are able to alter the resulting output of standard system function calls, they can, consequently, also alter the results of forensics tools.
There are many ways to deliberately implement rootkit techniques within our own system in order to hide information, the details of which will need a dedicated paper, but generally, they make use of code or DLL injection, at least for those at Ring 3, through which to perform hooking or patching of the commonly used API functions. Ring 0 rootkit, on the other hand, are usually implemented using the operating systems support for device drivers in kernel-mode.
Although their use may seem unlikely in systems subject to investigation, they can be present especially in cases related to cyber crimes and where we suspect a good technical skill of the owner.
In order to show that it can be relatively easy to implement these techniques, we can create a simple global DLL injection by changing the value of the registry key "HKLMSoftware MicrosoftWindows NTCurrentVersionWindowsAppInit_DLLs" in order to load an arbitrary library in all processes that use the User32.dll, which only a few do not use.
The piece of code presented below is the main instructions for changing the value of this key:
[plain]RegOpenKeyEx(HKEY_LOCAL_MACHINE,"SoftwareMicrosoftWindows NTCurrentVersionWindows",0,KEY_SET_VALUE,&hKey );
GetWindowsDirectory(PATH_SISTEMA,sizeof(PATH_SISTEMA));
strcat_s(PATH_SISTEMA,"my_rootkit_library.dll");
RegSetValueEx(hKey,"Appinit_Dlls",0,REG_SZ,(const
unsigned
char*)PATH_SISTEMA,sizeof(PATH_SISTEMA));
[/plain]
Next, this is the main code of our custom prepared DLL to hide a specific process in our system through the use of Mhook library:
[plain]do
{
pCurrent = pNext;
pNext = (PMY_SYSTEM_PROCESS_INFORMATION)((PUCHAR)pCurrent + pCurrent->NextEntryOffset);
if (!wcsncmp(pNext->ImageName.Buffer, L"notepad.exe", pNext->ImageName.Length))
{
if (0 == pNext->NextEntryOffset)
{
pCurrent->NextEntryOffset = 0;
}
else
{
pCurrent->NextEntryOffset += pNext->NextEntryOffset;
}
pNext = pCurrent;
}
}
while(pCurrent->NextEntryOffset != 0);
}
[/plain]
Once the value of the registry key is modified, the result is that the process "notepad.exe" will no longer be shown in software like Task Manager or Process Explorer.

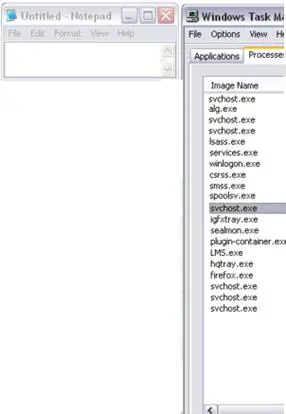
Nothing new here, but it is a useful example to show that some controls have to be made during the analysis of systems belonging to people with good technical skills. These controls are usually translated into "Integrity Check," "Signature Based Rootkit Detection," "Hook Detection" and "Cross-Checks."
Often, however, for more complex threats that are usually created in a customized manner, these may not be sufficient, because it is also possible, by simultaneously using different rootkit techniques on userspace and kernelspace, to deeply modify an operating system, until the point that standard anti-rootkit algorithms of common anti-rootkit tools fail to detect such hidden active processes, for example. The following image shows, in fact, through a custom and powerful rootkit (the details of which will not be discussed in this document), that we can alter the final "Process List" output of GMER, a well known anti-rootkit tool, while our rootkit hides the process "cmd.exe"…
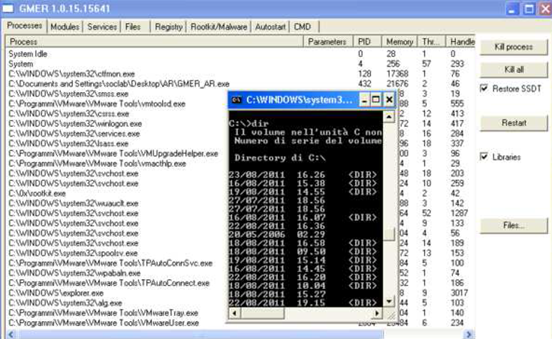
No hidden process has been detected, while "cmd.exe" is running.
In this case, it is possible to mention standard procedures to be undertaken when we go to suspect such actions of concealment.
These procedures include the acquisition of the volatile memories and the capture of any network traffic, in addition, of course, to the static analysis of media.
AV / AR scans must also necessarily be included among these countermeasures.
Data Forgery
Data forgery is also a practice aimed at avoiding the identification of incriminating material. In addition to changing file extensions, there are other methods that can significantly falsify the true nature of information.
Even in this case, the technique relies on the fact that if information cannot be identified, it cannot be analyzed.
Transmogrification
The easiest way to implement this technique is to modify the header of a file so that it can no longer be associated with any type of file already known. Following the general structure of a PE executable file for example, it always starts with a word value (2 bytes) shown below
HEX -> X4DX5A / ASCII -> MZ
Many forensic tools for recovering files within the analyzed systems refer to these parameters, sometimes only the header and others both headers and footers. Obviously, by changing these values, and restoring them only in case of necessity, it is possible to avoid detection of a hypothetical compromising document. This approach is adopted by "Transmogrify," an anti-forensic tool developed by the MAFIA (Metasploit Anti-Forensic Investigation Arsenal). The technique basically aims to deceive the signature-based scan engine of these tools.
Deceive Exe strings analysis
When an investigator is in contact with some suspicious executable, he usually limits its analysis to a control of the internal strings of the same, to visualize its general purpose and origin. In order to make this analysis not very useful, it is possible to proceed with the use of exe compressors or encryptor. This technique usually makes the reconstruction of the operations performed by our files much more difficult, depending on the level of protection put in place and the file interaction with virtual environments and dynamic analysis.
There are many packers and encryptors available for this purpose, but most of them are easily identifiable and, usually, it is very easy to recover the code protected through them. In contrast, a custom "homemade" packer definitely adds a new level of security in this sense, as it will almost certainly require the assistance of a specialized software reverse engineer (increasing the cost and time of analysis) to analyze it in depth.
Even an executable protected with a custom packer, however, often has very few strings embedded and functions imported. This immediately catches the attention and could lead one to think about some kind of malicious software.
Assuming that the reader is already familiar with the general functioning of exe packers, a way to address this issue is to wrap the stub program with valid code, so that it looks like a legitimate application. In addition, we can also "decorate" the stub program with some misleading string so that the analyst has the opportunity to read something.
Another good way to make life difficult for analysts is to employ a cryptor that goes to protect some important routines of our software. But then we have the problem of where to store the decryption key within the software. One solution is to use many keys for the decryption of our routine by dividing our program into multiple segments, each of which will make use of a different key.
Of course, each key will not be stored in clear in our program (even if compressed), but will be generated at runtime from an initial value at our discretion. To conclude, it's important to know that, because sooner or later our program will have to start, and this software protection should be considered as a temporary analysis countermeasure because a good reverser will still be able to go back to the original protected instructions.
Timestamp alterations / MACB scrambling
In a few words that summarize this sub-chapter, the purpose of these activities is to prevent a reliable reconstruction of the operations performed by a user or during the breach of a system.
Usually, these events are reconstructed in a "timeline" primarily through the use of MACB timestamp parameters of the file system, where MACB stands for "Modified, Accessed, Changed, Birth."
It's important to note that not all file systems record the same information about these parameters and not all operating systems take advantage of the opportunity given by the file system to record this information.
The following is a fast representation of the meaning of MACB broken down by type of file system:
File System
M
A
C
B
FAT
Written
Accessed
Changed
-
NTFS
Modified
Accessed
MFT Modified
Created
Ext 2/3
Modified
Accessed
Changed
-
Ext 4
Modified
Accessed
Changed
Created
UFS
Modified
Accessed
Changed
-
Considering how great of an example NTFS is, we can specify that for each file, it stores two sets of timestamps:
- $STANDARD_INFO
- $FILE_NAME
$STANDARD_INFO contains metadata such as SID, owner, flags and the first set of MACB attributes.
$FILE_NAME contains a second set of MACB attributes and is modifiable only in kernel mode.
Through these parameters it is usually possible to reconstruct the activity performed on a system as shown below:

When we are going to change these attributes to confuse a forensic analyst, the tool that certainly comes first to mind is "Timestomp." The software's goal is to allow for the deletion or modification of timestamp-related information on files. The practice to completely delete these attributes, however, is not advisable as it is already evidence of changes occurring in the system.
It's important to note that "Timestomp" can modify only the SI ($STANDARD_INFO) MACE values and, after modification, a forensic analyst could still compare these valueswith those in FN ($FILE_NAME) MACE to check the accuracy of the information found. The comparison with the FN MACE is the only point where it is useful to look for changes occurred in the timestamp parameters (excluding other data from external systems). This means that if we can modify FN MACE attributes, we can also profoundly confuse even an expert analyst.
A simple way to do so is described here: http://www.forensicswiki.org/wiki/Timestomp.
Log files
There's not much to say about the log files. Every computer professional knows of their existence and the ease with which they can be altered. Specifically, in contrast to a forensic analysis, the log files can be altered in order to insert dummy, misleading or malformed data. Simply, they can also be destroyed. However, the latter case is not recommended, because a forensic analyst expects to find some data if he goes to look for them in a specific place, and, if he doesn't find them, will immediately think that some manipulation is in place, which of course could also be demonstrated. The best way to deal with log files is to allow the analyst to find what he is looking for, but of course making sure that he will see what we want him to see.
It's good to know that the first thing that a forensic analyst will do if he suspects a log alteration, will be to try to find as many alternative sources as possible, both inside and outside of the analyzed system. So it is good to pay attention to any log files replicated or redundant (backups?!).
Data deletion
The first mission of a forensic examiner is to find as much information as possible (files) relating to a current investigation. For this purpose, he will do anything to try to recover as many files as possible from among those deleted or fragmented. However, there are some practices to prevent or hinder this process in a very efficient way.
Wiping
If you want to irreversibly delete your data, you should consider the adoption of this technique. When we delete a file in our system, the space it formally occupied is in fact marked only as free. The content of this space, however, remains available, and a forensics analyst could still recover it. The technique known as "disk wiping" overwrites this "space" with random data or with the same data for each sector of disk, in such a way that the original data is no longer recoverable. Generally, in order to counter the use of advanced techniques for file recovery, more "passages" for each sector and specific overwriting patterns are adopted.
"Data wiping" can be performed at software level, with dedicated programs that are able to perform overwriting of entire disks or based on specific areas in relation to individual files.
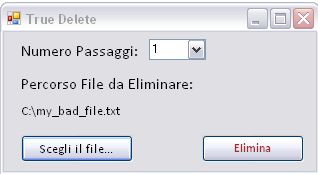
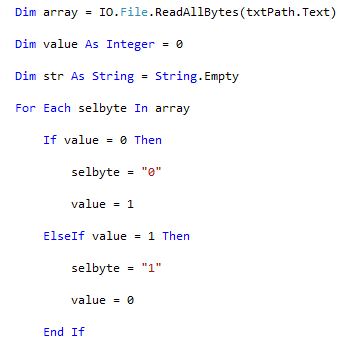
It isn't even too complex to prepare home-made software that's quite effective for this purpose, such as the one created for this article by the author, whose images are shown below:
Here a simple snippet of code of this program:
Excluding those "homemade," among the most effective software for this purpose are the following:
1) DBAN
2) HDDErase
3) MHDD
To conclude, we can then consider this technique quite effective in achieving the purposes for which it is used, but it is also necessary to point out that this practice may leave traces of conducted activity, and that sometimes these software have some limitations.
For example, some areas of the disc may not be accessible due to media degradation or other errors. Furthermore, in relation to a "journaled" file system or RAID, wiping may not work in a reliable manner when applied to specific files. Therefore, it is a good practice to always check our work.
To ensure that our "disk wiping" was successful, we can open a drive through any Hex Editor. Obviously, the idea is that if we totally wipe a disk by entering the value 0×00 for each sector, we should see only a series of 00 from sector 0/1, until the end. At that point we could confirm the effectiveness of our operation.
Meta-data shredding
The technique of "Meta-Data Shredding", in addition to overwriting the bytes that constitute a file, also destroys all metadata associated with it.
Physical destruction
The technique of physical destruction of media is certainly self explanatory. However, we should focus on the most effective and clean of these: disk degaussing.
"Degaussing" refers to the process of reduction or elimination of a magnetic field. This means, when referring to hard drives, floppy disks or magnetic tape, a total cancellation of the data contained within these.
Although it's very effective, degaussing is a technique rarely used because of the high costs of the equipment needed to put it into practice. In view of modern magnetic media, to use this technique means to make the media totally unusable for future writings.
Another spectacular and certainly "hot" technique for media destruction is surely this: http://www.youtube.com/watch?v=k-ckechIqW0
End of Part 1.
In the next article of this series, we will discuss the most advanced techniques against forensics analysis such as Syscall Proxying, Memory Injection and hybrids of anti-forensics approaches.


