Hacking clients with WPAD (web proxy auto-discovery) protocol [updated 2021]
In this tutorial, we’ll take a look at how we can hack clients in the local network by using WPAD (Web Proxy Auto-Discovery). The WPAD protocol allows automatic discovery of web proxy configuration and is primarily used in networks where clients are only allowed to communicate to the outside world through a proxy. This is true for most enterprise networks where security is a primary concern.
Usually, the internal networks are configured so that internet traffic from clients is disallowed. This is because such traffic is hard to control. By forcing the users to connect through a proxy, all HTTP traffic can be inspected on application layers for arbitrary attacks, and detected threats can be easily blocked. Since attackers often use HTTPS traffic to circumvent IDS/IPS in such configurations, HTTPS traffic can also be inspected, but that forces the HTTPS sessions to be established from client to proxy and then from proxy to actual HTTPS web server – clients cannot establish an HTTPS session directly to an HTTPS web server.
If we don’t have a web proxy in our internal network and we would like to set it up in order to enhance security, we usually have to set up Squid or some other proxy and then configure every client to use it. If we have many clients, that can be tedious and require a lot of work, which is why WPAD can be used to automate the proxy discovery process. This makes proxy integration into the local network a breeze.
Note that the auto discovery option still needs to be turned on in the web browser to enable proxy auto discovery. Despite this, using WPAD is still beneficial in case we want to change the IP of the Squid server, which wouldn’t require any additional work for an IT administrator.
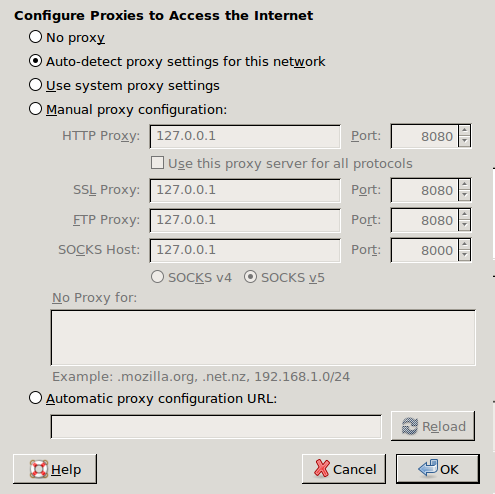
Nevertheless, a WPAD protocol is used to enable clients to auto discover the proxy settings, so manual configuration is not needed. All that needs to be done on the clients themselves is enabling the auto-detection of proxy settings.

FREE role-guided training plans
The first part of automatic proxy detection is getting our hands on the wpad.dat file, which contains the proxy settings. There are different methods to discover the wpad.dat file:
- Local File: The wpad.dat file can be stored on a local computer, so the applications only need to be configured to use that file.
- DNS: Usually, a wpad string is prepended to the existing FQDN local domain. For example, if a local domain is infosec.local, the actual wpad domain will be wpad.infosec.local, where a GET request for /wpad.dat file will be sent.
- DHCP: A DHCP server itself can provide information where the wpad.dat file is stored.
Setting up Squid
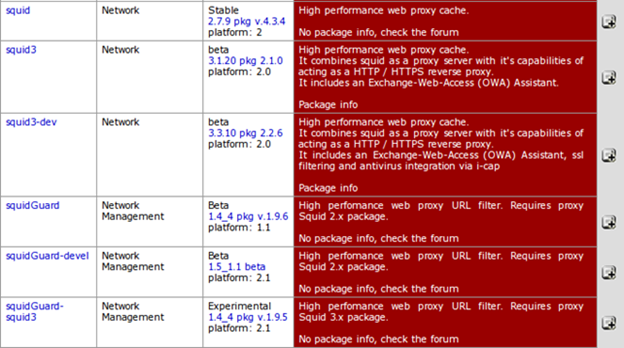
First we have to set up Squid, which will perform the function of proxying the requests from Pfsense to the internet. In the Pfsense web interface, we first have to go to Packages – Available Packages and locate the Squid packages. Notice that there are many Squid-related packages available, but we will only install the Squid package (the first one below), since we don’t need advanced features that are offered by the rest of the Squid packages.
After the installation, the Squid proxy configuration is available at Services – Proxy Server. In the General tab, we have to configure Squid appropriately. We have to select the interface on which the proxy will listen, as well as allow users on the interface by checking the checkbox.
For our testing, we have to set up a non-transparent proxy, so the outbound HTTP traffic won’t be automatically passed through the proxy. Since we want to use WPAD, we have to be able to specify our own proxy settings, which is why the transparent proxy mustn’t be enabled. We can also change the proxy port from default port 3128 to 8080 in case we don’t like the default port (or to use security through obscurity to prevent attackers from immediately knowing that a Squid proxy is being used).
Setting up WPAD
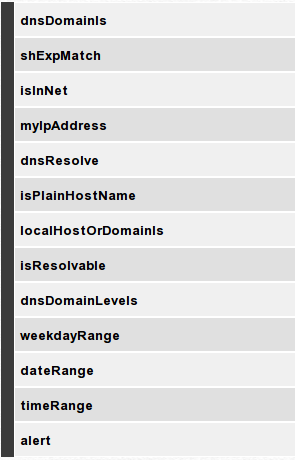
The first thing we need to do is create the wpad.dat file, which contains a JavaScript code that tells the web browser the proxy hostname and port. Each web browser that supports WPAD provides the following functions in a secure sandbox environment. All the other functions are prohibited.
The wpad file usually uses the following functions:
- IsInNet(host, net, mask): Checks whether the requested IP address host is in the net network with subnet mask mask. The “isInNet (host, “192.168.1.0”, “255.255.255.0”)” checks whether the requested IP is contained in the 192.168.1.0/24 network.
- shExpMatch(host, regex): Checks whether the requested hostname host matches the regular expression regex.
- dnsDomainIs(host, regex): Checks whether the requested hostname host matches the regular expression regex.
Let’s write a simple wpad.dat file, which contains the following code that checks whether the requested hostname matches google.com and sends the request to Google directly (without proxying it through the proxy). All the other hostnames will be sent through a proxy available at 192.168.1.0:8080.
[plain]
function FindProxyForURL(url,host) {
if (dnsDomainIs(host, ".google.com"))
return "DIRECT";
return "PROXY 192.169.1.1:8080";
}
[/plain]
That file then needs to be sent to any web server in the internal network and copied to the DocumentRoot of the web server so it will be accessible over HTTP. This can be done with a simple SSH command, but we can also SSH to the box and create the file manually.
[plain]
# scp wpad.dat myserver:/var/www/
[/plain]
If we’re using Nginx, we also need to create the /etc/nginx/sites-enabled/wpad configuration and tell Nginx where the DocumentRoot of the wpad.infosec.local domain is. Such a configuration file can be seen below. It also contains a few logging options in order to simplify the debugging if something goes wrong.
[plain]
server {
listen *:80;
server_name wpad.infosec.local;
root /var/www/;
access_log /var/log/nginx/wpad-access.log;
error_log /var/log/nginx/wpad-error.log;
}
[/plain]
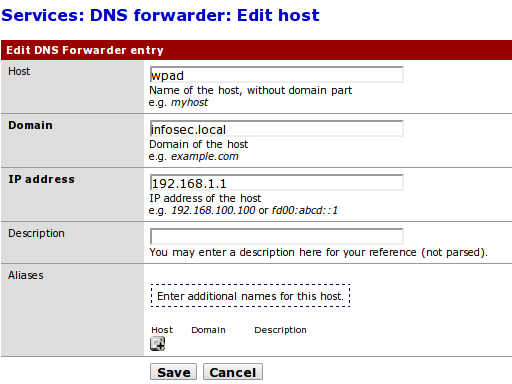
After that we need to create the appropriate DNS entry in the Pfsense, so the wpad.infosec.local domain will resolve to the same web server, where the wpad.dat is contained. We can add the DNS entry by selecting Services – DNS Forwarder in the menu. Then we can add a DNS entry by editing the fields presented below, which are self-explanatory.
After saving the options, we can also check whether the DNS resolution works in the internal network. We can do that with a simple nslookup command:
[plain]
# nslookup wpad.infosec.local
Server: 192.168.1.1
Address: 192.168.1.1#53
Name: wpad.infosec.local
Address: 192.168.1.1
[/plain]
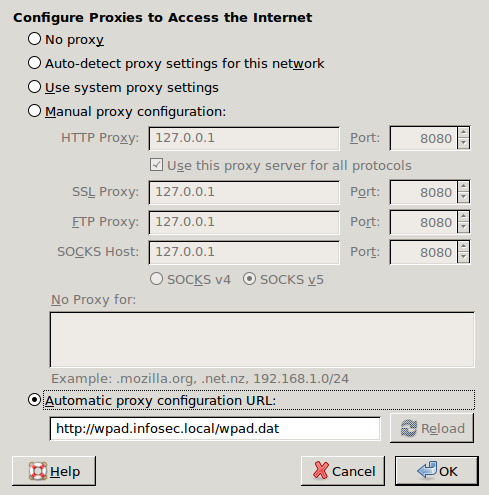
Alternatively, we could also specify the settings as follows, which is beneficial if something doesn’t work exactly as it should. This option verifies whether the WPAD works; if it does, then the problem is somewhere in the DNS resolution of the wpad.infosec.local.
After that, we can execute the following command on the wpad.infosec.local server to verify whether Firefox is actually able to access the wpad.dat file. In the output, we can see that the client from IP address 192.168.1.13 is accessing the wpad.dat file, which is our Firefox browser.
[plain]
# tail -f /var/log/nginx/*.log
192.168.1.13 – – [09/Jul/2014:19:55:14 +0200] "GET /wpad.dat HTTP/1.1" 200 136 "-" "Mozilla/5.0 (X11; Linux x86_64; rv:24.0) Gecko/20100101 Firefox/24.0"
[/plain]
When browsing with the browser after all the configured settings, we can see the logs of the proxy server to check whether the proxy is actually serving the web sites. We can visit www.wikipedia.com and execute the tail command in the Pfsense firewall; the following will be displayed, which verifies that www.wikipedia.com is actually being queried by the proxy server.
[plain]
# tail -f /var/log/squid/*.log
1404669813.129 125 192.168.1.13 TCP_MISS/301 931 GET http://www.wikipedia.com/ – DIRECT/91.198.174.192 text/html
1404669813.281 117 192.168.1.13 TCP_MISS/200 11928 GET http://www.wikipedia.org/ – DIRECT/91.198.174.192 text/html
1404669813.459 136 192.168.1.13 TCP_MISS/200 2513 GET http://bits.wikimedia.org/meta.wikimedia.org/load.php? – DIRECT/91.198.174.202 text/css
1404669813.605 111 192.168.1.13 TCP_MISS/200 3215 GET http://upload.wikimedia.org/wikipedia/meta/6/6d/Wikipedia_wordmark_1x.png – DIRECT/91.198.174.208 image/png
1404669813.861 47 192.168.1.13 TCP_MISS/200 3077 GET http://upload.wikimedia.org/wikipedia/meta/3/3b/Wiktionary-logo_sister_1x.png – DIRECT/91.198.174.208 image/png
1404669813.932 117 192.168.1.13 TCP_MISS/200 3217 GET http://upload.wikimedia.org/wikipedia/meta/a/aa/Wikinews-logo_sister_1x.png – DIRECT/91.198.174.208 image/png
1404669813.940 124 192.168.1.13 TCP_MISS/200 2359 GET http://upload.wikimedia.org/wikipedia/meta/c/c8/Wikiquote-logo_sister_1x.png – DIRECT/91.198.174.208 image/png
1404669813.942 103 192.168.1.13 TCP_MISS/200 2508 GET http://upload.wikimedia.org/wikipedia/meta/7/74/Wikibooks-logo_sister_1x.png – DIRECT/91.198.174.208 image/png
1404669813.947 108 192.168.1.13 TCP_MISS/200 1179 GET http://upload.wikimedia.org/wikipedia/meta/0/00/Wikidata-logo_sister_1x.png – DIRECT/91.198.174.208 image/png
1404669813.949 106 192.168.1.13 TCP_MISS/200 2651 GET http://upload.wikimedia.org/wikipedia/meta/2/27/Wikisource-logo_sister_1x.png – DIRECT/91.198.174.208 image/png
1404669813.956 114 192.168.1.13 TCP_MISS/200 3355 GET http://upload.wikimedia.org/wikipedia/meta/8/8c/Wikispecies-logo_sister_1x.png – DIRECT/91.198.174.208 image/png
1404669813.959 112 192.168.1.13 TCP_MISS/200 1573 GET http://upload.wikimedia.org/wikipedia/meta/7/74/Wikivoyage-logo_sister_1x.png – DIRECT/91.198.174.208 image/png
1404669813.963 119 192.168.1.13 TCP_MISS/200 1848 GET http://upload.wikimedia.org/wikipedia/meta/a/af/Wikiversity-logo_sister_1x.png – DIRECT/91.198.174.208 image/png
1404669813.967 120 192.168.1.13 TCP_MISS/200 7897 GET http://upload.wikimedia.org/wikipedia/meta/1/16/MediaWiki-logo_sister_1x.png – DIRECT/91.198.174.208 image/png
1404669813.970 123 192.168.1.13 TCP_MISS/200 2408 GET http://upload.wikimedia.org/wikipedia/meta/9/90/Commons-logo_sister_1x.png – DIRECT/91.198.174.208 image/png
1404669813.973 126 192.168.1.13 TCP_MISS/200 2424 GET http://upload.wikimedia.org/wikipedia/meta/f/f2/Meta-logo_sister_1x.png – DIRECT/91.198.174.208 image/png
1404669814.319 59 192.168.1.13 TCP_MISS/200 1264 GET http://upload.wikimedia.org/wikipedia/commons/b/bd/Bookshelf-40x201_6.png – DIRECT/91.198.174.208 image/png
1404669814.436 176 192.168.1.13 TCP_MISS/200 37298 GET http://upload.wikimedia.org/wikipedia/meta/0/08/Wikipedia-logo-v2_1x.png – DIRECT/91.198.174.208 image/png
[/plain]
This verifies that we’ve successfully configured the WPAD protocol, but we haven’t really talked about how to actually use that for the attack.
In order to attack the clients on the network, we first have to rely on auto-configuration being enabled in their browsers, which by default is not. Nevertheless, this option is often enabled in enterprise environments, which makes it a possible attack vector.
Whenever we’re doing a penetration test of an internal network, we have to check whether proxy auto-discovery is actually being used and set up the appropriate wpad.company.local domain on our laptop to advertise the existence of a proxy server, which is also being set up on our attacker machine. The web browsers resolving the wpad.company.local DNS domain name would then request our malicious wpad.dat, which would instruct the proxies to proxy all the requests through our proxy. At this time, we’ll be able to save all the requests and save them into the appropriate file for later analysis.

What should you learn next?
Conclusion
WPAD auto-discovery is often enabled in enterprise environments, which enables us to attack the DNS auto-discovery process. We can do that by setting up a proxy on our attacking machine and instruct all the clients to forward the requests through our proxy, which enables us to save all the requests in a .pcap file. We could also change the responses which are being returned to the user to present different content.
There’s a tool that automatically does this and is called responder, so we don’t actually have to set up everything as presented in the tutorial, but it makes a great practice in order to truly understand how the attack vector works. The responder program can be downloaded from the GitHub page, where the WPAD functionality is being presented as follows:
[plain]
WPAD rogue transparent proxy server. This module will capture all HTTP requests from anyone launching Internet Explorer on the network. This module is highly effective. You can now send your custom Pac script to a victim and inject HTML into the server’s responses. See Responder.conf. This module is now enabled by default.
[/plain]
To use a responder, we simply have to download it via git clone command and run with appropriate parameters. The -i parameter is specifying the proxy IP address, which should usually be our own IP address (in this case it’s 192.168.1.13) and the -w parameter enables the WPAD proxy server.
[plain]
# ./Responder.py -i 192.168.1.13 -w
[/plain]
Remember that it’s always a good idea to spend a little time figuring how things work in order to gain deeper knowledge about the technology than blindly running the tools in question to execute the attack for us. This enables us to reconfigure the attack vector if the responder program doesn’t work as expected, but there are still clients with the WPAD protocol enabled.
Sources
- Configuring the Squid Package as a Transparent HTTP Proxy, Netgate Docs
- Setting up WPAD Autoconfigure for the Squid Package, Netgate Docs
- SpiderLabs/Responder, GitHub

