Hacking tools with Python: Part one
Python is a brilliant language. It is known to be a lazy programming language that can be used to write codes small in number of lines, but able to do huge tasks. Today we will uncover some of these aspects.
We will understand how to use Python programming language, and how to start writing code in Python. Quite obviously, folks who are already good at using Python can choose to skip this blog.

FREE role-guided training plans
Anyway, to start off, we will have to first download the Python from the below-mentioned link:
https://www.python.org/downloads/ [make sure you download the 2.7.3 version, as our post will revolve around the same].
Install it in some directory, say, C: Python27. Exploring this directory will show you a file named Python.exe, which will be used to run every program we write.
Once done with that, get a good Python editor. I personally use NotePad++, gives a light yet strong interface to write programs. This choice is completely up to you.
Another thing to understand about Python is the Python libraries. Python libraries are nothing but an extra resource of efficient codes written by someone else, but you can import them and use their functions to avoid spending time writing your own. For example, you can write a code to resolve an IP into name and spend a lot of time, or you can use the library and simply call a function, and write a more useful code out of it.
Anyway, good. Let's not waste much time, and kick off.
Problem Statement: X application has a lot of URLs which should open only if the user is logged in. However, due to insufficient access controls, this is messed up, and as a Security Tester you are supposed to highlight all the URLs which are accessible without login.
Obviously there are lot of tools available for this, but remember we have to code our own. To do this, we will divide the whole task into small pieces so that you are able to learn it easy.
- Example code 1: Okay, first things first. We will write Hello World.
Code Snippet 1: Hello World program
[python]
#test.py
print "Hello World"
[/python]
Yes, it's that easy. The first line, which starts with a #, denotes a comment.
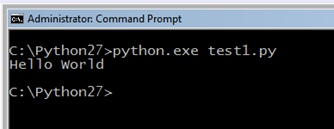
Image 1: Basic Hello World program
The second one prints the string "Hello World". You don't need to define what kind of variable is your value. Python just takes care of this on its own.
- Example code 2: Playing with loops and conditions.
Okay, Python is quite cool with loops and conditions. See it yourself in the below codes. The xrange function is used to do arithmetic progressions, i.e. the xrange(x,y) function will iterate values from x to y, inclusive of x and exclusive of y.
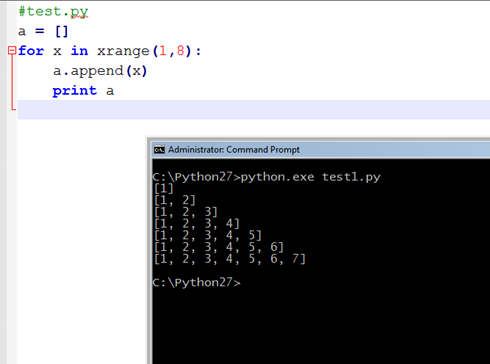
Image 2: Program for appending items in a list using for loop.
- Example code 3: If / else condition within for loop.
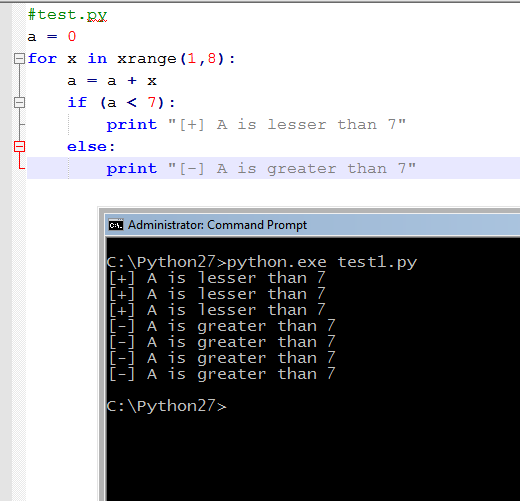
Image 3: Applying If / Else condition within a For loop.
As 'a' is zero in starting, we picked x as a variable and using the xrange function, we are incrementing x from 1 to 7. So when we write a = a + x, this works in the manner that a becomes 0 + 1, i.e. 1. In the second iteration it becomes 1 + 2 = 3, in the third it becomes 6. So up until here, a was not greater than six, and hence the program was going into an if condition. From the next iteration, this condition became false and the program started going into an else condition.
Also, you might have noticed, I have used proper tabs (spacing) in the blocks. For example, for all the code which comes under the FOR statement, there is spacing of one tab. Similarly, lines under the IF statement have a spacing of two tabs. This is mandatory, because Python works upon indentation. There should be proper indents in all your lines.
- Example code 4: Create and play with a list. This is denoted by a pair of square brackets.
Code Snippet 2: Playing around with a list.
[python]
#test.py
a = []
a.append(2)
a.append('hello')
a.append(33)
a.append(55)
print a[3]
print a
print str(type(a)) + 'n' + str(type(a[3]))
[/python]
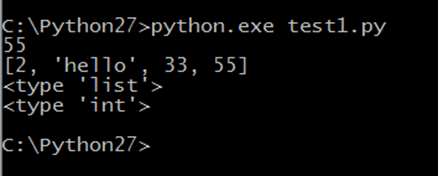
Image 4: Playing around with a list.
You can call specific objects by using their index positions (like print a[1]), indexes start with 0. Values within lists are already assigned to string/int etc. data-types. Type function returns the data type of the variable being passed to it. For example, here data-type of 'a' was list, and data-type of 'a[3]', was int, as this points specifically to items on the third index. We will cover dictionaries in the second part of this tutorial series.
- Example code 5: Including a library
Moving forward, let's understand how to include a library. Some libraries like sys, etc. are by default a part of Python. But let's say we need the library named 'requests', which is not part of the standard Python installation and we have to download it from its repo. We have three options here:

2. Use Easy_install

Image 6: Installing library using Easy_install
So, pip or Easy_install? We have a very nice blog from my friend Sanchit on this.
http://lazyprogrammer.blog.com/2015/01/03/installing-python-modules/
3. Download the package from the official repo and follow the instructions for making it.
Figure out the option which suits you well and get over it. Go back to your editor and write code:
Going further, let's divide the problem statement into subtasks:
- Sub task1: sending a GET request to a URL.
Code Snippet 3: Sending GET request to a hardcoded URL and printing the response attributes.
[python]
#test.py
import requests
req = requests.get('/')
print 'Response Code: ' + str(req.status_code)
print 'nResponse:n' + req.text
[/python]
- Imported requests library in the second line.
- Created an object req and used function requests.get and passed our URL to this.
- The req object has several properties, which can be looked at its documentation. Almost every function in a library gives you this sort of facility.
- Req.status_code gives the response code of the response, and req.text gives the whole content of the response.
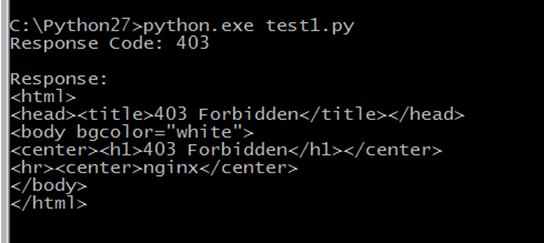
Image 7: Sending GET request to a Hardcoded URL and printing the response attributes.
- Sub task 2: take arguments from user.
There is a library called sys which enables you to interact with the system itself. On the least part of its use, we will receive input from the user by parameters. You can also employ the optparse library, which solves this purpose and comes up with a cool help menu too. We will cover that in our next blog post.
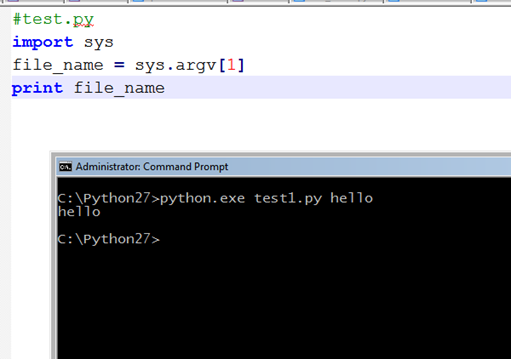
Image 8: Taking arguments from console.
- Sub task 3: take input file from user and read from this file.
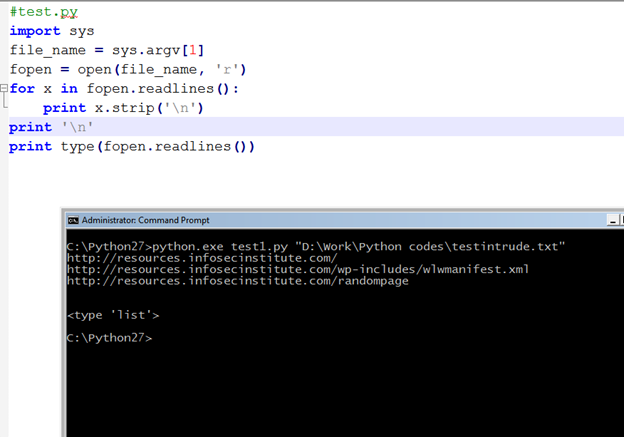
Image 9: Taking filename from user and reading the file.
Fopen is the object we created for opening the file. We are passing two arguments here, one being the filename and second being the mode of opening the file. Here the mode is r, which means read access, so basically you cannot write anything to the file, as only read access is granted. Below are the list of file access modes which can be used in place of r.
Table 1: Python file operation modes.

FREE role-guided training plans
The readlines function reads from every line, and puts all values in a list. As n is present in every line of the file, the strip function removes this from every value and prints the same.
- Sub task 4: handle exceptions
This is a universal truth. If you don't handle exceptions, your code gets messed up. Every language gives you option to handle things, and on similar grounds, Python also gives you options for handling exception using Try and Except keywords.
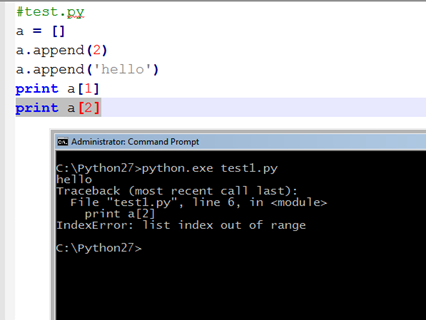
Image 10: No exception handling in place.
Quite obviously, the list has only two elements positioned at index 0 and index 1. When asked to print the element at position 1, Hello was printed. However, when asked for the element at position 2, there was nothing, and as our code has not got anything to respond, it got broken with an 'index out of range' error. Different errors get triggered on different problems. Here is how to handle this:
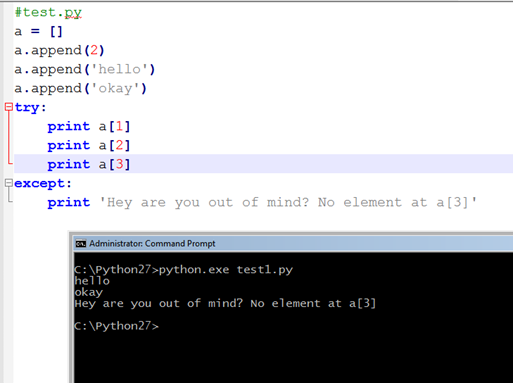
Image 11: Custom Handling exceptions using Try and Except.
If you are not aware of what error might come up, you can use the following code. Here we have used the keyword Exception and passed it to a variable called e. In case any problem occurs, we ask our code to print e, instead of showing the complete stack trace of the problem.
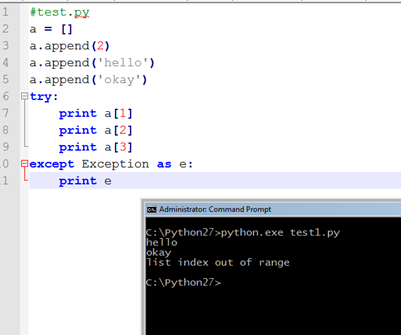
Image 12: Generic Exception Handling
- Sub task 5: get the list of URLs from the file, and send them a GET request one by one.
Code Snippet 4: fetch URLs from a file, and send them a GET request one by one.
[python]
#test.py
import requests
import sys
try:
file_name = sys.argv[1]
fopen = open(file_name, 'r')
for x in fopen.readlines():
url = x.strip('n')
req = requests.get(url)
print url
print req.status_code
fopen.close()
except Exception as e:
print e
[/python]
Summary: Passed the file name from user to variable file_name, passed this variable to fopen object which opens our file. Using a for loop, read all lines of the file one by one passing them to a variable URL, meanwhile striping the 'n' part from all these values. Sent a GET request to these URLs one by one, printed the URL and then the response code returned from the server. Here is how the output for the same looks:
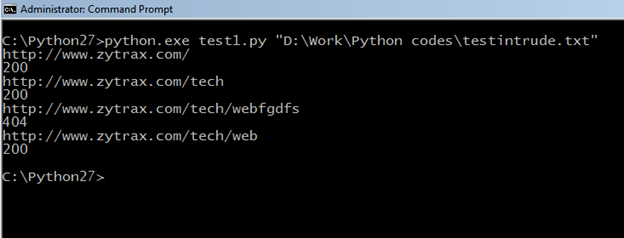
Image 13: Capturing response codes from URLs
Final task: putting it altogether and writing the results into a small report
Okay, so for writing a report we need to open another file, in write mode. Not in append mode, because if we append, this will write in the file every time we run the program. Also the position of the write statement matters a lot, because if we include it in the for loop, it will overwrite the file every time and we will be left with output from the last iteration only. Here is the code snippet which will fulfill the purpose:
[python]
#test.py
import requests
import sys
file_name = sys.argv[1]
fwrite = open('C:test_report.csv', 'w')
fopen = open(file_name, 'r')
counter = 0
for x in fopen.readlines():
counter = counter + 1
url = x.strip('n')
req = requests.get(url)
try:
req = requests.get(url)
success = 'true'
except Exception as e:
print e
success = 'false'
if (success == 'false'):
print ( '[-] ' + url.strip('n') + ',' + ',' + 'n')
fwrite.write('[-],' + str(counter) +',' + url.strip('n') + 'No Result' + ',' + 'n')
[/python]
Code Snippet 5: Putting it altogether.
[python]
else:
if (req.status_code == 200):
print ('[+] ' + url.strip('n') + ',' + str(req.status_code) + ',' + 'n')
fwrite.write('[+],' + str(counter) + ',' + url.strip('n') + ',' + str(req.status_code) + ',' + 'n')
else:
print ('[-] ' + url.strip('n') + ',' + str(req.status_code) + ',' + 'n')
fwrite.write('[-],' + str(counter) +',' + url.strip('n') + ',' + str(req.status_code) + ',' + 'n')
fwrite.close()
fopen.close()
[/python]
Summary: Open a write object on C:test_report.csv file. We have chosen CSV as it is relatively easier to work on. Any other file format can also be picked up as per your convenience. Once we have received the response code, we checked if there is any exception which might have happened at network layer. In case any issue occurred, we set the false value to a success variable. Got back from the try except block, and checked if success is true or false. In case of success being false, we simply wrote a negative sign [-], Sr.No. (using counter variable), URL, and Message (No Result Found) each repeated by a single comma which denotes a cell break in CSV.
In case of success variable being true, we checked further is the response code was 200 or not. In case this was 200, we wrote negative sign, sr.no. URL, status code returned from server.
And in case of status_code being 200, we just replaced the [-] sign with [+] sign. Also as the user might be impatient, and might get panic while all this is happening at the backend, so we printed all these values on screen as well.
Output for this will be something like this:
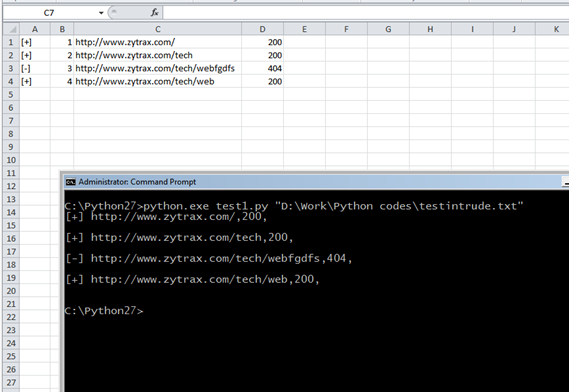
Image 14: Final results, On console as well as in the CSV file.
So this is it. By now we are ready with a small piece of code which will take a file name from the user which will be holding a list of URLs on which test is to be performed. These URLs will be parsed, processed and will be checked if they can be accessed directly without login or not.
In case yes, the report will include the [+] sign, with respective details, and a [-] sign in case of any other response code.
Note: Obviously, status-codes might be different for different websites, so you can tweak the logic.
I hope this was an easy tutorial with real time snapshots and code snippets which would help you a lot while learning. This was quite a basic one. I also missed lot of details as I thought they are not relevant to this specific tool. I will include required details in every blog post. Also, this might crash in specific test cases, like if you don't provide a valid file name or no filename at all, etc. Anyway, we will understand all those things in our next tutorial where we will add cool features to this tool, like 'allowing user to search for specific regex', 'adding cool help to guide users', etc.
Free hour-long hacking course!
Learn how to hack and use AI in this free 1-hour course, led by Keatron Evans, 20-year cybersecurity veteran and VP of Portfolio Product and AI Strategy at Infosec!
Please comment if you have any suggestions/queries/feedback.


