Nmap cheat sheet: Part 4
This is the fourth part of our Nmap Cheat Sheet. Here we will discuss more about firewall scanning, IDS/IPS Evasion, web server pen testing, etc. Before that, we should know some basics about firewall so that it will easy to bypass it.
What is a Firewall?

FREE role-guided training plans
A firewall is nothing but a software or hardware used to access or forbid unauthorized access to or from a network. As a pen tester, a security researcher is always trying to find the firewall installed on the infrastructure, so that he/she can try to bypass the firewall. There are lots of public exploits and o-a day vulnerabilities available on the Internet which helps for well-known exploitation.
Basically there are two category of firewall:
- Host based firewall
- Network based firewall
Host Based Firewall
These are software running on a single host (read, computer system), which are used to control inbound traffic (traffic from the network toward the host) and outbound traffic (from the host toward the network). These are installed on the operating systems of individual computers. Examples include IPTables and Firestarter for Linux, and Zone Alarm and Tiny Personal Firewall for Windows.
Network Based Firewall
These are either hardware devices, software, or combinations of hardware and software, which are used to control inbound traffic from the external, unprotected network.
Firewalls are installed in between the protected and unprotected network. They watch all traffic going to and fro, and are configured by setting rules to allow only the required inbound and outbound traffic.
Scanning firewall
To effectively scan a firewall we must check all open ports, services, and states. While scanning for Nmap also behavior should be taken, so timing options should be seen to determine the firewall presence. So you can see below details of Nmap results. From Nmap scan results we can easily know that there is a firewall.
Port status
Port type
Details
By advance Googling I came to know that the following IP address is protected by WAF (web application firewall) as well as some kind of IDS. We tried with some kind of brute force attack, SQL injection. Every time we put some special character, it wass showing "Firewall authentication failed". We came to know that this thing can be bypassed with HTTP verb tampering. We will discuss that later.
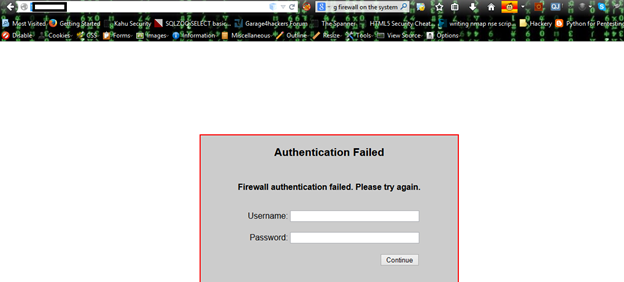
So firewall is present. Let's do Nmap for more reefing results. So first do an Nmap scan with –Pn.
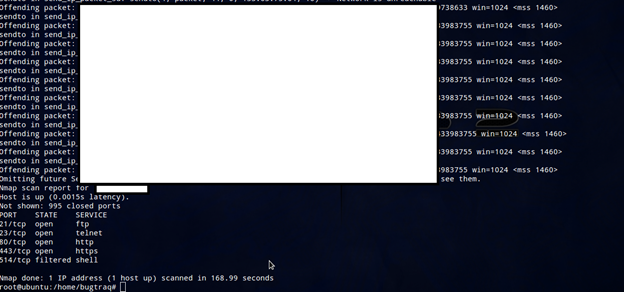
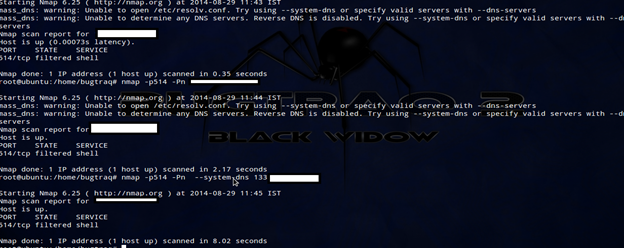
Now we confirmed that remote shell is running in the remote server which is filtered. So we are sure there is a firewall behind the scene. Let's do the scan with specified port to get details.
Let's do an internal network scan. First we will check version scan:
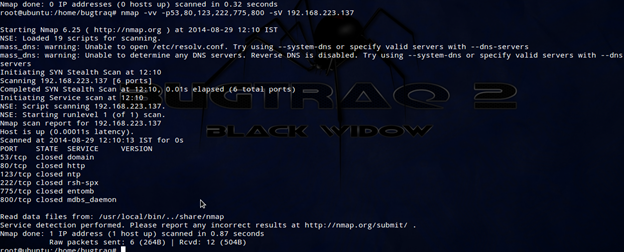
We came to know that there are lots of services running in the network with port specification and timing options.
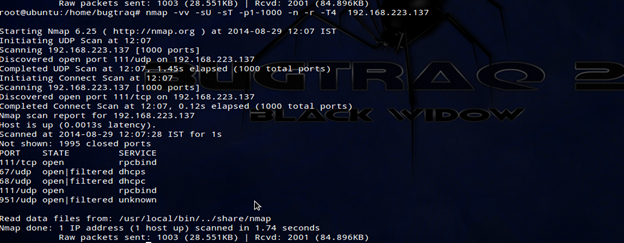
Observation:
The scanned firewall runs various services for the inside network, including DNS, SSH, HTTPS and Web proxy. These are accessible to all PCs on the internal network. It also runs a transparent proxy on port 80, so that client browser settings are not required to be changed.
Evade or Evasion or Bypass of a Firewall
Well a bypass or evasion or evade is nothing but another way to get into the system. To block malicious attack or spam, admin uses firewall or IDS/IPS. But from an attacker's point of view, he will find a way to bypass the rule for firewall; there are lots of way to bypass the firewall for an Nmap scan. We will discuss everything below. But one thing is sure shot "skill and common sense" that is used by an attacker.
-
Fragmentation
In general, the word fragmentation means dividing large objects into small parts. Similarly, Nmap uses 8 bytes of packet for bypassing firewall/ids/ips. Nmap will split into small small packets for bypassing firewall. This technique is very old, still it will work if there is a misconfiguration of firewall.
Nmap –f host

MTU:
MAXIMUM Transmission Unit. It is an alias of fragmentation, but here we can specify the scan for a custom amount of packets.
Nmap –mtu 16 host

The above Nmap scan instructs to use 16 bytes of packets instead of 8 bytes in the previous scan. So we can specify the custom packets which should be multiple of 8.
-
Decoy
This type of scan is very stealthy and undetectable. In this scan, targets are scanned by multiple fake or spoofed IP addresses. This way the firewall can be bypassed and the firewall will think that the attack or scan is done by multiple resources or ip addresses.

Decoys are used both in the initial ping scan (using ICMP, SYN, ACK, or whatever) and during the actual port scanning phase. Decoys are also used during remote OS detection (-O). Decoys do not work with version detection or TCP connect scan.
This effectively makes it appear that the target is being scanned by multiple systems simultaneously. Using decoys allows the actual source of the scan to "blend into the crowd", which makes it harder to trace where the scan is coming from.
There are two ways to perform decoy scan:
1.nmap –D RND:10 TARGET

Here Nmap will generate random 10 IPs and it will scan the target using 10 IP and source.
2.nmap –D decoy1,decoy2,decoy3 target
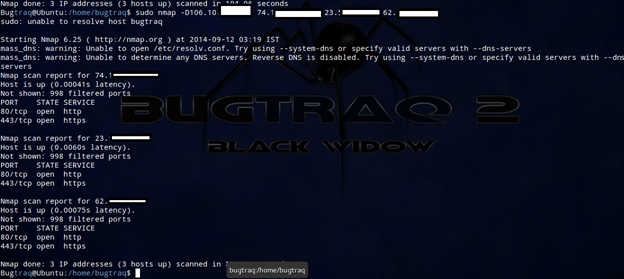
Here decoys are specified by the attacker.
The below network capture show multiple decoys which will fool the firewall.
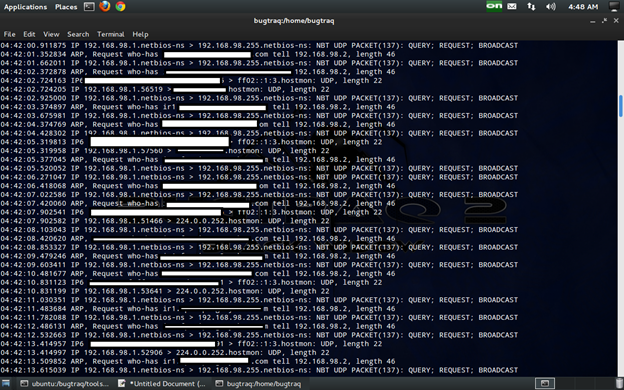
Idle zombie scan
Using this technique, the attacker will first exploit an idle system and use it to scan the target system.
The scan works by exploiting the predictable IP sequence ID generation employed by some systems. In order for an idle scan to be successful, the zombie system must truly be idle at the time of scanning. For any doubt please refer to the previous installments.
In this technique the IP of the attacker will be hidden.
Nmap –P0 -sI zombie target
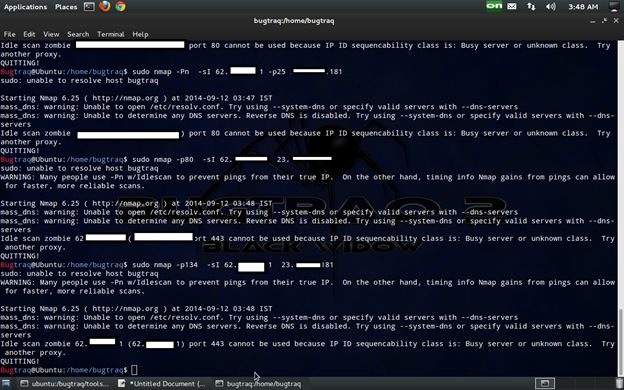
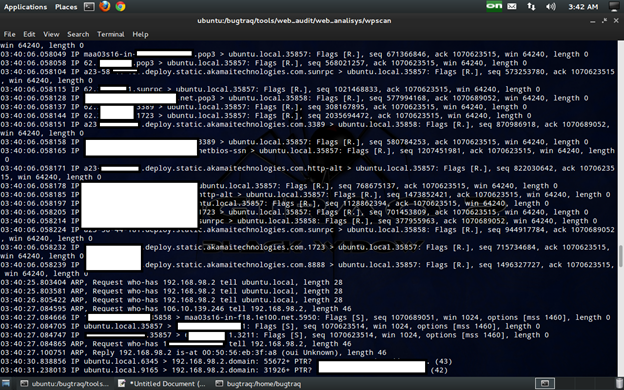
For confirmation we will use tcpdump to dump all network traffic and also to be able to capture the traffic.
Tcpdump –I interface
--source-port option:
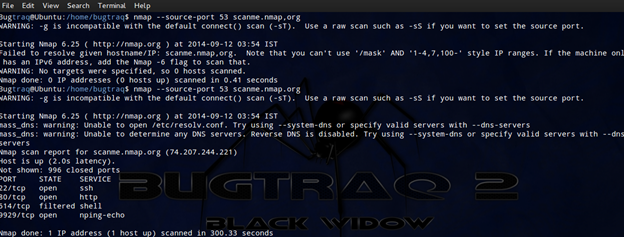
Every TCP segment contains a source port number in addition to a destination. By default, Nmap will randomly pick an available outgoing source port to probe a target. The --source-port option will force Nmap to use the specified port as the source for all packets. This technique can be used to exploit weaknesses in firewalls that are improperly configured to blindly accept incoming traffic based on a specific port number. Port 20 (FTP), port 53 (DNS), and 67 (DHCP) are common ports susceptible to this type of scan.
Nmap –source-port port target
Random data length
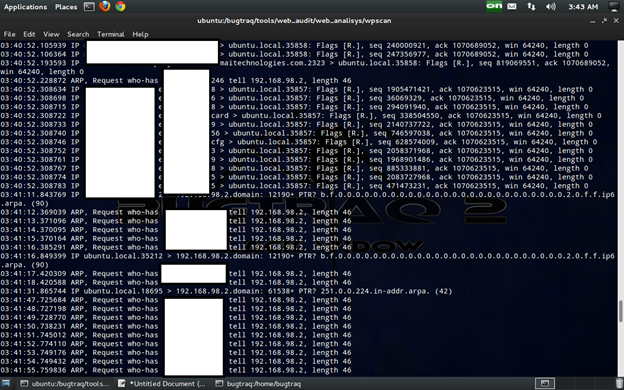
Appending random data length, we can also bypass firewall. Many firewalls are inspecting packets by looking at their size in order to identify a potential port scan. This is because many scanners are sending packets that have specific size. In order to avoid that kind of detection we can use the command –data-length to add additional data and to send packets with a different size than the default. In the image below, we have changed the packet size by adding 25 more bytes.
nmap --data-length target

Capture traffic as below:
Randomize target scan order
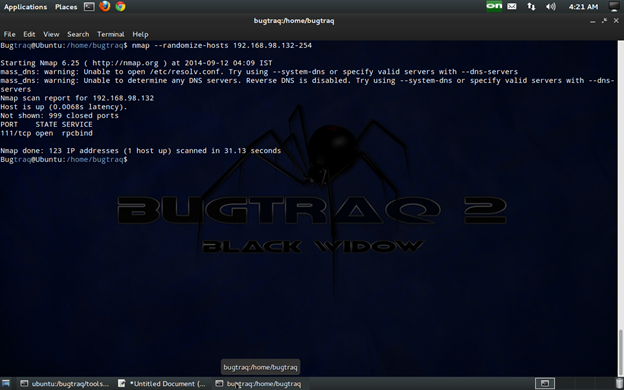
The --randomize-hosts option is used to randomize the scanning order of the specified targets. The --randomize-hosts option helps prevent scans of multiple targets from being detected by firewalls and intrusion detection systems. This is done by scanning them in a random order instead of sequential.
nmap --randomize-hosts targets
Spoof MAC address
MAC (Media Access Control) is nothing but the unique physical address for a machine. So this is also another method for bypassing the firewall. In some firewalls, the MAC address rule is applied, so it is very useful for this rule. You will need to discover which MAC address you need to set in order to obtain results. This can be easily done either manually or by advanced fuzzing. I like fuzzing, which can be done in Python very easily. Everything we will do in manual can be imported into Python as regex and can start to automate.
Specifically the –spoof-mac option gives you the ability to choose a MAC address from a specific vendor, to choose a random MAC address, or to set a specific MAC address of your choice. Another advantage of MAC address spoofing is that you make your scan stealthier, because your real MAC address it will not appear on the firewall log files.
nmap -sT -PN --spoof-mac aa:bb:cc:dd:ee:ff target
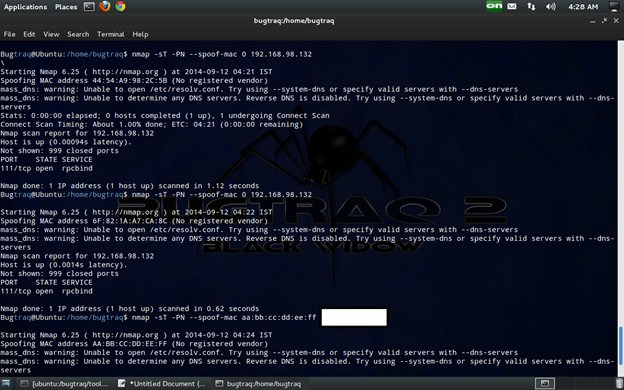
The spoof mac address takes the following arguments:
Send bad checksum
Checksum is nothing but the integrity check. In some firewalls or IDS/IPS, packets are checked by the checksum of packets. So the attacker will fool the IDS/IPS by sending bad checksums.

Sun-RPC grind scan
What is Sun RPC?
Sun RPC (remote procedure Call) is a Unix protocol used to implement many services including NFS. Originally developed by Sun, but now widely available on other platforms (including Digital Unix). Also known as Open Network Computing (ONC).
Sun RPC package has an RPC compiler (rpcgen) that automatically generates the client and server stubs.
Nmap comes with an nmap-rpc database of almost 600 RPC programs. Many RPC services use high-numbered ports and/or the UDP transport protocol, making them available through many poorly configured firewalls. RPC programs (and the infrastructure libraries themselves) also have a long history of serious remotely exploitable security holes. So network administrators and security auditors often wish to learn more about any RPC programs on their networks.
Basically we can get details about RPC by:
command:rpcinfo/rpcinfo –p hostname.
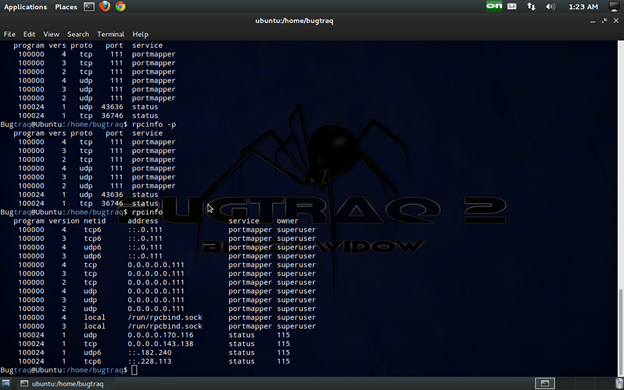
the rpc server must be mapped to the host which can be confirmed by port mapper.
if the port mapper (rpcbind) service (UDP or TCP port 111) is available
This shows that hosts frequently offer many RPC services, which increases the probability that one is exploitable. We also noticed that most of the services are on strange high-numbered ports (which may change for any number of reasons) and split between UDP and TCP transport protocols.
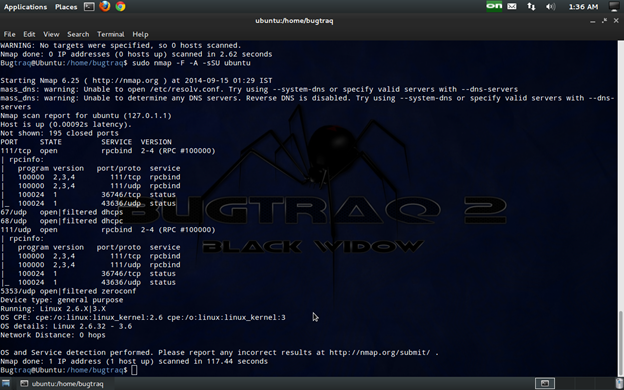
Nmap can determine all of the information by directly communicating with open RPC ports through the following three-step process.
-
The TCP and/or UDP port scan finds all of the open ports.
-
Version detection determines which of the open ports use the SunRPC protocol.
-
The RPC brute force engine determines the program identity of each RPC port by trying a null command against each of the 600 programs numbers in nmap-rpc. Most of the time Nmap guesses wrong and receives an error message stating that the requested program number is not listening on the port. Nmap continues trying each number in its list until success is returned for one of them. Nmap gives up in the unlikely event that it exhausts all of its known program numbers or if the port sends malformed responses that suggest it is not really RPC.
The above scan has results for RPC services, but unfortunately we did not get any SUN RPC, because we have an Ubuntu machine. In a real pen testing environment, we can gather information about SUN if we have a SUN server.
SSL Post-processor scan
Nmap has the capacity to detect the SSL encryption protocol and then launch an encrypted session through which it executes normal version detection. As with the RPC grinder discussed previously, the SSL post-processor/scan is automatically executed whenever an appropriate (SSL) port is detected.
Command: nmap -Pn -sSV -T4 –F target
nmap-service-probes File Format:
As with remote OS detection (-O), Nmap uses a flat file to store the version detection probes and match strings. While the version of nmap-services distributed with Nmap is sufficient for most users, understanding the file format allows advanced pen testers to add their own services to the detection engine. Like many Unix files, nmap-service-probes is line-oriented. Lines starting with a hash (#) are treated as comments and ignored by the parser. Blank lines are ignored as well.
Exclude Directive
This directive excludes the specified ports from the version scan. It can only be used once and should be near the top of the file, above any Probe directives. Port should be separated by a comma.
Syntax: Exclude <port specification>
Probe Directive
Syntax: Probe <protocol> <probename> <probestring>
Examples:
Probe TCP GetRequest q|GET / HTTP/1.0rnrn|
Probe UDP DNSStatusRequest q|��x10���������|
Probe TCP NULL q||The Probe directive tells Nmap what string to send to recognize various services. The arguments are as follows:
<protocol>
This must be either TCP or UDP. Nmap only uses probes that match the protocol of the service it is trying to scan.
<probename>
This is a plain English name for the probe. It is used in service fingerprints to describe which probes elicited responses.
<probestring>
Tells Nmap what to send. It must start with a q, then a delimiter character which begins and ends the string. Between the delimiter characters is the string that is actually sent. It is formatted similarly to a C or Perl string in that it allows the following standard escape characters: �, a, b, f, n, r, t, v, and xHH (whereH is any hexadecimal digit). One Probe line in nmap-service-probes has an empty probe string, as shown in the third example above. This is the TCP NULL probe which just listens for the initial banners that many services send. If your delimiter character (| in these examples) is needed for your probe string, you need to choose a different delimiter.
match Directive
Syntax: match <service> <pattern> [<versioninfo>]
Examples:
match ftp m/^220.*Welcome to .*Pure-?FTPd (dS+s*)/ p/Pure-FTPd/ v/$1/ cpe:/a:pureftpd:pure-ftpd:$1/
match ssh m/^SSH-([d.]+)-OpenSSH[_-]([w.]+)r?n/i p/OpenSSH/ v/$2/ i/protocol $1/ cpe:/a:openbsd:openssh:$2/
match mysql m|^x10��x01xffx13x04Bad handshake$| p/MySQL/ cpe:/a:mysql:mysql/
match chargen m|@ABCDEFGHIJKLMNOPQRSTUVWXYZ|
match uucp m|^login: login: login: $| p/NetBSD uucpd/ o/NetBSD/ cpe:/o:netbsd:netbsd/a
match printer m|^([w-_.]+): lpd: Illegal service requestn$| p/lpd/ h/$1/
match afs m|^[dD]{28}s*(OpenAFS)([d.]{3}[^s�]*)�| p/$1/ v/$2/The match directive tells Nmap how to recognize services based on responses to the string sent by the previous Probe directive. A single Probe line may be followed by dozens or hundreds of match statements. If the given pattern matches, an optional version specifier builds the application name, version number, and additional info for Nmap to report. The arguments to this directive follow: <service>
This is simply the service name that the pattern matches. Examples would be ssh, smtp, http, or snmp.
<pattern>
This pattern is used to determine whether the response received matches the service given in the previous parameter. The format is like Perl, with the syntax being m/[regex]/[opts]. The "m" tells Nmap that a match string is beginning. The forward slash (/) is a delimiter, which can be substituted by almost any printable character as long as the second slash is also replaced to match. The regex is a Perl-style regular expression. This is made possible by the excellent Perl Compatible Regular Expressions (PCRE) library (http://www.pcre.org). The only options currently supported are 'i', which makes a match case-insensitive and 's' which includes newlines in the '.' specifier. As you might expect, these two options have the same semantics as in Perl. Subexpressions to be captured (such as version numbers) are surrounded by parentheses as shown in most of the examples above.
The <versioninfo> section actually contains several optional fields. Each field begins with an identifying letter (such as h for "hostname"). Next comes a delimiter character which the signature writer chooses. The preferred delimiter is slash ('/') unless that is used in the field itself. Next comes the field value, followed by the delimiter character. The following table describes the six fields:
Softmatch directive
Syntax: softmatch <service> <pattern>
Examples:
softmatch ftp m/^220 [-.w ]+ftp.*rn$/isoftmatch smtp m|^220 [-.w ]+SMTP.*rn|softmatch pop3 m|^+OK [-[]()!,/+:<>@.w ]+rn$|
The softmatch directive is similar in format to the match directive discussed above. The main difference is that scanning continues after a softmatch, but it is limited to probes that are known to match the given service. This allows for a normal ("hard") match to be found later, which may provide useful version information.
ports and sslports Directives
Examples:
ports 21,43,110,113,199,505,540,1248,5432,30444ports 111,4045,32750-32810,38978
This line tells Nmap what ports the services identified by this probe are commonly found on. It should only be used once within each Probe section. The syntax is a slightly simplified version of that taken by the Nmap -p option. Syntax: sslports <portlist>
Example:
sslports 443
This is the same as 'ports' directive described above, except that these ports are often used to wrap a service in SSL. For example, the HTTP probe declares "sslports 443" and SMTP-detecting probes have an "sslports 465" line because those are the standard ports for HTTPS and SMTPS respectively. The <portlist> format is the same as with ports. This optional directive cannot appear more than once per Probe.
totalwaitms Directive
Syntax: totalwaitms <milliseconds>
Example:
totalwaitms 5000
This rarely necessary directive specifies the amount of time Nmap should wait before giving up on the most recently defined Probe against a particular service. The Nmap default is usually fine.
Rarity directive
Syntax: rarity <value between 1 and 9>
Example:
rarity 6
The rarity directive roughly corresponds to how infrequently this probe can be expected to return useful results. The higher the number, the rarer the probe is considered and the less likely it is to be tried against a service.
Fallback directive
Syntax: fallback <Comma separated list of probes>
Example:
fallback GetRequest,GenericLines
This optional directive specifies which probes should be used as fallbacks if there are no matches in the current Probe section. For TCP probes without a fallback directive, Nmap first tries match lines in the probe itself and then does an implicit fallback to the NULL probe. If the fallback directive is present, Nmap first tries to match lines from the probe itself, then those from the probes specified in the fallback directive (from left to right). Finally, Nmap will try the NULL probe. For UDP, the behavior is identical except that the NULL probe is never tried.
Practice for above:
Ok we have studied enough theory, it is time for practice, because theory is boring unless and until practice is done. So let us do some pen testing. Following are the steps a pen tester can follow for real life hacking or security assessments.
1. Locate the Nmap file probes: command:locate nmap-service-probes

2. Edit the file:
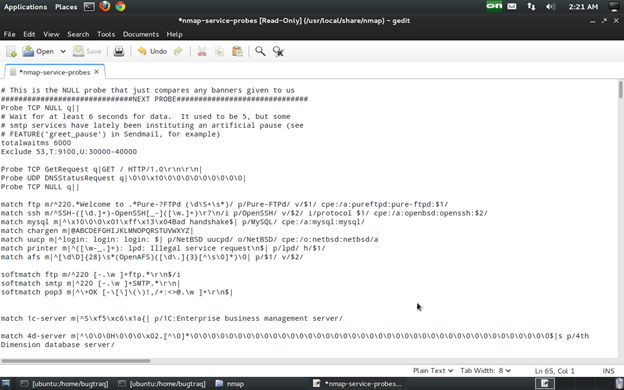
Here we are editing via gedit and we will put all rules as we need for our pen testing. Follow the below picture. Save the file and go for pen testing.
Now it is the best time to start our ninja skill for pen testing using Nmap. Obviously using Nmap we can do lot of things. Here we will start with basic web app pen testing.
First we will start with web-server pen-testing. Basically a web server is a space or a server which handles all scripts, web pages and validation, if required and then sends to client's browser. I a web server has vulnerablilities, then it is prone to different types of attack like sqli, xss, csrf, HPP, RCE, etc. So it is better to do server side validation. Here we will discuss some common vulnerabilities that we will pen test using Nmap.
HTTP Methods by Nmap:
HTTP methods are nothing but different types of requests handled by a web server to deliver web pages.
Web servers support different HTTP methods according to their configuration and software, and some of them could be dangerous under certain conditions. Pen testers need a way of quickly listing the available methods. Some methods are GET, HEAD, POST, TRACE, DEBUG, OPTION, DELETE, TRACK, PUT, etc. A full list of methods that are handled by the browser can be found at the link: http://www.w3.org/Protocols/rfc2616/rfc2616-sec9.html
As previously described, Nmap can do easy work with an NSE script. Check the below script:
Cmd: nmap -p80,443 --script http-methods scanme.nmap.org

The argument -p80,443 --script http-methods makes Nmap launch the httpmethods script if a web server is found on ports 80 or 443 (-p80,443).
To individually check for the HTTP methods, the following scripts are needful.
Cmd:
nmap -p80,443 --script http-methods --script-args http-methods.retest scanme.nmap.org
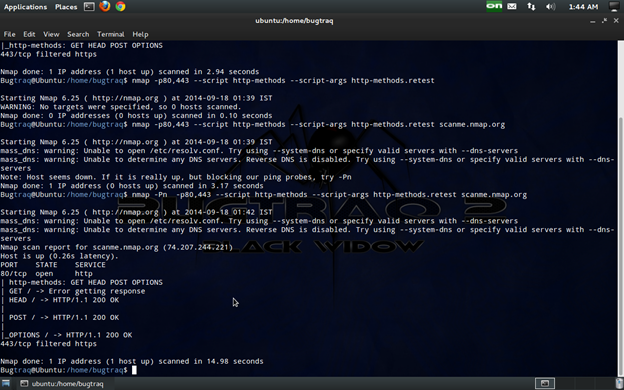
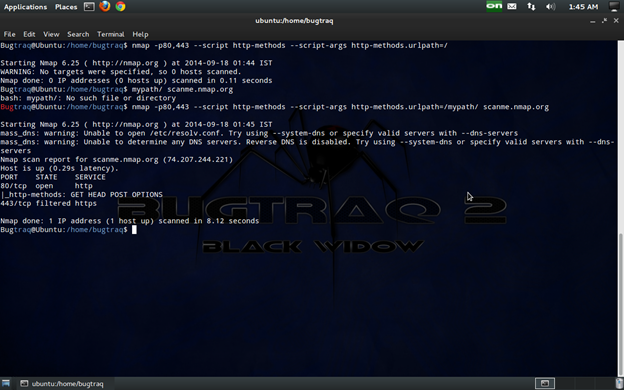
By default, the script http-methods uses the root folder as the base path ( / ). If we wish to set a different base path, set the argument http-methods.url-path:
Cmd:
nmap -p80,443 --script http-methods --script-args http-methods.urlpath=/mypath/ scanme.nmap.org
The HTTP methods TRACE, CONNECT, PUT, and DELETE might present a security risk, and they need to be tested thoroughly if supported by a web server or application. TRACE makes applications susceptible to Cross Site Tracing (XST) attacks and could lead to attackers accessing cookies marked as httpOnly. The CONNECT method might allow the web server to be used as an unauthorized web proxy. The methods PUT and DELETE have the ability to change the contents of a folder, and this could obviously be abused if the permissions are not set properly.
You can learn more about common risks associated with each method here: https://www.owasp.org/index.php/Test_HTTP_Methods_%28OTG-CONFIG-006%29
HTTP User Agent:
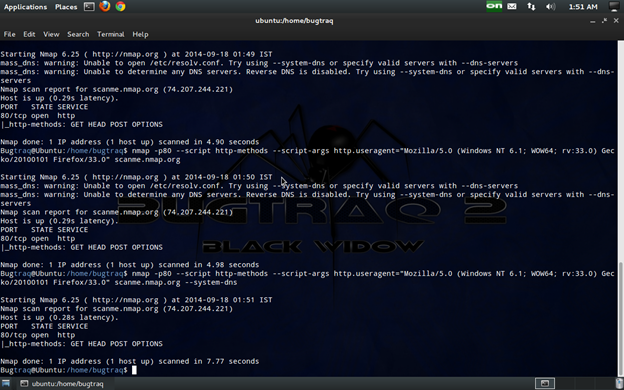
There are some packet filtering products that block requests that use Nmap's default HTTP User Agent. You can use a different HTTP User Agent by setting the argument http.useragent:
cmd: nmap -p80 --script http-methods --script-args http.useragent="Mozilla 5" <target>
HTTP pipelining
Some web servers allow the encapsulation of more than one HTTP request in a single packet. This may speed up the execution of an NSE HTTP script, and it is recommended that it is used if the web server supports it. The HTTP library, by default, tries to pipeline 40 requests and auto adjusts the number of requests according to the traffic conditions, based on the Keep-Alive header.
Cmd: nmap -p80 --script http-methods --script-args http.pipeline=25 <target>

Additionally, we can use the argument http.max-pipeline to set the maximum number of HTTP requests to be added to the pipeline. If the script parameter http.pipeline is set, this argument will be ignored:
cmd:nmap -p80 --script http-methods --script-args http.max-pipeline=10 <target>
HTTP-Proxy scanning with Nmap:
HTTP proxies are used to make requests through their addresses, therefore hiding our real IP address from the target. Detecting them is important if you are a system administrator who needs to keep the network secure, or an attacker who spoofs his real origin. The following command shows how to detect open proxy:
cmd: nmap --script http-open-proxy -p8080 <target>
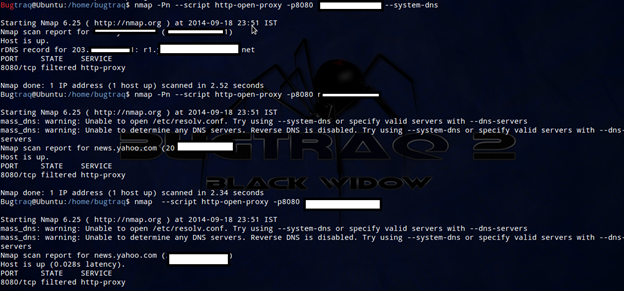
Here the argument --script http-open-proxy -p8080 to launch the NSE script http-open-proxy if a web server is found running on port 8080.
Different pattern:
We may use a different pattern by a specified URL to target for scanning. It can be done by a specified NSE Script. Follow the below command:
Cmd: nmap --script http-open-proxy –script-args http-open-proxy.url=http://whatsmyip.org,http-open-.pattern="Your IP address is" -p8080 <target>
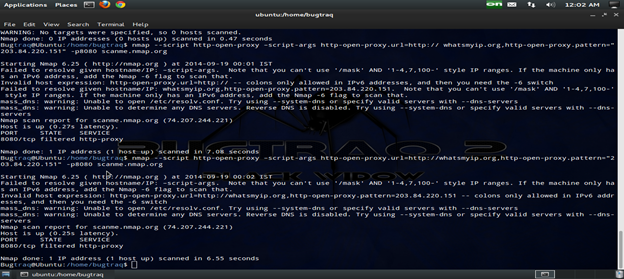
HTTP User Agent:
There are some packet filtering products that block requests that use Nmap's default HTTP user agent. You can use a different HTTP User Agent by setting the argument http.useragent:
nmap -p80 --script http-trace --script-args http.useragent="Mozilla 5"<target>
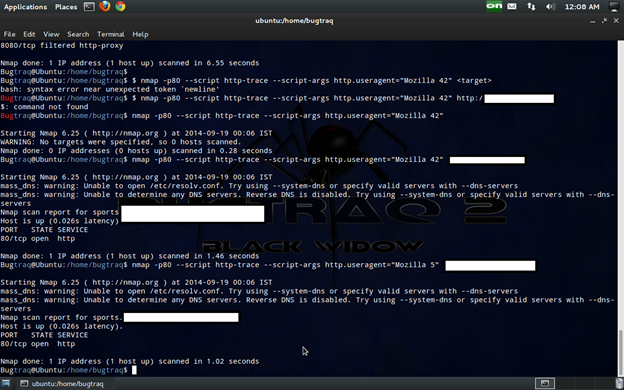
Remember: we can specify different browser agents like Mozilla, Chrome, Apple Webkit, etc.
Discovering interesting files and directories on admin accounts
One of the common tasks during penetration tests that cannot be done manually is file and directory discovery. Web application vulns often disclosed directory listing, user account enumeration, account panel, config files, etc. For doing our work faster, Nmap gives an ideal way to discover through NSE SCRIPTS.
nmap --script http-enum -p80 <target>

Discovering LUA scripts
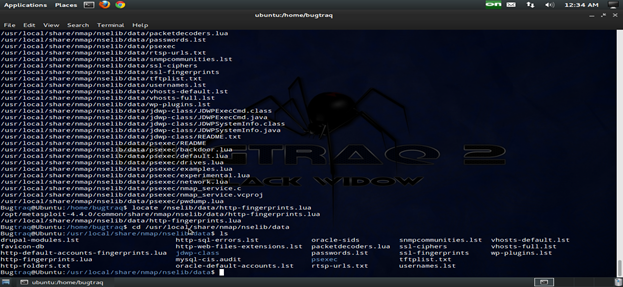
Entry in LUA table
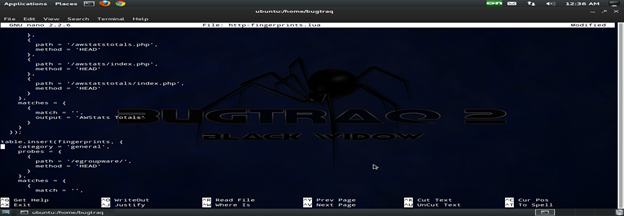
The fingerprints are stored in the file http-fingerprints.lua in /nselib/data/, and they are actually LUA tables. An entry looks like something like the following:
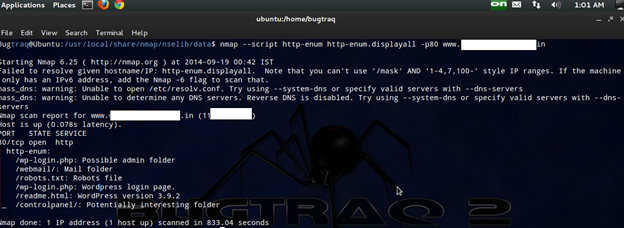
To display all the entries that returned a status code that could possibly indicate a page exists, use the script argument http-enum.displayall:
nmap script http-enum http-enum.displayall -p80 -- <target>
BY HTTP User Agent
There are some packet filtering products that block requests made using Nmap's default HTTP User Agent. We can use a different HTTP User Agent by setting the argument http.useragent:
nmap -p80 --script http-enum --script-args http.useragent="Mozilla 5"<target>

BY HTTP pipelining
Some web servers allow the encapsulation of more than one HTTP request in a single packet. This may speed up the execution of an NSE HTTP script, and it is recommended that it is used if the web server supports it. The HTTP library, by default, tries to pipeline 40 requests and automatically adjusts that number according to the traffic conditions, based on the Keep-Alive header.
$ nmap -p80 --script http-enum --script-args http.pipeline=25 <target>

Additionally, we can use the argument http.max-pipeline to set the maximum number of HTTP requests to be added to the pipeline. If the script parameter http.pipeline is set, this argument will be ignored:
nmap -p80 --script http-methods --script-args http.max-pipeline=10

Brute forcing HTTP authentication
Many home routers, IP webcams, and even web applications still rely on HTTP authentication these days, and penetration testers need to try a word list of weak passwords to make sure the system or user accounts are safe. Now, thanks to the NSE script http-brute, we can perform robust dictionary attacks against HTTPAuth protected resources. See below commands:
nmap -p80 --script http-brute –script-args http-brute.path=/admin/ <target>
The script http-brute depends on the NSE libraries unpwdb and brute. These libraries have several script arguments that can be used to tune the auditing for our brute force password. To use different username and password lists, set the arguments userdb and passdb:
nmap -p80 --script http-brute --script-args userdb=/var/usernames.txt,passdb=/var/passwords.txt <target>

Using HTTP User Agent
There are some packet filtering products that block requests made using Nmap's default
HTTP User Agent. You can use a different User Agent value by setting the argument
http.useragent:
$ nmap -p80 --script http-brute --script-args http.useragent="Mozilla 5" <target>
Brute-force modes
The brute library supports different modes that alter the combinations used in the attack.basically a pentester will try to bruteforce the different parameters.they are using Burp Proxy and Intruder to perform the attack. The same thing can be used by Nmap.
The available modes are:
user: In this mode, for each user listed in userdb, every password in passdb will be tried.
nmap --script http-brute --script-args brute.mode=user <target>
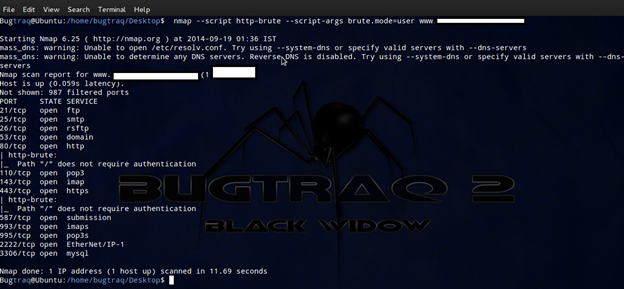
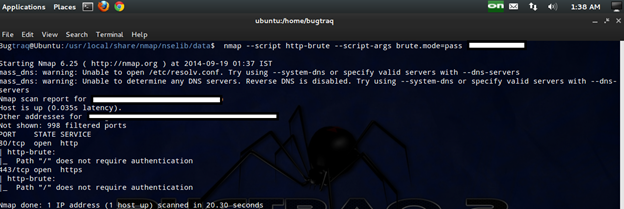
pass: In this mode, for each password listed in passdb, every user in usedb will be tried.
nmap --script http-brute --script-args brute.mode=pass <target>
fcreds: This mode requires the additional argument brute.credfile.
nmap --script http-brute --script-args brute.mode=creds,brute.credfile=./creds.txt <target>
mod_userdir Pentesting:
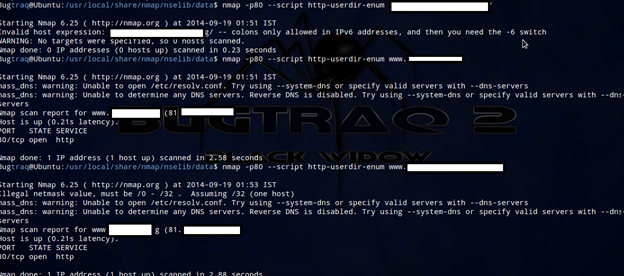
Apache's module UserDir provides access to the user directories by using URIs with the syntax /~username/. With Nmap we can perform dictionary attacks and determine a list of valid usernames on the web server. To try to enumerate valid users in a web server with mod_userdir; use Nmap with these
arguments:
nmap -p80 --script http-userdir-enum <target>
HTTP User Agent
There are some packet filtering products that block requests made using Nmap's default HTTP User Agent. You can use a different User Agent value by setting the argument http.
useragent:
nmap -p80 --script http-brute --script-args http.useragent="Mozilla 42" <target>
HTTP pipelining
Some web servers allow the encapsulation of more than one HTTP request in a single packet. This may speed up the execution of an NSE HTTP script, and it is recommended that it is used if the web server supports it. The HTTP library, by default, tries to pipeline 40 requests and auto adjusts that number according to the traffic conditions, based on the Keep-Alive header.
nmap -p80 --script http-methods --script-args http.pipeline=25 <target>
Testing for Default credentials:
Often default credentials are found in the web applications.NSE scripts made easy to find the vulnerable application.
nmap -p80 --script http-default-accounts <target>
The script detects web applications by looking at known paths and initiating a login
routine using the stored, default credentials. It depends on a fingerprint file located at /
nselib/data/http-default-accounts.nse
WordPress Auditing:
To find accounts with weak passwords in WordPress installations, use the following Nmap command:
$ nmap -p80 --script http-wordpress-brute <target>
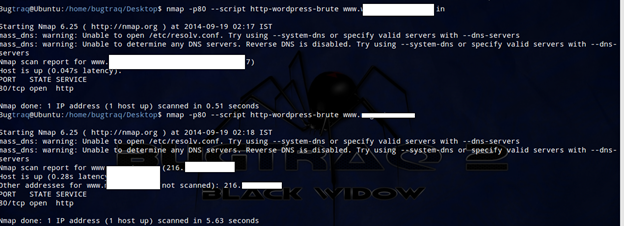
To set the number of threads, use the script argument http-wordpress-brute.threads:
$ nmap -p80 --script http-wordpress-brute --script-args http-wordpressbrute.
threads=5 <target>
If the server has virtual hosting, set the host field by using the argument http-wordpressbrute.
hostname:
nmap -p80 --script http-wordpress-brute --script-args http-
wordpressbrute.hostname="ahostname.wordpress.com" <target>
To set a different login URI, use the argument http-wordpress-brute.uri:
$ nmap -p80 --script http-wordpress-brute --script-args http-wordpressbrute.
uri="/hidden-wp-login.php" <target>
To change the name of the POST variable that stores the usernames and passwords, set the arguments http-wordpress-brute.uservar and http-wordpress-brute.passvar:
$ nmap -p80 --script http-wordpress-brute --script-args http-wordpressbrute.uservar=usuario,http-wordpress-brute.passvar=pasguord <target>
Joomla Auditing:
Joomla! is a very popular CMS that is used for many different purposes, including
e-commerce. Detecting user accounts with weak passwords is a common task for penetration
testers, and Nmap helps with that by using the NSE script http-joomla-brute.
nmap -p80 --script http-joomla-brute <target>

NB: the same method for WordPress will apply to Joomla
Detecting Web Application Firewall:
Like a firewall app, WAF can also be used by the server for protecting against malicious attacks. Web servers are often protected by packet filtering systems that drop or redirect suspected malicious packets. Web penetration testers benefit from knowing that there is a traffic filtering system between them and the target application. If that is the case, they can try more rare or stealthy techniques to try to bypass the Web Application Firewall (WAF) or Intrusion Prevention System (IPS). It also helps them to determine if a vulnerability is
actually exploitable in the current environment.
To detect a Web Application Firewall or Intrusion Prevention System:
nmap p80 --script http-waf-detect <target>-

As we can see, there is a firewall mod_security which throws an error:
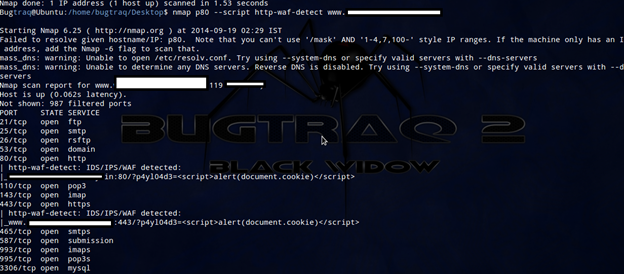
To detect changes in the response body, use the argument http-waf-detect. detectBodyChanges. I recommend that you enable it when dealing with pages with little dynamic content:
nmap -p80 --script http-waf-detect --script-args="http-waf-detect.detectBodyChanges" <target>

To include more attack payloads, use the script argument http-waf-detect.aggro. This mode generates more HTTP requests but can also trigger more products:
nmap -p80 --script http-waf-detect --script-args="http-waf-detect.aggro" <target>

HTTP User Agent
There are some packet filtering products that block requests made using Nmap's default HTTP User Agent. You can use a different User Agent value by setting the argument http.useragent:
nmap -p80 --script http-waf-detect --script-args http.useragent="Mozilla 42" <target>
HTTP pipelining
Some web servers allow the encapsulation of more than one HTTP request in a single packet. This may speed up the execution of an NSE HTTP script, and it is recommended that it is used if the web server supports it. The HTTP library, by default, tries to pipeline 40 requests and automatically adjusts that number according to the traffic conditions, based on the Keep-Alive header.
$ nmap -p80 --script http-methods --script-args http.pipeline=25 <target>
Additionally, you can use the argument http.max-pipeline to set the maximum number of HTTP requests to be added to the pipeline. If the script parameter http.pipeline is set, this argument will be ignored:
$.nmap -p80 --script http-methods --script-args http.max-pipeline=10 <target>
Detecting XST Vulnerabilities:
Cross Site Tracing (XST) vulnerabilities are caused by the existence of Cross Site Scripting vulnerabilities (XSS) in web servers where the HTTP method TRACE is enabled. This technique is mainly used to bypass cookie restrictions imposed by the directive httpOnly. Pen testers can save time by using Nmap to quickly determine if the web server has the method TRACE enabled.
nmap -p80 --script http-methods,http-trace --script-args http-methods.retest <target>

Detecting XSS Vulnerabilities:
XSS or cross site scripting is a well known attack where an attacker can execute JavaScript. Cross Site Scripting vulnerabilities allow attackers to spoof content, steal user cookies, and even execute malicious code on the user's browsers. There are even advanced exploitation frameworks such as Beef that allow attackers to perform complex attacks through JavaScript hooks. Web pen testers can use Nmap to discover these vulnerabilities in web servers in an automated manner. For that, Nmap has a solution, which is NSE.
nmap -p80 --script http-unsafe-output-escaping <target>
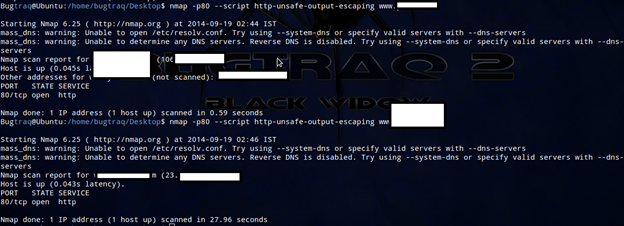
The script http-unsafe-output-escaping was written by Martin Holst Swende, and it spiders a web server to detect the possible problems with the way web applications return output based on user input. The script inserts the following payload into all the parameters it finds:
ghz%3Ehzx%22zxc%27xcv
The payload shown above is designed to detect the characters > " ', which could cause Cross Site Scripting vulnerabilities. The official documentation of the scripts http-unsafe-output-escaping and httpphpself-xss can be found at the following URLs:
http://nmap.org/nsedoc/scripts/http-phpself-xss.html
http://nmap.org/nsedoc/scripts/http-unsafe-output-escaping.html
Detecting SQL Injection
SQL injection vulnerabilities are caused by the lack of sanitation of user input, and they allow attackers to execute DBMS queries that could compromise the entire system.
To scan a web server looking for files vulnerable to SQL injection by using Nmap, use the following command:
nmap -p80 --script http-sql-injection <target>
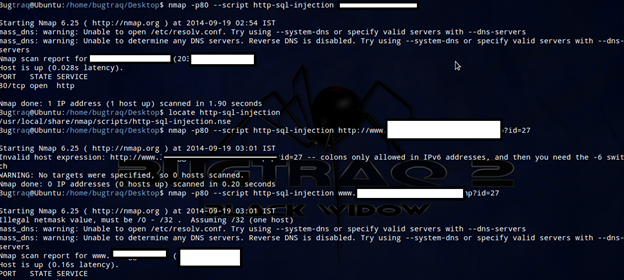
The httpspider library behavior can be configured via library arguments. By default, it uses pretty conservative values to save resources, but during a comprehensive test, we need to tweak several of them to achieve optimum results. For example, the library will only crawl 20 pages by default, but we can set the argument httpspider.maxpagecount accordingly for bigger sites, as shown in the following command:
nmap -p80 --script http-sql-injection --script-args httpspider.maxpagecount=200 <target>
Another interesting argument is httpspider.withinhost, which limits the web crawler to a given host. This is turned on by default, but if you need to test a collection of web applications linked to each other, you could use the following command:
nmap -p80 --script http-sql-injection --script-args httpspider.withinhost=false <target>
The official documentation for the library can be found at
http://nmap.org/nsedoc/lib/httpspider.html
HTTP User Agent
There are some packet filtering products that block requests made using Nmap's default HTTP User Agent. We can use a different User Agent value by setting the argument http.useragent:
nmap -p80 --script http-sql-injection --script-args http.useragent="Mozilla 42" <target>
HTTP pipelining
Some web servers allow the encapsulation of more than one HTTP request in a single packet. This may speed up the execution of an NSE HTTP script, and it is recommended that this is used if the web server supports it. The HTTP library, by default, tries to pipeline 40 requests and automatically adjusts that number according to the traffic conditions, based on the Keep-Alive header.
nmap -p80 --script http-sql-injection --script-args http.pipeline=25<target
N.B: there are some examples for which a screenshot is unavailable because it's impossible for everything to be put here. My recommendation is for all readers to try all commands and let me know if any problem occurs. There are lots of NSE scripts available for pen testing. The above are a few examples. All the scripts will be discussed in the upcoming installments.

FREE role-guided training plans
Cyber Threat Disclosure Policy
The above scanning /malicious activity is done by the proper permission of the respective website domain owner. It is recommended to not use these skills for attacking/hacking a website.


