PowerShell for Pentesters Part 3: Functions and Scripting with PowerShell

Introduction
The more we advance in our articles, the more we notice the power of PowerShell, and that impression will only increase as we move forward.

FREE role-guided training plans
In this article, we will try to focus on Scripting and Functions with PowerShell.
Functions with PowerShell
As we've seen for all concepts with PowerShell so far, functions are also very simple to use.
To use them, all you have to do is to use the following syntax:
function [<scope:>]<name> [([type]$parameter1[,[type]$parameter2])]
{
param([type]$parameter1 [,[type]$parameter2])
dynamicparam {<statement list>}
begin {<statement list>}
process {<statement list>}
end {<statement list>}
}
It can be very simple or very complex, depending on the context.
Now let's discover how to use functions with PowerShell. We'll begin with a simple function: multiplying 4 by 3.
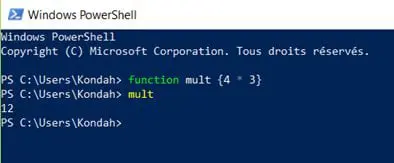
Figure 1: Simple function with PowerShell
It can also be used with arguments by using the object $args as an array, and the positions will simply represent the order of arguments that we will get from the user. We can see this in the following screenshot:

Figure 2: Exploiting functions with arguments
We can also use named parameters as following:
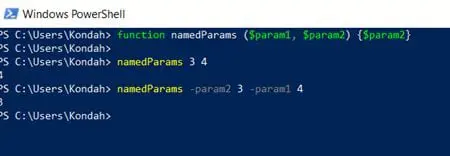
Figure 3: Exploiting named parameters in functions with PowerShell
There is also a very interesting feature with parameters. We can monitor the type of parameters that are parsed.
In the following example, we will try to filter and permit only integer parameters to be parsed. Anything else will launch an exception.
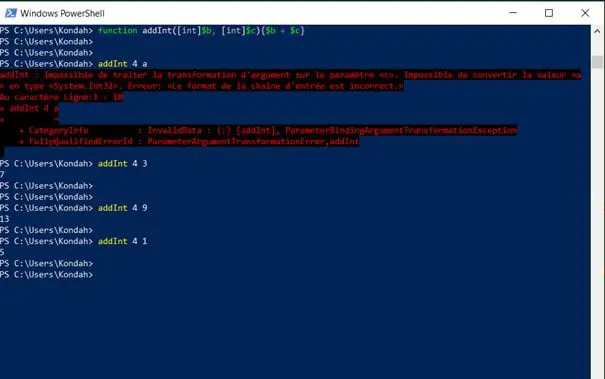
Figure 4: Manipulating type with functions
Don't forget: I'm only presenting to you the basics needed, but there's a lot of things you can discover for yourself, especially when using advanced functions like parameters and attributes or working with parameter validation. We'll discuss some examples later.
Scripting with PowerShell
Now, let's talk a little bit about scripting with PowerShell. But before we began to write some scripts directly, let's talk about how Microsoft is protecting our systems from malicious scripts.
There's a very interesting concept that we can found on scripts' execution security policy which Microsoft calls the execution policy. The execution policy is part of the security strategy of Windows PowerShell.
It determines whether you run scripts or not, and it also determines which scripts, if any, must be digitally signed before running it.
You can get the current execution policy by using the following command:
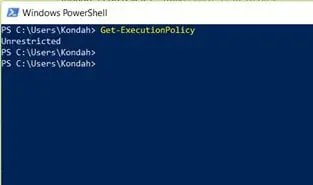
Figure 5: Result of Get-ExecutionPolicy Command
There are multiple execution policies that can be exploited. Per Microsoft's own documentation:
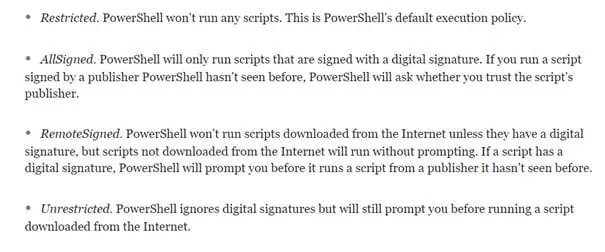
Figure 6: Execution policies set in PowerShell
You can change the default policy by using the following command : Set-ExecutionPolicy <policy>.

Figure 7: Set-ExecutionPolicy result
Now that we've set our execution policy to a mode that makes us able to execute scripts, let's attack this. (Yes, I'm excited to finish this part and attack pentest use cases!)
You can write scripts with a simple notepad or you can exploit the scripting interface of PowerShell, which is the PowerShell Integrated Scripting Environment (ISE). This is present by default.
And yes, my friends, it will be very useful to us!
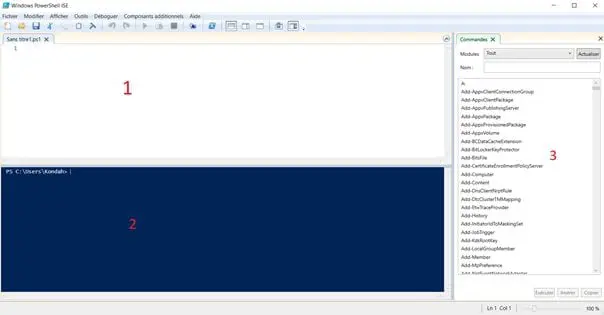
Figure 8: PowerShell ISE
The most important things are the following points:
- Scripting Area
- PowerShell Interpreter
- Existing Commands (it can also be filtered)
Now, you can write a simple script and executing with the green Execute button:
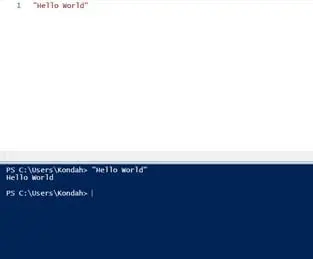
Figure 9: Executing script using execute button
Or save it and execute using command line, like the following screenshot:

Figure 10: Executing script using command line
Now, you can do whatever you want with whatever we discovered. And together, we will discover awesome use cases and scenarios with the following articles and pentest use cases.
Use Case with Scripts and Functions
Here's a simple script that will make us able to kill a specific process, based on a parameter which is the PID of the process that we want to kill.

Figure 11: Script of the use case

Figure 12: Result of the script
Conclusion
Of course, this is still just the beginning. In the next few articles we will discuss advanced situations, use cases, best practices and more.

What should you learn next?
Brace yourself — the best is coming!


