PowerShell for Pentesters, Part 5: Remoting With PowerShell
Introduction
In part five of our series on PowerShell for pentesters, we will discuss a very important subject: the process of remoting with PowerShell. Remoting will allow us to execute PowerShell commands on a remote target machine(s). So let’s learn how to do it!
Of course, we are talking about this only for penetration testing purposes; other techniques or ways might exist to exploit remoting, but we’re choosing the most important for this specific context.

What should you learn next?
Remoting With PowerShell
Remoting lets us run PowerShell commands or access full PowerShell sessions on remote Windows systems. This is very important to us as pentesters because PowerShell has been natively present in Windows OS-based systems since Windows 7.
Remoting with PowerShell is based on the WSMAN protocol and uses WinRM. So I will need the port 5985 (HTTP) and 5986 (HTTPS).
In the first config, you might have problems using remoting. This is due to WinRM not being configured and the firewall rule not added. We can solve this by using the following command:
![]() Note: If you are part of a trusted domain, there is no requirement, but if your computers aren’t on a domain, you need to perform a few more steps in order to get things started. You should have already enabled remoting on the PC to which you want to connect using the command:
Note: If you are part of a trusted domain, there is no requirement, but if your computers aren’t on a domain, you need to perform a few more steps in order to get things started. You should have already enabled remoting on the PC to which you want to connect using the command:
Enable-PSRemoting -Force. Then you need to configure the TrustedHosts setting on both the PC to which you want to connect and the computer (or computers) you want to connect from. This is so that the computers will trust each other. If you’re on a home network where you want to go ahead and trust any PC to connect remotely, you can type the following cmdlet in PowerShell: Set-Item wsman:localhostclienttrustedhosts *, then restart the WinRM service: Restart-Service WinRM.
Now we can begin.
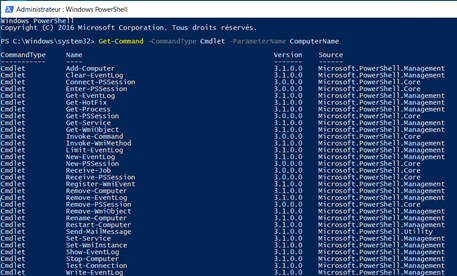
For our first example, we will simply execute commands remotely without creating a session. We can achieve this by using cmdlets that support remoting. We can identify them by searching cmdlets with Parameter: ComputerName like we can see in the following screenshot:
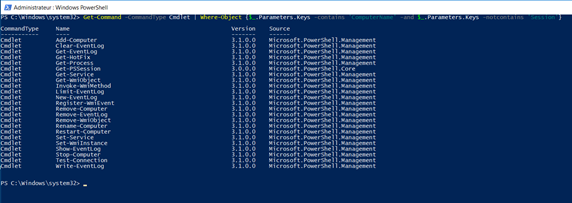
Unfortunately, we will have some cmdlets that are related to sessions, so we will need to define our results to get only cmdlets that can be executed on target machine(s). We can do this by using a loop that will only get cmdlets that are not related to sessions, as we can see in the following screenshot:
Let’s try one of them.
One of the most interesting cmdlets that we can use is « Get-Hotfix », which will make us able to get updates that have been installed on either the local computer or on specified remote computers by Windows Update, Microsoft Update or Windows Server Update Services. The cmdlet also gets hotfixes or updates that have been installed manually by users, which is very important to us as pentesters.
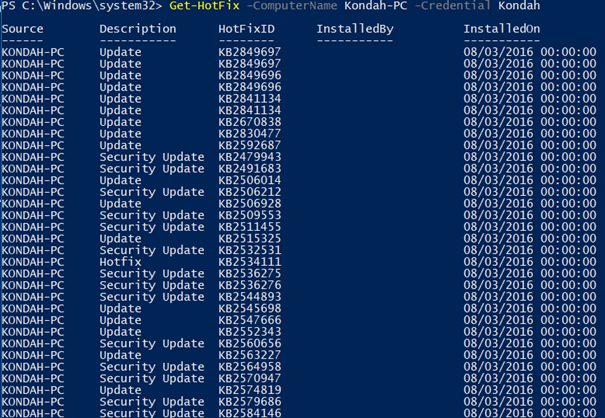
We can use it as we can see in the following screenshot:
Let’s discuss the components of our cmdlet:
- The first part is our cmdlet
- The second part is our computer name
- The third part is our credential. It specifies a user account that has permission to perform this action. The default is the current user, and for our example we used the username “Kondah” because it doesn’t belong to any domain. If it does, you can do it by putting in a credential for your account and domain as the following: “DomainUser”
- Once you press enter, you will see a pop-up prompt to enter your password
Once executed, we can see the following result:
We can also use a very important cmdlet that will be very useful to us in the future and which allows us to execute remote commands on a target/remote system(s). It’s called Invoke-Command.
The syntax to use is: Invoke-Command -ComputerName COMPUTER -ScriptBlock { COMMAND } -credential USERNAME
You can also execute multiple commands rather than just one, or even store the results in variables.
More information can be found here.
Let’s use it with the Get-Process cmdlet:
Now let’s discuss now the other possibility, which is the creation of an interactive session with PowerShell in a one-to-one context. We can achieve this through PSSessions, which will allow us to initiate, interact with and close a PowerShell session.
We can initiate a session with the following command:
Note that we are using the same parameters that we saw earlier (ComputerName and Credential).We can see all available sessions with the following command:
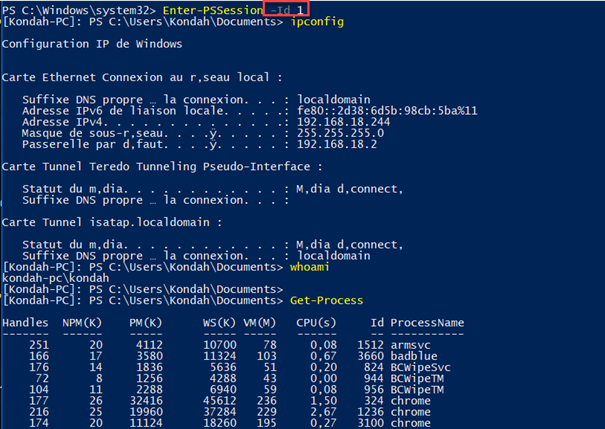
Without forgetting the interaction with our target using the following command:
In this case, the ID parameter is relative to the ID of the session that we are interacting with. It might be different if you have more than one session or if you have initiated another session before.
To exit the session, the exit command is sufficient:
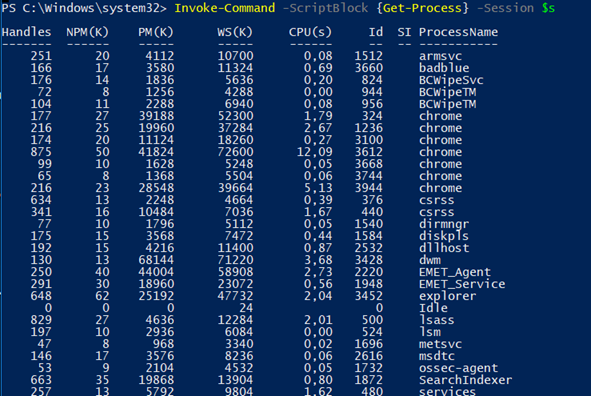
We can also use the Invoke-Command cmdlet with the session parameter after specifying the session parameter, as we can see in the following screenshot:
Don’t forget before using this to assign the get-pssession command to the « $S » variable (by default it will execute this on all sessions, but you can specify certain sessions only):
Become a Certified Ethical Hacker, guaranteed!
Get training from anywhere to earn your Certified Ethical Hacker (CEH) Certification — backed with an Exam Pass Guarantee.
Conclusion
That’s all for this part. We’ll be back soon when we will discover some advanced remoting with PowerShell tips and tricks. Then we’ll be looking at some jobs with PowerShell.

