Which weapon should I choose for Web Penetration Testing? 3.0
Introduction
So here we are on the third edition of "Which weapon should I choose for Web Penetration Testing?" For this edition, I am going to take a walk through two interesting tools for pen-testing: OWASP ZAP and Netsparker - Community Edition. In the previous edition, I had a request for OWASP ZAP from the ZAP project, so here is my promised walk through.

FREE role-guided training plans

-
Official web site:https://www.owasp.org/index.php/OWASP_Zed_Attack_Proxy_Project
-
License: Apache License 2.0
-
Additional Information: Love the fuzzer
-
Tested version: 2.0.0
-
Guides:
-
https://www.youtube.com/watch?feature=player_embedded&v=eH0RBI0nmww
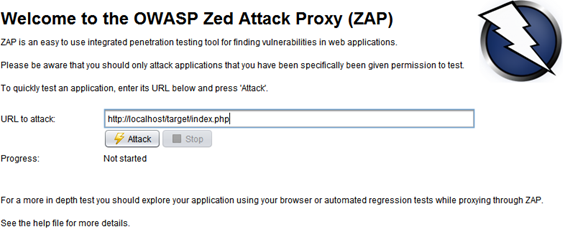
Figure 1. Defining the target
At first impression of OWASP ZAP, you may find that it is pretty simple to use. You can start the scanning process with entering the link of your web application on the right side and just click on "Attack" in order to start.
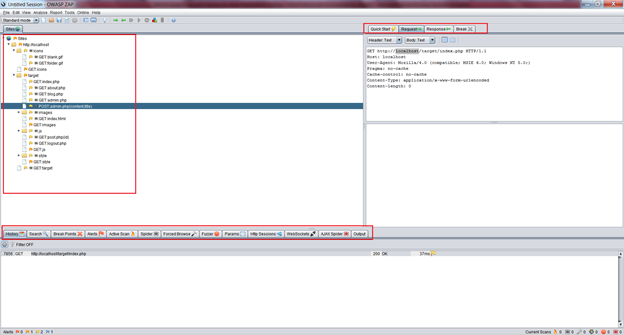
Figure 2. OWASP ZAP environment
As you can see from the Figure 2, when you perform the scan on the left side, there is a tree display of the scanned links. On the bottom, there is a group of tabs reserved for the current scanning session.

Figure 3. Tools for active session
So we will start with the History tab. Here, you can view the links of all web applications that previously were scanned. If you press right click on some of the links (that is if you previously finished with the scanning), you can see additional options and operations that could be performed. There are options such as making notes for you target, adding tags to it, exclude or include from, etc…
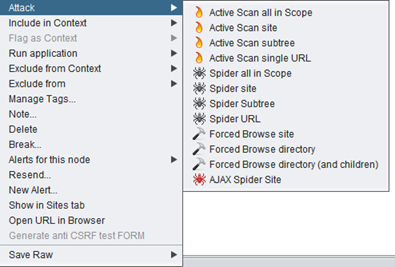
Figure 4. Additional menu with options
Next to the History tab is Search tab, where you can view all the links that were crawled. Here you can search for particular links or filter links by type.

Figure 5. Search tab
The next tab is Break Points. There isn't much to explain here, just to know that on specified links, breakpoints could be put. After the Break Points tab comes Alerts tab.

Figure 6. Alert tab
In the Alert tab, you can find all the priority alerts that occurred during the scanning session. There are four types of priority alerts: Informational ( blue color), Low (
 yellow color), Medium (
 orange color) and High (
 red color)
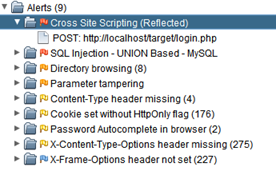
Figure 7. Detected alerts
On the left part of the tab, you can see the tree view of the detected alerts sorted by priority (form high to low). If you double click on the alert, you can edit its information, and if you right click, you can perform the same options and operations as mentioned in the previous History tab.

Figure 8. Alert information
On Figure 8, as you can see above,the Alert information is displayed, which is composed of: general information of the Alert, Description, Other info, Solution and Reference. The general information gives the details of the alert in which the following information is included:
- The vulnerable URL link
- Risk level of the Alert
- Reliability factor of the Alert
- Vulnerable parameter
- Used code in finding the vulnerability
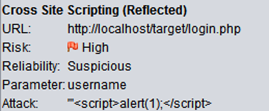
Figure 9. Sample of an Alert
After the Alert tab is the Active Scan tab. Here you can view the current process of scanning (links that are current processed).

Figure 10. Process of scanning
Also here, as a feature (by clicking the icon on the left side of the progress bar), is the view of plugins that are running during the scan.
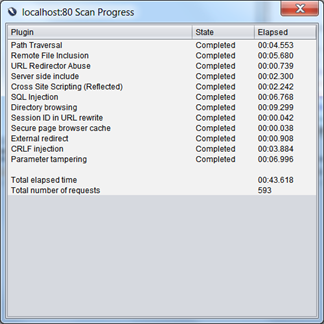
Figure 11. Process of scanning
The next tab is the Spider tab, used for displaying the list of current crawled links.

Figure 12. Process of crawling
Next to it is Forced Browse tab used for discovering files and directories. For this process, you need to select a filethat consists of already defined names which will be combined with the target base URL in order to discovery new directories and files. This is similar to a dictionary attack when you try to crack a password, which could be very exhaustive and could lead to DoS.

Figure 13. Process of forced discovery of files and directories
The Params tab displays list of all of the parameters a site has used.

Figure 14. Overview of all parameters used in the web application
If you want to use the fuzzer for your testing you need to select a URL link that previously was scanned. On the right side of the OWASP ZAP environment you need to click on the Request tab, mark the field you want to perform the fuzzing and by right clicking on it and clicking "Fuzz..." option, you can start the process.
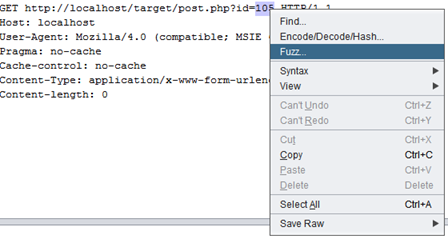
Figure 15. Fuzzing process
Before starting the fuzzing process, you need to select what type of fuzzing will be performed. In Fuzz Category, there is an impressive list of fuzzing profiles that could be performed.
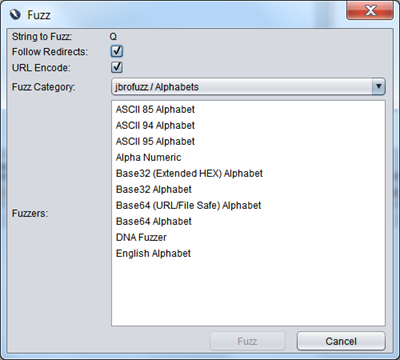
Figure 16. Selecting fuzzer profile
After you choose the profile you can start with the fuzzing and also view the test cases used.

Figure 17. Overview of fuzzer test cases
I will leave the rest of the tabs to you to explore. For now, I'll continue with OWASP ZAP menu of options.

Figure 18. OWASP ZAP menu
If you select Analyse -> Scan Policy from the OWASP ZAP menu, a new window will appear where you can adjust your scanning policy.
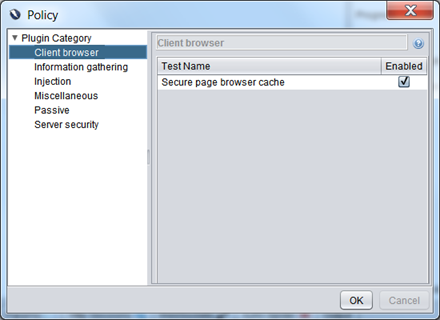
Figure 19. Configuring the scanning policy
The last interesting thing to mention is the report generator; you can generate a report by clicking Report -> (option you need) from the menu. I think the report could be better because there is no graphical statistics of vulnerabilities or statistics of found vulnerabilitieson the report; there is just a list of found vulnerabilities.

Figure 20. HTML report
Conclusion: OWASP ZAP is a great tool that is developed by a great community. The tool offers lots of feature such as scanning, fuzzing, scrawling, generating reports, etc… From all the options that are offered, I liked the fuzzer the best because it has lot of fuzzing plugins that can be used; also, the process of fuzzing is pretty optimized and fast.
The thing that I didn't like in OWASP ZAP is that when I scanned my web application twice, I got different results. That application suffers from SQLi was included in the first scanning, which the case in the second wasn't scanning. Anyway, OWASP ZAP has a lot of tools which are well organized in a user-friendly environment. The last thing to mention is that it is free to use!
Pros:
-
Easy to use
-
Free software
-
One of the most popular
-
Well organized and up-to-date
Cons:
-
High false-positive factor
-
SQLi vulnerability reported as XSS
-
There is no support for multiple scanning profiles
-
Report is not very detailed and doesn't support PDF formats
-
Netsparker

-
Official web site:http://www.mavitunasecurity.com/communityedition/
-
License:Community edition (Free)
-
Additional Information:
-
Tested version: v2.5.2.0
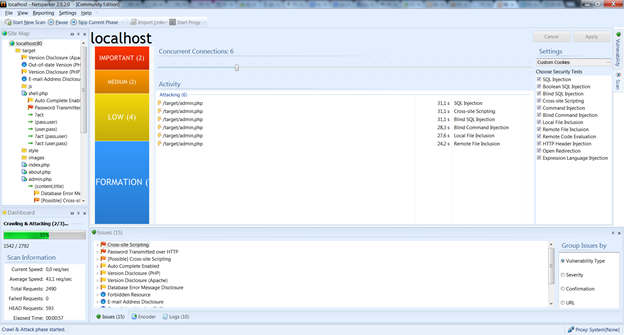
Figure 21. Netsparker environment
When you start Netsparker, a window will appear where you can set up the scanning profile. First, extend the options field and adjust the scanning profile according to your needs.
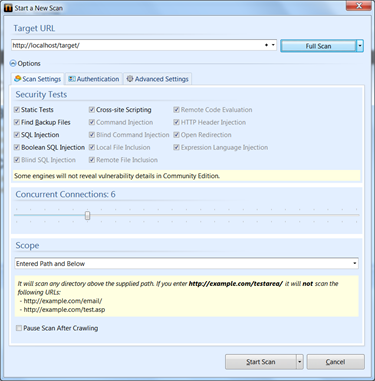
Figure 22. Setting up the scanning profile
When you start scanning, the main environment will appear, where on the left side there is the tree display of the web application, in the middle there is the current processed links with the type of scan performed, on right there are the settings for the security test, and on the bottom there is the grouping for the found vulnerabilities.
When you are done with the scanning, press on the tab Vulnerability (which can be found on the right side of the Netsparker environment) in order to view the details for each found vulnerability.

Figure 23. Preview of found vulnerability
The details of the vulnerability starts with "name of the vulnerability" (in our case "Boolean Based SQL Injection") then the URL which contains the vulnerable link together with the exploit string. Next there is the vulnerable parameter's name (in our case "id"), then the parameters type (in our case "Querystring"), and the last is the attack pattern field which holds the string used to exploit the vulnerability (in our case "-1 OR 17-7=10").

Figure 24. Preview of found vulnerability
After the vulnerability details, we have information about the type of the vulnerability and the side-effects that might occur if the web application is attacked by using this kind of vulnerability.

Figure 25. Preview of found vulnerability
Next are the details about how to prevent these kind of vulnerabilities from appearing, then what skills are required in order to exploit the vulnerability and the last thing are the references about detections and prevention.
The most interesting part is that you can manually exploit the target by executing SQL commands (for this kind of vulnerability), get shell or extract some information by LFI exploitation.

Figure 26. Exploiting the target
You can also see the request and the response for the found vulnerability.
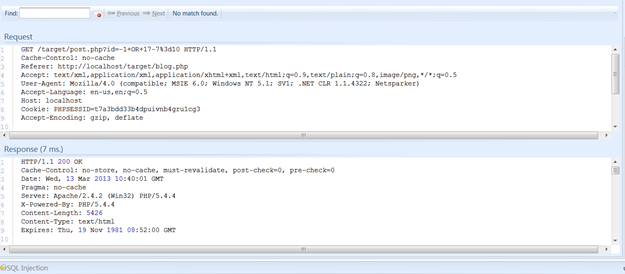
Figure 27. Viewing request and response
The last thing to explain will be the Settings.If you want to adjust the tools that are used, you need to go to the top menu and click Setting -> Settings (or just press F4).
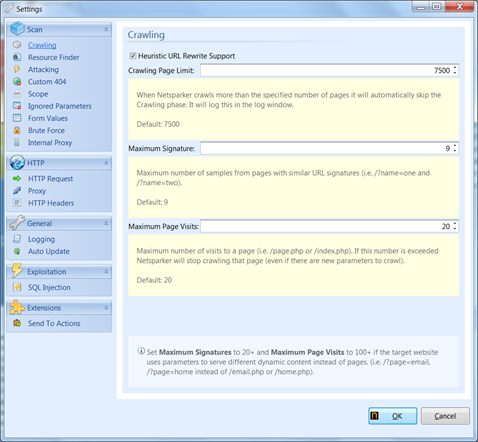
Figure 23. Settings for adjusting the used tools in the scan
Conclusion: Netsparker is nice tool for penetration testing,for it offers nice grouping of results, great details per vulnerability, support for profiles, etc… I especially liked the grouping of the vulnerabilities and the details about them, but I didn't like Netsparker's lack of tests customization, because you just set up the target, start the scan and that is it; you can't view what requests that are made in the background.
Pros:
-
Well organized environment
-
Nice display of vulnerability details
-
Support for profiles
Cons:
Become a Certified Ethical Hacker, guaranteed!
Get training from anywhere to earn your Certified Ethical Hacker (CEH) Certification — backed with an Exam Pass Guarantee.
-
Only one scanning process in a time
-
Not much settings for customization
-
False-positive result on simple SQLi (reported as XSS vulnerability)
-
Report is unavailable for the commercial version
- Conclusion
The conclusion is that both of the tools are excellent and widely used, so it is hard to conclude which one is better. Try them yourself and see which one matches your needs. Hope you liked my walk through, if you want to suggest a tool just make a simple comment on this page.
- References
- http://www.mavitunasecurity.com/communityedition/
- https://www.owasp.org/index.php/OWASP_Zed_Attack_Proxy_Project


